没有合适的资源?快使用搜索试试~ 我知道了~
资源推荐
资源详情
资源评论
Aircraft Intuitive Design (AID)
Contents
OVERVIEW 1
DESIGN 2
ANALYSIS 8
FUTURE WORK 13
VARIABLE NAMES 14
Overview
AID is an academic tool intended to assist in developing an intuitive understanding of
aircraft stability and control. By interfacing user-friendly aircraft modeling with rapid
aerodynamic analysis, this program visually depicts how various design parameters
affect the way an airplane flies.
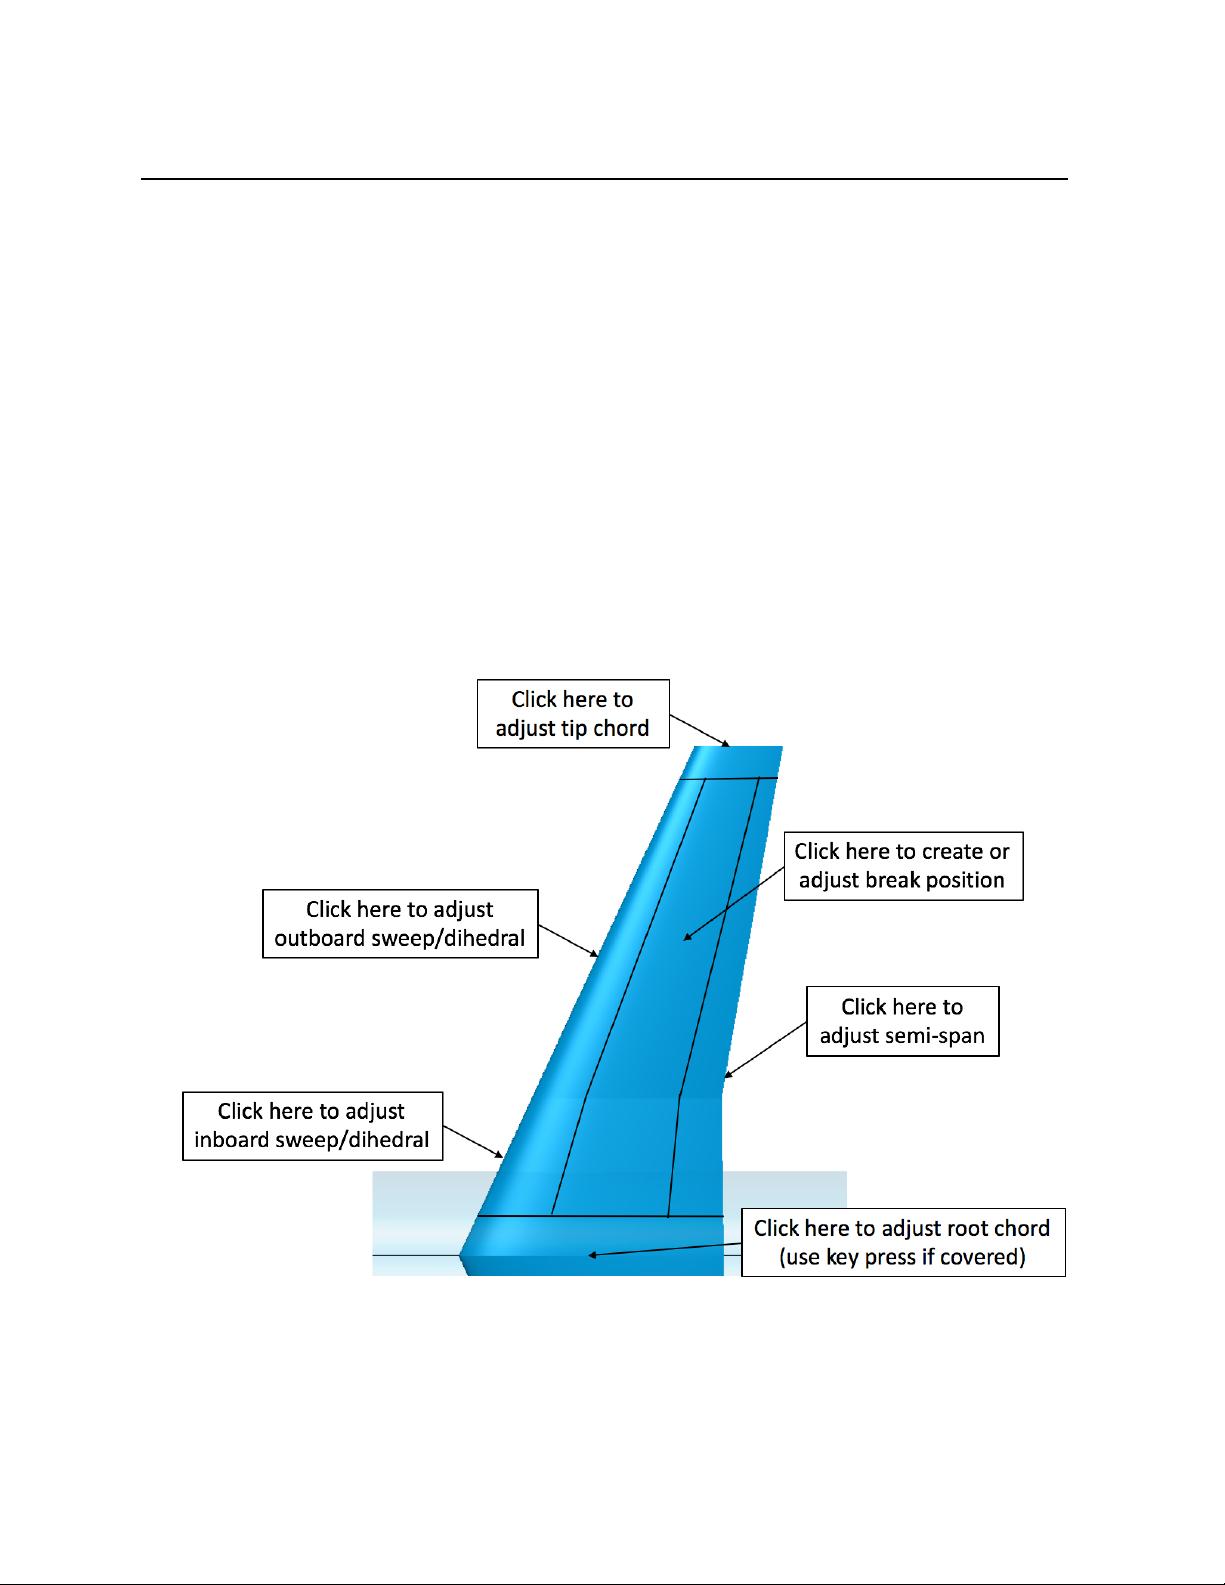
Numerous geometric and aerodynamic parameters (i.e., planform shape, airfoil type,
general configuration) must be tuned throughout the preliminary design phase, and
knowing how these values influence a plane’s stability is critical in making educated
decisions to meet design goals. This program helps provide the user with this
understanding, while also greatly reducing the time spent on trade studies between
different wing/tail placements, planform shapes, and several other design
considerations.
From the moment the program is first opened, several calculations have already been
performed estimating the lift, drag, and moment of each planform and body, as well as
many of the stability derivatives characterizing the aircrafts flight. In addition to these
built-in, linearized stability approximations that are constantly being updated, the
program interfaces with the following software for more advanced analysis:
USAF Digital DATCOM
Tornado Vortex Lattice Method
AVL (Athena Vortex Lattice Method)
Note: While the majority of the inputs and outputs for these programs are written/read in automatically, the user is still
encouraged to glance through the input/output files for errors by selecting Settings > Inputs/Outputs.
This program also gains added functionality from the following open source software:
DATCOM Plot Interpolation Functions – Prof. Glen Greiner and Lenny
Gartenberg (Embry-Riddle Aeronautical University, Daytona Beach, FL)
AVL Input/Output Functions – Joseph Moster (Mathworks File Exchange)
Datcomimport – MathWorks Aerospace Toolbox – loads DATCOM for006.dat
NACA456 – Ralph Carmichael (PDAS) – NACA 6-series airfoil ordinates
Design
Interactive Controls (Aircraft Model)
When first opening the program, try left clicking somewhere on the aircraft model,
for example on the wing tip (refer to the figure below or Help > Quick Start for an
overview of what each clickable region corresponds to). Two things will happen:
1. Some sort of visual reference on the actual model will be highlighted with a black
line (if you clicked on the wing tip, it will highlight the wing tip profile)
2. The input box for the selected parameter will be highlighted blue, indicating that it
is ready to be adjusted (you could also click on the input box to select it directly)
Now, adjust the selected parameter by simply scrolling up or down.
Note: You can change the scroll sensitivity for most values by selecting Settings > Scroll Sensitivity.
To uncover or isolate a component, hold down any key (besides shift and space) after
selecting its corresponding input tab. This is useful for selecting a planform’s root chord.
Note: Clicking anywhere on the fuselage will allow you to adjust the shape parameter, P, of the nearest station. This
parameter defines a modified super-ellipse or fermat curve for the fuselage cross-section. Essentially, P=1 gives a
regular ellipse, higher values of P make the body more rectangular, and P=0 gives the cross-section of an SR-71.
Hold shift to drag individual components along reference axes and quickly adjust the
airplane’s configuration. For example, try holding shift to drag the wing up or down.
Double click on a body or planform to edit its cross-sectional shape. This feature
is most commonly used for adjusting the fuselage. Your current view of the aircraft will
decide whether to edit the side and top profiles, as described in the following section.
Right click a component to input weight and balance data.
General Controls: (These mouse controls apply universally throughout the program)
Left click and drag to rotate
Right click (on the model or a plot) and drag to pan
Left click off body and scroll to zoom
Right click anywhere off the body to
– Reset the plot
– Create a report (of some input/output variable or expression)
– Adjust the view (side/top/front)
– Load/Adjust a background image
Cursor Tool
When rotating the model, your cursor will change into a little airplane indicating which
profile you are currently working with. When it shows a side view of the airplane,
double-clicking on the fuselage or any other body will allow you to edit the upper and
lower surfaces from a side view. Conversely, a top view cursor indicates that you want
to edit the width of each station. Lastly, the front view allows you to edit the dihedral of a
planform by clicking on the leading edge, whereas clicking on the leading edge from any
other view will select the planform sweep.
Cursor Symbol
Description
Side View: Adjust side profile of fuselage/body
Top View: Adjust top profile of fuselage/body
Front View: Adjust planform dihedral (rather than sweep)
Profile Sketcher
Double clicking on any surface from the “Geometry” editor will load up a cross-sectional
view of the body or planform, allowing you to edit its profile shape. This feature will most
commonly be used to edit the fuselage and additional bodies, but can also be helpful in
fine-tuning a planform’s root or tip airfoil shape.
Profile Sketcher Controls: (These tips can also be found in Help > Quick Start)
Click and drag nodes to move individual points
Click and drag lines to move segments vertically
Click and drag inside body to move entire profile
Click and drag outside body to move upper/lower surface
Center/Shift click and drag from a node to "draw" profile
Note: Using the option Settings > Auto-Add Points will create points where sharp gradients are detected.
Center/shift click and drag from inside/outside body to select multiple nodes
Click “Save” to update the model or simply close the window to cancel
Background Image
Right click anywhere on the figure background to pull up a list of options, then hover
over the “Background” menu item and select “Load” to load an image file as the
background.
Background Image Controls:
Left click on the image and drag to (…you guessed it) drag the image
Left click on the image and scroll to zoom (focused at your cursor location)
Right click and hover over the “Background” menu item to
– Flip the image horizontally
– Rotate the image 90 counter-clockwise
– Hide the image
Profile Sketcher Window
Nodes (Stations)
Lines
剩余15页未读,继续阅读
资源评论
m0_63530673
- 粉丝: 0
- 资源: 2
上传资源 快速赚钱
- 我的内容管理 展开
- 我的资源 快来上传第一个资源
- 我的收益 登录查看自己的收益
- 我的积分 登录查看自己的积分
- 我的C币 登录后查看C币余额
- 我的收藏
- 我的下载
- 下载帮助
安全验证
文档复制为VIP权益,开通VIP直接复制
信息提交成功