💡🚀🚀🚀本博客 改进源代码改进 适用于 YOLOv8 按步骤操作运行改进后的代码即可
💡YOLOv8改进专栏完整目录链接: 👉《芒果YOLOv8原创改进专栏》🌟🌟🌟,只需订阅这一个专栏即可阅读:芒果YOLOv8所有改进内容
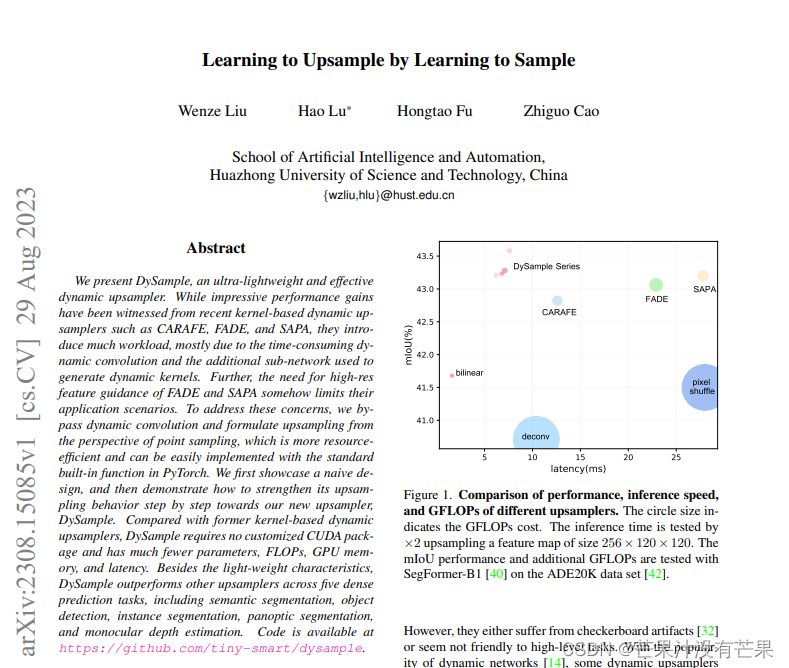
DySample是一个超轻量级和有效的动态上采样器,是一种更简洁、更高效的方式,用于提升图像分辨率。相较于传统的CARAFE和SAPA方法,DySample对计算资源的需求更小,能够在不增加额外负担的情况下实现图像分辨率的提升。
该篇博客为
免费阅读内容,YOLOv8 + 上采样Dysample 改进内容🚀🚀🚀
1. Dysample 论文
我们介绍了 DySample,这是一款超轻量级且有效的动态上采样器。虽然最近基于内核的动态上采样器(如 CARAFE、FADE 和 SAPA)已经取得了令人印象深刻的性能提升,但它们引入了大量工作负载,这主要是由于耗时的动态卷积和用于生成动态内核的额外子网。此外,FADE和SAPA对高分辨率特征引导的需求在某种程度上限制了它们的应用场景。为了解决这些问题,我们绕过了动态卷积,从点采样的角度制定了上采样,这样可以节省资源,并且可以通过 PyTorch 中的标准内置函数轻松实现。我们首先展示了一个朴素的设计,然后演示了如何逐步加强其上采样行为,以实现我们新的上采样器 DySample。与以前基于内核的动态上采样器相比,DySample 不需要定制的 CUDA 包,参数、FLOP、GPU 内存和延迟也少得多。除了轻量级特性外,DySample 在五项密集预测任务中的表现优于其他上采样器,包括语义分割、目标检测、实例分割、全景分割和单目深度估计。
具体细节可以去看原论文:https://arxiv.org/pdf/2308.15085.pdf
2. YOLOv8 核心代码改进部分
2.1 核心新增代码
首先在ultralytics/nn/modules文件夹下,创建一个 dysample.py文件,新增以下代码
import torch
import torch.nn as nn
import torch.nn.functional as F


def normal_init(module, mean=0, std=1, bias=0):
    if hasattr(module, 'weight') and module.weight is not None:
        nn.init.normal_(module.weight, mean, std)
    if hasattr(module, 'bias') and module.bias is not None:
        nn.init.constant_(module.bias, bias)


def constant_init(module, val, bias=0):
    if hasattr(module, 'weight') and module.weight is not None:
        nn.init.constant_(module.weight, val)
    if hasattr(module, 'bias') and module.bias is not None:
        nn.init.constant_(module.bias, bias)


class DySample(nn.Module):
    def __init__(self, in_channels, scale=2, style='lp', groups=4, dyscope=False):
        super().__init__()
        self.scale = scale
        self.style = style
        self.groups = groups
        assert style in ['lp', 'pl']
        if style == 'pl':
            assert in_channels >= scale ** 2 and in_channels % scale ** 2 == 0
        assert in_channels >= groups and in_channels % groups == 0

        if style == 'pl':
            in_channels = in_channels // scale ** 2
            out_channels = 2 * groups
        else:
            out_channels = 2 * groups * scale ** 2

        self.offset = nn.Conv2d(in_channels, out_channels, 1)
        normal_init(self.offset, std=0.001)
        if dyscope:
            self.scope = nn.Conv2d(in_channels, out_channels, 1)
            constant_init(self.scope, val=0.)

        self.register_buffer('init_pos', self._init_pos())

    def _init_pos(self):
        h = torch.arange((-self.scale + 1) / 2, (self.scale - 1) / 2 + 1) / self.scale
        return torch.stack(torch.meshgrid([h, h])).transpose(1, 2).repeat(1, self.groups, 1).reshape(1, -1, 1, 1)

    def sample(self, x, offset):
        B, _, H, W = offset.shape
        offset = offset.view(B, 2, -1, H, W)
        coords_h = torch.arange(H) + 0.5
        coords_w = torch.arange(W) + 0.5
        coords = torch.stack(torch.meshgrid([coords_w, coords_h])
                             ).transpose(1, 2).unsqueeze(1).unsqueeze(0).type(x.dtype).to(x.device)
        normalizer = torch.tensor([W, H], dtype=x.dtype, device=x.device).view(1, 2, 1, 1, 1)
        coords = 2 * (coords + offset) / normalizer - 1
        coords = F.pixel_shuffle(coords.view(B, -1, H, W), self.scale).view(
            B, 2, -1, self.scale * H, self.scale * W).permute(0, 2, 3, 4, 1).contiguous().flatten(0, 1)
        return F.grid_sample(x.reshape(B * self.groups, -1, H, W), coords, mode='bilinear',
                             align_corners=False, padding_mode="border").view(B, -1, self.scale * H, self.scale * W)

    def forward_lp(self, x):
        if hasattr(self, 'scope'):
            offset = self.offset(x) * self.scope(x).sigmoid() * 0.5 + self.init_pos
        else:
            offset = self.offset(x) * 0.25 + self.init_pos
        return self.sample(x, offset)

    def forward_pl(self, x):
        x_ = F.pixel_shuffle(x, self.scale)
        if hasattr(self, 'scope'):
            offset = F.pixel_unshuffle(self.offset(x_) * self.scope(x_).sigmoid(), self.scale) * 0.5 + self.init_pos
        else:
            offset = F.pixel_unshuffle(self.offset(x_), self.scale) * 0.25 + self.init_pos
        return self.sample(x, offset)

    def forward(self, x):
        if self.style == 'pl':
            return self.forward_pl(x)
        return self.forward_lp(x)
2.2 代码修改部分
第一步:
在ultralytics/nn/tasks.py文件开头部分中,新增:定义在 dysample.py 里面的模块
from ultralytics.nn.modules.dysample import DySample
直接复制这段代码即可
如下图所示:

然后在 在tasks.py中配置
找到
        elif m is nn.BatchNorm2d:
            args = [ch[f]]
在这句上面加一个
        elif m in [DySample]:
            args = [ch[f], *args[0:]]
直接复制这段代码即可
2.3 YOLOv8-Dysample网络配置文件
新增YOLOv8-Dysample.yaml
# Ultralytics YOLO 🚀, AGPL-3.0 license
# YOLOv8 object detection model with P3-P5 outputs. For Usage examples see https://docs.ultralytics.com/tasks/detect

# Parameters
nc: 80  # number of classes
scales: # model compound scaling constants, i.e. 'model=yolov8n.yaml' will call yolov8.yaml with scale 'n'
  # [depth, width, max_channels]
  n: [0.33, 0.25, 1024]  # YOLOv8n summary: 225 layers,  3157200 parameters,  3157184 gradients,   8.9 GFLOPs
  s: [0.33, 0.50, 1024]  # YOLOv8s summary: 225 layers, 11166560 parameters, 11166544 gradients,  28.8 GFLOPs
  m: [0.67, 0.75, 768]   # YOLOv8m summary: 295 layers, 25902640 parameters, 25902624 gradients,  79.3 GFLOPs
  l: [1.00, 1.00, 512]   # YOLOv8l summary: 365 layers, 43691520 parameters, 43691504 gradients, 165.7 GFLOPs
  x: [1.00, 1.25, 512]   # YOLOv8x summary: 365 layers, 68229648 parameters, 68229632 gradients, 258.5 GFLOPs

# YOLOv8.0n backbone
backbone:
  # [from, repeats, module, args]
  - [-1, 1, Conv, [64, 3, 2]]  # 0-P1/2
  - [-1, 1, Conv, [128, 3, 2]]  # 1-P2/4
  - [-1, 3, C2f, [128, True]]
  - [-1, 1, Conv, [256, 3, 2]]  # 3-P3/8
  - [-1, 6, C2f, [256, True]]
  - [-1, 1, Conv, [512, 3, 2]]  # 5-P4/16
  - [-1, 6, C2f, [512, True]]
  - [-1, 1, Conv, [1024, 3, 2]]  # 7-P5/32
  - [-1, 3, C2f, [1024, True]]
  - [-1, 1, SPPF, [1024, 5]]  # 9

# YOLOv8.0n head
head:
  - [-1, 1, DySample, []]
  - [[-1, 6], 1, Concat, [1]]  # cat backbone P4
  - [-1, 3, C2f, [512]]  # 12

  - [-1, 1, DySample, []]
  - [[-1, 4], 1, Concat, [1]]  # cat backbone P3
  - [-1, 3, C2f, [256]]  # 15 (P3/8-small)

  - [-1, 1, Conv, [256, 3, 2]]
  - [[-1, 12], 1, Concat, [1]]  # cat head P4
  - [-1, 3, C2f, [512]]  # 18 (P4/16-medium)

  - [-1, 1, Conv, [512, 3, 2]]
  - [[-1, 9], 1, Concat, [1]]  # cat head P5
  - [-1, 3, C2f, [1024]]  # 21 (P5/32-large)

  - [[15, 18, 21], 1, Detect, [nc]]  # Detect(P3, P4, P5)
直接复制这段代码即可
2.4 运行代码
直接替换YOLOv8-Dysample.yaml 进行训练即可
到这里就完成了这篇的改进。
改进说明
这里改进是放在了主干后面,如果想放在改进其他地方,也是可以的。直接新增,然后调整通道,配齐即可,如果有不懂的,可以添加博主联系方式,如下
🥇🥇🥇
添加博主联系方式:
友好的读者可以添加博主QQ: 2434798737, 有空可以回答一些答疑和问题
🚀🚀🚀
参考
https://github.com/ultralytics/ultralytics