# XMind

**[XMind](https://github.com/zhuifengshen/xmind)** 是基于 Python 实现,提供了对 [XMind思维导图](https://www.xmind.cn/)进行创建、解析、更新的一站式解决方案!
### 一、安装方式
```
pip3 install XMind
or
pip3 install xmind
```
### 二、版本升级
```
pip3 install -U XMind
```
### 三、使用方式
#### 1、创建XMind文件
```
def gen_my_xmind_file():
# 1、如果指定的XMind文件存在,则加载,否则创建一个新的
workbook = xmind.load("my.xmind")
# 2、获取第一个画布(Sheet),默认新建一个XMind文件时,自动创建一个空白的画布
sheet1 = workbook.getPrimarySheet()
# 对第一个画布进行设计完善,具体参照下一个函数
design_sheet1(sheet1)
# 3、创建第二个画布
gen_sheet2(workbook, sheet1)
# 4、保存(如果指定path参数,另存为该文件名)
xmind.save(workbook, path='test.xmind')
```

```
def design_sheet1(sheet1):
# ***** 第一个画布 *****
sheet1.setTitle("first sheet") # 设置画布名称
# 获取画布的中心主题,默认创建画布时会新建一个空白中心主题
root_topic1 = sheet1.getRootTopic()
root_topic1.setTitle("root node") # 设置主题名称
# 创建一个子主题,并设置其名称
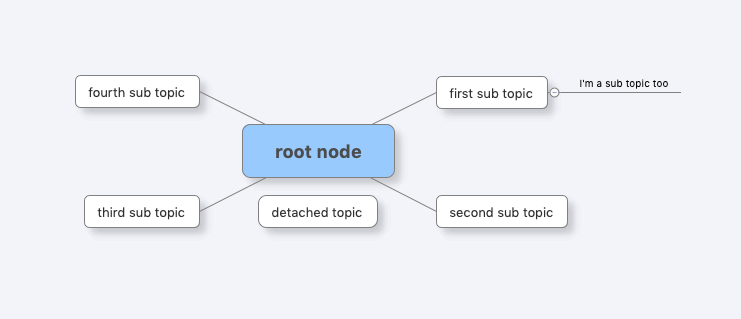
sub_topic1 = root_topic1.addSubTopic()
sub_topic1.setTitle("first sub topic")
sub_topic2 = root_topic1.addSubTopic()
sub_topic2.setTitle("second sub topic")
sub_topic3 = root_topic1.addSubTopic()
sub_topic3.setTitle("third sub topic")
sub_topic4 = root_topic1.addSubTopic()
sub_topic4.setTitle("fourth sub topic")
# 除了新建子主题,还可以创建自由主题(注意:只有中心主题支持创建自由主题)
detached_topic1 = root_topic1.addSubTopic(topics_type=TOPIC_DETACHED)
detached_topic1.setTitle("detached topic")
detached_topic1.setPosition(0, 30)
# 创建一个子主题的子主题
sub_topic1_1 = sub_topic1.addSubTopic()
sub_topic1_1.setTitle("I'm a sub topic too")
```

```
def gen_sheet2(workbook, sheet1):
# ***** 设计第二个画布 *****
sheet2 = workbook.createSheet()
sheet2.setTitle("second sheet")
# 获取画布的中心主题
root_topic2 = sheet2.getRootTopic()
root_topic2.setTitle("root node")
# 使用另外一种方法创建子主题
topic1 = TopicElement(ownerWorkbook=workbook)
# 给子主题添加一个主题间超链接,通过指定目标主题ID即可,这里链接到第一个画布
topic1.setTopicHyperlink(sheet1.getID())
topic1.setTitle("redirection to the first sheet")
topic2 = TopicElement(ownerWorkbook=workbook)
topic2.setTitle("topic with an url hyperlink")
# 给子主题添加一个URL超链接
topic2.setURLHyperlink("https://github.com/zhuifengshen/xmind")
topic3 = TopicElement(ownerWorkbook=workbook)
topic3.setTitle("third node")
# 给子主题添加一个备注(快捷键F4)
topic3.setPlainNotes("notes for this topic")
topic3.setTitle("topic with \n notes")
topic4 = TopicElement(ownerWorkbook=workbook)
# 给子主题添加一个文件超链接
topic4.setFileHyperlink("logo.png")
topic4.setTitle("topic with a file")
topic1_1 = TopicElement(ownerWorkbook=workbook)
topic1_1.setTitle("sub topic")
# 给子主题添加一个标签(目前XMind软件仅支持添加一个,快捷键)
topic1_1.addLabel("a label")
topic1_1_1 = TopicElement(ownerWorkbook=workbook)
topic1_1_1.setTitle("topic can add multiple markers")
# 给子主题添加两个图标
topic1_1_1.addMarker(MarkerId.starBlue)
topic1_1_1.addMarker(MarkerId.flagGreen)
topic2_1 = TopicElement(ownerWorkbook=workbook)
topic2_1.setTitle("topic can add multiple comments")
# 给子主题添加一个批注(评论)
topic2_1.addComment("I'm a comment!")
topic2_1.addComment(content="Hello comment!", author='devin')
# 将创建好的子主题添加到其父主题下
root_topic2.addSubTopic(topic1)
root_topic2.addSubTopic(topic2)
root_topic2.addSubTopic(topic3)
root_topic2.addSubTopic(topic4)
topic1.addSubTopic(topic1_1)
topic2.addSubTopic(topic2_1)
topic1_1.addSubTopic(topic1_1_1)
# 给中心主题下的每个子主题添加一个优先级图标
topics = root_topic2.getSubTopics()
for index, topic in enumerate(topics):
topic.addMarker("priority-" + str(index + 1))
# 添加一个主题与主题之间的联系
sheet2.createRelationship(topic1.getID(), topic2.getID(), "relationship test")
```
具体代码参考:[create_xmind.py](https://github.com/zhuifengshen/xmind/blob/master/example/create_xmind.py)
#### 2、解析XMind文件
##### (1) 将XMind文件转换为Dict数据 / JSON数据
```
import xmind
workbook = xmind.load('demo.xmind')
print(workbook.getData())
print(workbook.to_prettify_json())
Output:
[ # 画布列表
{ # 第1个画布数据
"id": "2cc3b068922063a81a20029655", # 画布ID
"title": "first sheet", # 画布名称
"topic": { # 中心主题
"id": "2cc3b06892206f95288e487b6c", # 主题ID
"link": null, # 超链接信息
"title": "root node", # 主题名称
"note": null, # 备注信息
"label": null, # 便签信息
"comment": null, # 批注(评论)信息
"markers": [], # 图标列表
"topics": [ # 子主题列表
{
"id": "2cc3b06892206c816e1cb55ddc", # 子主题ID
"link": null,
"title": "first sub topic",
"note": null,
"label": null,
"comment": null,
"markers": [],
"topics": [ # 子主题下的子主题列表
{
"id": "b0ed74214dbca939935b981906",
"link": null,
"title": "I'm a sub topic too",
"note": null,
"label": null,
"comment": null,
"markers": []
}
]
},
{
"id": "b0ed74214dbca693b947ef03fa",
"link": null,
"title": "second sub topic",
"note": null,
"label": null,
"comment": null,
"markers": []
},
{
"id": "b0ed74214dbca1fe9ade911b94",
"link": null,
"title": "third sub topic",
"note": null,
"label": null,
"comment": null,
"markers": []
},
{
"id": "b0ed74214dbcac00c0eb368b53",
"link": null,
"title": "fourth sub topic",
weixin_39840515
- 粉丝: 448
- 资源: 1万+
最新资源
- sqlserver jtds 驱动
- 微电网逆变器控制策略与并网仿真研究:下垂控制仿真模型及其参考资料综述,微电网逆变器控制策略与并网仿真研究:下垂控制仿真模型及其应用探讨,微电网逆变器控制、并网仿真、下垂控制等仿真模型以及一些参考资料
- DeepSeek清华大学全套学习资料1-5
- 【毕业设计】Python的Django-html深度学习的安全帽佩戴检测系统源码(完整前后端+mysql+说明文档+LW+PPT).zip
- 【毕业设计】Python的Django-html深度学习的聊天机器人设计源码(完整前后端+mysql+说明文档+LW+PPT).zip
- 【毕业设计】Python的Django-html搜索的目标站点内容监测系统源码(完整前后端+mysql+说明文档+LW+PPT).zip
- 蒙特卡洛思想下的充电汽车负荷曲线生成研究报告:探索1万台汽车的充电负荷曲线模拟,基于蒙特卡洛思想的充电汽车充电负荷曲线生成研究报告-涵盖负荷曲线的精细分析与实际应用解析,基于蒙特卡洛思想生成1000
- DeepSeek 保姆级新手教程
- MATLAB下电转气协同与碳捕集垃圾焚烧虚拟电厂优化调度复现程序及仿真结果展示,基于MATLAB和CPLEX的碳捕集与垃圾焚烧虚拟电厂电转气协同优化调度算法研究,MATLAB代码:计及电转气协同的含碳
- 基于直齿行星齿轮传动系统的ode45求解方法及自由度收敛研究,基于直齿行星齿轮传动系统的ODE45求解及其自由度全收敛分析研究,直齿行星齿轮传动系统ode45求解,自由度全部收敛 本人主攻齿轮动力学
- 洪泽湖流域1951-2008年面雨量变化特征与趋势分析及其防洪减灾应用
- 基于TMS320F2812的PMSM有传感器矢量控制双闭环程序系统,TMS320F2812 DSP矢量控制实现PMSM传感器转速与电流双闭环控制程序,矢量控制dsp2812 主控为TMS320F281
- blender插件,mmd-tools-v2.10.3
- 黑龙江省近45年积温变化
- SVPWM过调制控制技术:深入解析与实际应用,基于SVPWM技术的过调制控制方法的研究与应用,SVPWM过调制控制方法 ,SVPWM; 过调制; 控制方法; 数字信号处理,SVPWM过调制控制策略
- 基于PI控制器与滑膜控制器的三相永磁同步电机无速度传感器控制策略及其SVPWM-MRAS-PI SMC算法研究与应用,基于PI控制器与滑膜控制器的三相永磁同步电机无速度传感器控制策略研究:SVPWM
资源上传下载、课程学习等过程中有任何疑问或建议,欢迎提出宝贵意见哦~我们会及时处理!
点击此处反馈


