# Complex YOLOv4
[![python-image]][python-url]
[![pytorch-image]][pytorch-url]
The PyTorch Implementation based on YOLOv4 of the paper: [Complex-YOLO: Real-time 3D Object Detection on Point Clouds](https://arxiv.org/pdf/1803.06199.pdf)
---
## Features
- [x] Realtime 3D object detection based on YOLOv4
- [x] Support [distributed data parallel training](https://github.com/pytorch/examples/tree/master/distributed/ddp)
- [x] Tensorboard
- [x] Mosaic/Cutout augmentation for training
- [x] Use [GIoU](https://arxiv.org/pdf/1902.09630v2.pdf) loss of rotated boxes for optimization.
- **Update 2020.08.26**: [Super Fast and Accurate 3D Object Detection based on 3D LiDAR Point Clouds](https://github.com/maudzung/Super-Fast-Accurate-3D-Object-Detection)
- Faster training, faster inference
- An Anchor-free approach
- No need for Non-Max-Suppression
- Demonstration (on a GTX 1080Ti)
[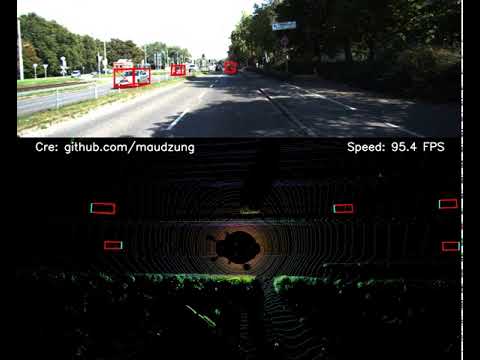](http://www.youtube.com/watch?v=FI8mJIXkgX4)
**[Youtube link](https://youtu.be/FI8mJIXkgX4)**
## 2. Getting Started
### 2.1. Requirement
```shell script
pip install -U -r requirements.txt
```
For [`mayavi`](https://docs.enthought.com/mayavi/mayavi/installation.html) and [`shapely`](https://shapely.readthedocs.io/en/latest/project.html#installing-shapely)
libraries, please refer to the installation instructions from their official websites.
### 2.2. Data Preparation
Download the 3D KITTI detection dataset from [here](http://www.cvlibs.net/datasets/kitti/eval_object.php?obj_benchmark=3d).
The downloaded data includes:
- Velodyne point clouds _**(29 GB)**_: input data to the Complex-YOLO model
- Training labels of object data set _**(5 MB)**_: input label to the Complex-YOLO model
- Camera calibration matrices of object data set _**(16 MB)**_: for visualization of predictions
- Left color images of object data set _**(12 GB)**_: for visualization of predictions
Please make sure that you construct the source code & dataset directories structure as below.
For 3D point cloud preprocessing, please refer to the previous works:
- [VoxelNet-Pytorch](https://github.com/skyhehe123/VoxelNet-pytorch)
- [Complex-YOLOv2](https://github.com/AI-liu/Complex-YOLO)
- [Complex-YOLOv3](https://github.com/ghimiredhikura/Complex-YOLOv3)
### 2.3. Complex-YOLO architecture

This work has been based on the paper [YOLOv4: Optimal Speed and Accuracy of Object Detection](https://arxiv.org/abs/2004.10934).
Please refer to several implementations of YOLOv4 using PyTorch DL framework:
- [Tianxiaomo/pytorch-YOLOv4](https://github.com/Tianxiaomo/pytorch-YOLOv4)
- [Ultralytics/yolov3_and_v4](https://github.com/ultralytics/yolov3)
- [WongKinYiu/PyTorch_YOLOv4](https://github.com/WongKinYiu/PyTorch_YOLOv4)
- [VCasecnikovs/Yet-Another-YOLOv4-Pytorch](https://github.com/VCasecnikovs/Yet-Another-YOLOv4-Pytorch)
### 2.4. How to run
#### 2.4.1. Visualize the dataset (both BEV images from LiDAR and camera images)
```shell script
cd src/data_process
```
- To visualize BEV maps and camera images (with 3D boxes), let's execute _**(the `output-width` param can be changed to
show the images in a bigger/smaller window)**_:
```shell script
python kitti_dataloader.py --output-width 608
```
- To visualize mosaics that are composed from 4 BEV maps (Using during training only), let's execute:
```shell script
python kitti_dataloader.py --show-train-data --mosaic --output-width 608
```
By default, there is _**no padding**_ for the output mosaics, the feature could be activated by executing:
```shell script
python kitti_dataloader.py --show-train-data --mosaic --random-padding --output-width 608
```
- To visualize cutout augmentation, let's execute:
```shell script
python kitti_dataloader.py --show-train-data --cutout_prob 1. --cutout_nholes 1 --cutout_fill_value 1. --cutout_ratio 0.3 --output-width 608
```
#### 2.4.2. Inference
Download the trained model from [**_here_**](https://drive.google.com/drive/folders/1RHD9PBvk-9SjbKwoi_Q1kl9-UGFo2Pth?usp=sharing),
then put it to `${ROOT}/checkpoints/` and execute:
```shell script
python test.py --gpu_idx 0 --pretrained_path ../checkpoints/complex_yolov4/complex_yolov4_mse_loss.pth --cfgfile ./config/cfg/complex_yolov4.cfg --show_image
```
#### 2.4.3. Evaluation
```shell script
python evaluate.py --gpu_idx 0 --pretrained_path <PATH> --cfgfile <CFG> --img_size <SIZE> --conf-thresh <THRESH> --nms-thresh <THRESH> --iou-thresh <THRESH>
```
(The `conf-thresh`, `nms-thresh`, and `iou-thresh` params can be adjusted. By default, these params have been set to _**0.5**_)
#### 2.4.4. Training
##### 2.4.4.1. Single machine, single gpu
```shell script
python train.py --gpu_idx 0 --batch_size <N> --num_workers <N>...
```
##### 2.4.4.2. Multi-processing Distributed Data Parallel Training
We should always use the `nccl` backend for multi-processing distributed training since it currently provides the best
distributed training performance.
- **Single machine (node), multiple GPUs**
```shell script
python train.py --dist-url 'tcp://127.0.0.1:29500' --dist-backend 'nccl' --multiprocessing-distributed --world-size 1 --rank 0
```
- **Two machines (two nodes), multiple GPUs**
_**First machine**_
```shell script
python train.py --dist-url 'tcp://IP_OF_NODE1:FREEPORT' --dist-backend 'nccl' --multiprocessing-distributed --world-size 2 --rank 0
```
_**Second machine**_
```shell script
python train.py --dist-url 'tcp://IP_OF_NODE2:FREEPORT' --dist-backend 'nccl' --multiprocessing-distributed --world-size 2 --rank 1
```
To reproduce the results, you can run the bash shell script
```bash
./train.sh
```
#### Tensorboard
- To track the training progress, go to the `logs/` folder and
```shell script
cd logs/<saved_fn>/tensorboard/
tensorboard --logdir=./
```
- Then go to [http://localhost:6006/](http://localhost:6006/):
### 2.5. List of usage for Bag of Freebies (BoF) & Bag of Specials (BoS) in this implementation
| |Backbone | Detector |
|---|---|---|
|**BoF** |[x] Dropblock <br> [x] Random rescale, rotation (global) <br> [x] Mosaic/Cutout augmentation|[x] Cross mini-Batch Normalization <br>[x] Dropblock <br> [x] Random training shapes <br> |
|**BoS** |[x] Mish activation <br> [x] Cross-stage partial connections (CSP) <br> [x] Multi-input weighted residual connections (MiWRC) |[x] Mish activation <br> [x] SPP-block <br> [x] SAM-block <br> [x] PAN path-aggregation block <br> [x] GIoU loss <br> [ ] CIoU loss |
## Contact
If you think this work is useful, please give me a star! <br>
If you find any errors or have any suggestions, please contact me (**Email:** `nguyenmaudung93.kstn@gmail.com`). <br>
Thank you!
## Citation
```bash
@article{Complex-YOLO,
author = {Martin Simon, Stefan Milz, Karl Amende, Horst-Michael Gross},
title = {Complex-YOLO: Real-time 3D Object Detection on Point Clouds},
year = {2018},
journal = {arXiv},
}
@article{YOLOv4,
author = {Alexey Bochkovskiy, Chien-Yao Wang, Hong-Yuan Mark Liao},
title = {YOLOv4: Optimal Speed and Accuracy of Object Detection},
year = {2020},
journal = {arXiv},
}
```
## Folder structure
```
${ROOT}
└── checkpoints/
├── complex_yolov3/
└── complex_yolov4/
└── dataset/
└── kitti/
├──ImageSets/
│ ├── train.txt
│ └── val.txt
├── training/
│ ├── image_2/ <-- for visualization
│ ├── calib/
│ ├── label_2/
│ └── velodyne/
└── testing/
│ ├── image_2/ <-- for visualization
│ ├── calib/
│ └── velodyne/
└── classes_names.txt
└── src/
├── config/
├── cfg/
│ ├── complex_yolov3.cfg
│ ├── complex_yolov3_tiny.cfg
│ ├�
【图像检测】基于YoloV4实现点云上实时 3D 对象检测附论文和python代码.zip

版权申诉
144 浏览量
2022-06-13
06:58:36
上传
评论 4
收藏 6.51MB ZIP 举报
 【图像检测】基于YoloV4实现点云上实时 3D 对象检测附论文和python代码.zip (42个子文件)
  docs
docs  demo_complex_yolo.gif 5.9MB
 complex_yolo_architecture.PNG 590KB dataset kitti ImageSets
  val.txt 10KB test.txt 51KB train.txt 41KB classes_names.txt 23B src models
  darknet2pytorch.py 17KB model_utils.py 3KB darknet_utils.py 11KB yolo_layer.py 12KB __init__.py 0B config cfg complex_yolov3_tiny.cfg 2KB complex_yolov3.cfg 9KB complex_yolov4.cfg 12KB complex_yolov4_tiny.cfg 3KB __init__.py 0B train_config.py 9KB kitti_config.py 2KB data_process kitti_data_utils.py 15KB transformation.py 14KB __init__.py 0B kitti_bev_utils.py 6KB kitti_dataset.py 11KB kitti_dataloader.py 8KB train_val_split.py 696B train.sh 202B test.py 8KB train.py 10KB test.sh 402B evaluate.py 6KB utils train_utils.py 6KB logger.py 1KB iou_rotated_boxes_utils.py 8KB visualization_utils.py 14KB misc.py 2KB evaluation_utils.py 12KB torch_utils.py 798B __init__.py 0B cal_intersection_rotated_boxes.py 6KB find_anchors.py 11KB requirements.txt 143B README.md 14KB
资源评论


