# VSCode-Maxim
_(If you're viewing this document from within Visual Studio Code you can press `CTRL+SHIFT+V` to open a Markdown preview window.)_
## Quick Links
* [VSCode-Maxim Github](https://github.com/Analog-Devices-MSDK/VSCode-Maxim)
* [Wiki](https://github.com/Analog-Devices-MSDK/VSCode-Maxim/wiki)
* If it's not in the readme, check the wiki.
* If it's not in the wiki, open a ticket!
## Introduction
VSCode-Maxim is a set of [Visual Studio Code](https://code.visualstudio.com/) project configurations and utilities for enabling embedded development for [Analog Device's MSDK](https://github.com/Analog-Devices-MSDK/msdk) and the [MAX-series](https://www.maximintegrated.com/en/products/microcontrollers.html) microcontrollers.
The following features are supported:
* Code editing with intellisense down to the register level
* Code compilation with the ability to easily re-target a project for different microcontrollers and boards
* Flashing programs
* GUI and command-line debugging
## Dependencies
* [Visual Studio Code](https://code.visualstudio.com/)
* [C/C++ VSCode Extension](https://github.com/microsoft/vscode-cpptools)
* [Maxim Micros SDK](https://www.maximintegrated.com/content/maximintegrated/en/design/software-description.html/swpart=SFW0010820A)
## Installation
The steps below are also available in video form in "Understanding Artificial Intelligence Episode 8.5 - Visual Studio Code" [here](https://www.maximintegrated.com/en/products/microcontrollers/artificial-intelligence.html/tab4/vd_1_2eaktism#.YyDxHaE8U_Y.mailto).
1. Download & install the Maxim Microcontrollers SDK for your OS from the links below.
* [Windows](https://www.maximintegrated.com/en/design/software-description.html/swpart=SFW0010820A)
* [Linux (Ubuntu)](https://www.maximintegrated.com/en/design/software-description.html/swpart=SFW0018720A)
* [MacOS](https://www.maximintegrated.com/en/design/software-description.html/swpart=SFW0018610A)
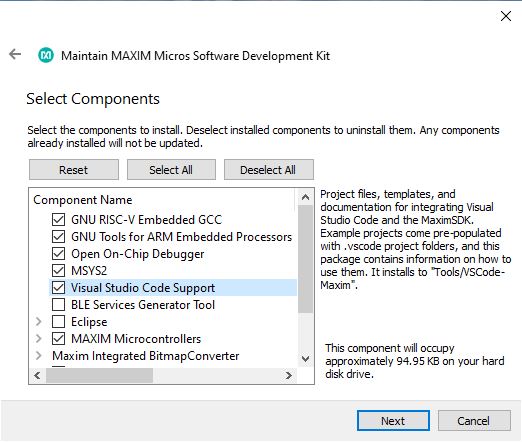
2. Run the installer executable, and ensure that "Visual Studio Code Support" is enabled for your installation.
3. Finish the MaximSDK installation, taking note of where the MaximSDK was installed.
4. Download & install Visual Studio Code for your OS [here](https://code.visualstudio.com/Download).
5. Launch Visual Studio Code.
6. Install the Microsoft [C/C++ extension](https://marketplace.visualstudio.com/items?itemName=ms-vscode.cpptools).
7. Use `CTRL + SHIFT + P` (or `COMMAND + SHIFT + P` on MacOS) to open the developer prompt.
8. Type "open settings json" and select the "Preferences: Open Settings (JSON)" option (_not_ the "Preferences: Open _Default_ Settings (JSON)"). This will open your user settings.json file in VS Code's editor.

9. Add the entries below into your user settings.json file.
```json
{
// There may be other settings up here...
"MAXIM_PATH":"C:/MaximSDK", // Set this to the installed location of the MaximSDK. Only use forward slashes '/' when setting this path!
"update.mode": "manual",
"extensions.autoUpdate": false,
// There may be other settings down here...
}
```
10. Save your changes to the file with `CTRL + S` and restart VS Code.
11. That's it! You're ready to start using Visual Studio Code to develop with Maxim's Microcontrollers. The MaximSDK examples come pre-populated with .vscode project folders, and the `Tools/VSCode-Maxim` folder of the SDK contains documentation and templates. See [Usage](#usage) below for more details.
## Usage
This section covers basic usage of the VSCode-Maxim project files. For documentation on Visual Studio Code itself, please refer to the official docs [here](https://code.visualstudio.com/Docs).
### Opening Projects
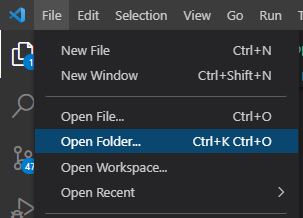
Visual Studio Code is built around a "working directory" paradigm. The editor is always rooted in a working directory, and the main mechanism for changing that directory is `File -> Open Folder...`.
As a result, you'll notice that there is no "New Project" mechanism. A "project" in VS Code is simply a folder. It will look inside of the opened folder for a `.vscode` _sub_-folder to load project-specific settings from.
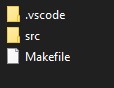
A project that is configured for VS Code will have, at minimum, a .vscode sub-folder and a Makefile in its directory _(Note: You may need to enable viewing of hidden items in your file explorer to see the .vscode sub-folder)_.
Ex:
### Where to Find Projects
The [Examples](https://github.com/Analog-Devices-MSDK/msdk/tree/main/Examples) in the MSDK come with with pre-configured .vscode project folders. These projects can be opened "out of the box", but it's good practice to copy example folders _outside_ of the MSDK so that the original copies are kept as clean references. The examples can be freely moved to any location _without a space in its path_.
Additionally, empty project templates and a drag-and-drop folder for "injecting" a VSCode-Maxim project can be found under `Tools/VSCode-Maxim` in the MaximSDK installation.
### Build Tasks
Once a project is opened 4 available build tasks will become available via `Terminal > Run Build task...` or the shortcut `Ctrl+Shift+B`. These tasks are configured by the `.vscode/task.json` file.

#### Build
* Compiles the code with a `make all` command.
* Additional options are passed into Make on the command-line based on the project's settings.json file.
* The `./build` directory will be created and will contain the output binary, as well as all intermediary object files.
#### Clean
* Cleans the build output, removing the `./build` directory and all of its contents.
#### Clean-Periph
* This task is the same as 'clean', but it also removes the build output for Maxim's peripheral drivers.
* Use this if you would like to recompile the peripheral drivers from source on the next build.
#### Flash
* Launching this task automatically runs the `Build` task first. Then, it flashes the output binary to the microcontroller.
* It uses the GDB `load` and `compare-sections` commands, and handles launching an OpenOCD internally via a pipe connection.
* The flashed program will be halted until the microcontroller is reset, power cycled, or a debugger is connected.
* A debugger must be connected correctly to use this task. Refer to the datasheet of your microcontroller's evaluation board for instructions.
#### Flash & Run
* This is the same as the `Flash` task, but it also will launch execution of the program once flashing is complete.
#### Erase Flash
* Completely erases all of the application code in the flash memory bank.
* Once complete, the target microcontroller will be effectively "blank".
* This can be useful for recovering from Low-Power (LP) lockouts, bad firmware, etc.
### Debugging
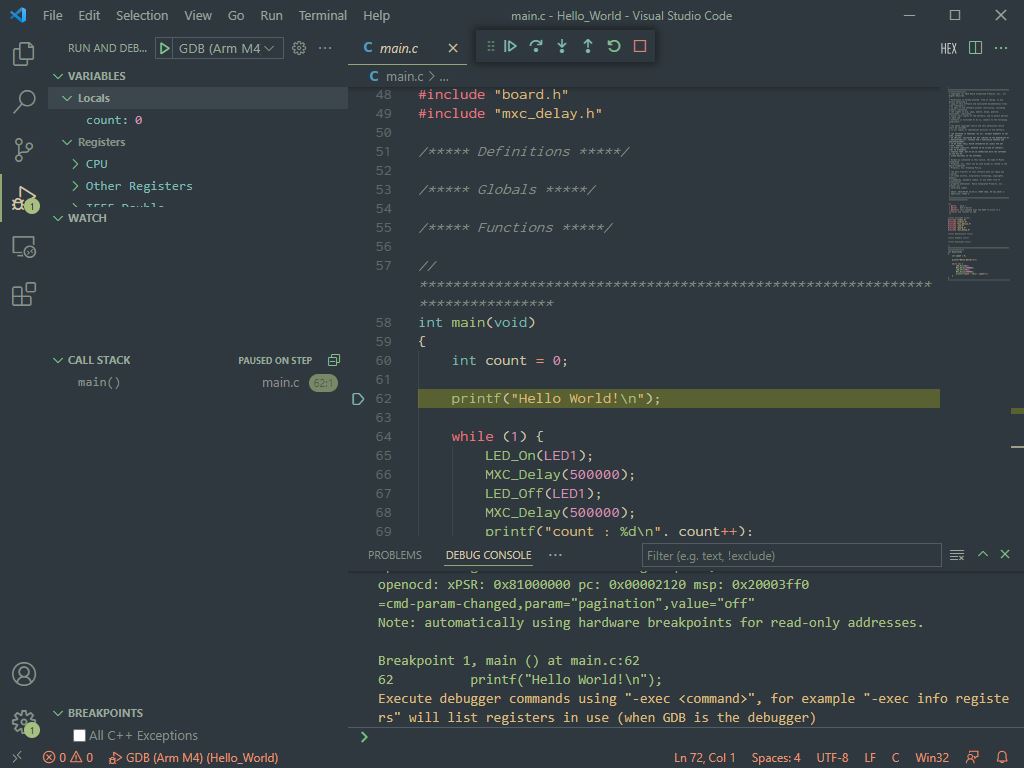
Debugging is enabled by Visual Studio Code's integrated debugger. Launch configurations can be found in the `.vscode/launch.json` file.
* Note: **Flashing does not happen automatically when launching the debugger.** Run the "Flash" [build task](#build-tasks) for your program _before_ debugging.
#### Debugger Limitations
In general, Maxim's microcontrollers have the following debugger limitations at the hardware level:
* The debug
基于MAX78000的猫咪识别喂食器+全部资料+详细文档(高分项目

版权申诉
188 浏览量
2024-05-11
18:00:09
上传
评论
收藏 3.45MB ZIP 举报
 基于MAX78000的猫咪识别喂食器,基于SSD目标检测网络,在单片机的CNN加速器上进行神经网络计算+全部资料+详细文档(高分项目).zip (41个子文件)
  cat-demo-master
  motor.c 1KB project.mk 796B .vscode flash.gdb 490B c_cpp_properties.json 1KB settings.json 4KB tasks.json 4KB README.md 32KB launch.json 5KB cnn.c 73KB process.h 646B Makefile 15KB tft.h 180B sampledata.h 75KB config.h 512B motor.h 140B process.c 11KB cnn.h 4KB README.assets
  IOU.png 15KB
 DB3309B3483EC0F9AA43B6BC90CB1372.jpg 393KB L298N_edit.png 217KB ppt1.jpg 131KB 70AE59A79F221A2F6372CC3052FAAB1A.jpg 265KB ppt2.jpg 180KB 6E4ED82652B82E7B23F9D74D18AFE897.jpg 262KB nms.png 354KB cat-content.png 20KB 71F6428D32F1BC48E88A2B94E2DFAF2C.jpg 426KB image-20230114015624959.png 188KB 63E8B66363D59BE13CC0F6504C54A796.jpg 407KB EB52F0B4CF9A6BAC94AF2F6A618398DB.jpg 317KB TFT.jpg 40KB Resources 321.png 1KB rgb.py 1KB weights.h 921KB tft.c 1KB .gitignore 16B SansSerif16x16.c 22KB main.c 5KB README.md 32KB 详细文档.md 3KB
 171265889347208773632.zip 416B
资源评论


不走小道
- 粉丝: 3209
- 资源: 5120

下载权益

C知道特权

VIP文章

课程特权
开通VIP


