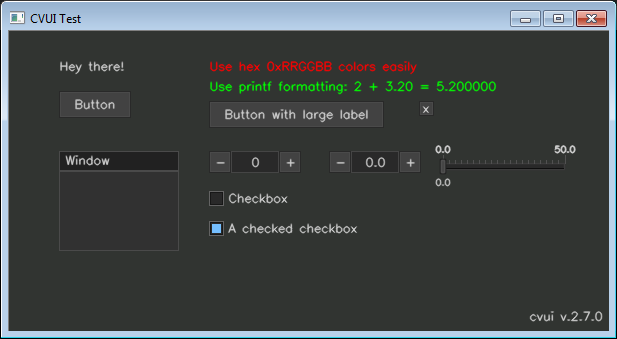
# cvui
A (very) simple UI lib built on top of OpenCV drawing primitives. Other UI libs, such as [imgui](https://github.com/ocornut/imgui), require a graphical backend (e.g. OpenGL) to work, so if you want to use imgui in a OpenCV app, you must make it OpenGL enabled, for instance. It is not the case with cvui, which uses *only* OpenCV drawing primitives to do all the rendering (no OpenGL or Qt required).

## Features
- Lightweight and simple to use user interface;
- Header-only with no external dependencies (except OpenCV);
- Based on OpenCV drawing primitives only (OpenGL or Qt are not required);
- Friendly and C-like API (no classes/objects, etc);
- Easily render components without worrying about their position (using rows/columns);
- Simple (yet powerful) mouse API;
- Modest number of UI components (11 in total);
- Available in C++ and Python (pure implementation, no bindings).
## Usage
Use of cvui revolves around calling `cvui.init()` to initialize the lib, rendering cvui components to a `np.ndarray` (that you handle yourself) and finally showing that `np.ndarray` on the screen using `cvui.imshow()`, which is cvui's version of `cv2.imshow()`. Alternatively you can use `cv2.imshow()` to show things, but in such case you must call `cvui.update()` yourself before calling `cv.imshow()`.
Below is an example:
```python
import numpy as np
import cv2
import cvui
WINDOW_NAME = 'CVUI Test'
# Initialize cvui and create/open a OpenCV window.
cvui.init(WINDOW_NAME)
# Create a frame to render components to.
frame = np.zeros((200, 400, 3), np.uint8)
while True:
# Clear the frame.
frame[:] = (49, 52, 49)
# Render a message in the frame at position (10, 15)
cvui.text(frame, 10, 15, 'Hello world!')
# Show frame in a window.
cvui.imshow(WINDOW1_NAME, frame)
if cv2.waitKey(20) == 27:
break
```
The following sections explain in detail each one of the steps required to use cvui.
### 1. Import and initialize cvui
Before using cvui, you need to call `cvui.init()` to initialize it. The easiest way is to initialize cvui and tell it to create any OpenCV window that will be used, e.g.:
```python
import numpy as np
import cv2
import cvui
WINDOW_NAME = 'CVUI Test'
# Tell cvui to init and create a window
cvui.init(WINDOW_NAME)
while True:
# your app logic here
if cv2.waitKey(20) == 27:
break
```
**Tip:** if you need to use cvui with multiple windows, or you want more control over the process of creating windows, check the <a href="https://dovyski.github.io/cvui/advanced-multiple-windows">Multiple OpenCV windows</a> page and the <a href="https://github.com/Dovyski/cvui/tree/master/example/src/multiple-windows">multiple-windows</a> and <a href="https://github.com/Dovyski/cvui/tree/master/example/src/multiple-windows-complex">multiple-windows-complex</a> examples.</div>
### 2. Rendering and using cvui components
All cvui components are rendered to a `np.ndarray`. Below is an example showing how to render a `'Hello world'` message on a `np.ndarray` named `frame`:
```python
import numpy as np
import cv2
import cvui
WINDOW_NAME = 'CVUI Test'
cvui.init(WINDOW_NAME)
# Create a frame
frame = np.zeros((200, 400, 3), np.uint8)
while True:
# clear the frame
frame[:] = (49, 52, 49)
# render a message in the frame at position (10, 15)
cvui.text(frame, 10, 15, 'Hello world!')
if cv2.waitKey(20) == 27:
break
```
Some cvui components, i.e. <a href="https://dovyski.github.io/cvui/components/counter/">counter</a>, <a href="https://dovyski.github.io/cvui/components/trackbar/">trackbar</a> and <a href="https://dovyski.github.io/cvui/components/checkbox/">checkbox</a>.</div>, use an external variable that they need to modify to control their internal state. Since there are no pointers to built-in types in Python, cvui components that need to change an external variable must receive such variable as an array/list with a single element.
Below is an example of a checkbox whose state is stored in the variable `checkboxState`:
```python
import numpy as np
import cv2
import cvui
WINDOW_NAME = 'CVUI Test'
cvui.init(WINDOW_NAME)
frame = np.zeros((200, 400, 3), np.uint8)
# use an array/list because this variable will be changed by cvui
checkboxState = [False]
while True:
frame[:] = (49, 52, 49)
# Render the checkbox. Notice that checkboxState is used AS IS,
# e.g. simply "checkboxState" instead of "checkboxState[0]".
# Only internally that cvui will use checkboxState[0].
cvui.checkbox(frame, 10, 15, 'My checkbox', checkboxState)
# Check the state of the checkbox. Here you need to remember to
# use the first position of the array/list because that's the
# one being used by all cvui components that perform changes
# to external variables.
if checkboxState[0] == True:
print('Checkbox is checked')
if cv2.waitKey(20) == 27:
break
```
**Tip:** see the <a href="https://dovyski.github.io/cvui/">online documentation</a> to learn more about all available cvui components.
### 3. Show (window) content
After rendering your components, show the final result using `cvui.imshow()`, which is cvui's improved version of OpenCV's `cv2.imshow()`:
```python
import numpy as np
import cv2
import cvui
WINDOW_NAME = 'CVUI Test'
cvui.init(WINDOW_NAME)
frame = np.zeros((200, 400, 3), np.uint8)
while True:
frame[:] = (49, 52, 49)
cvui.text(frame, 10, 15, 'Hello world!')
# Show window content
cvui.imshow(WINDOW1_NAME, frame)
if cv2.waitKey(20) == 27:
break
```
When you use `cvui.imshow()` instead of `cv2.imshow()`, cvui will not only show the content, but update its internal structures to ensure all UI interactions work.
If you want to use `cv2.imshow()`, you must call `cvui.update()` before `cv2.imshow()` and after you are finished invoking cvui components, so cvui can perform its internal processing to handle mouse interactions. E.g.
```python
import numpy as np
import cv2
import cvui
WINDOW_NAME = 'CVUI Test'
cvui.init(WINDOW_NAME)
frame = np.zeros((200, 400, 3), np.uint8)
while True:
frame[:] = (49, 52, 49)
cvui.text(frame, 10, 15, 'Hello world!')
# Update cvui internal stuff
cvui.update()
# Show window content
cv2.imshow(WINDOW1_NAME, frame)
if cv2.waitKey(20) == 27:
break
```
没有合适的资源?快使用搜索试试~ 我知道了~
温馨提示
本项目使用基于OPENCV和CVui的智能车图像处理视觉化,使用C++语言和C语言混合编程,旨在方便智能车图像的处理与图像处理算法的开发。 图像文件通过自己开发的C#上位机接收,为188*120的灰度图像并保存为bmp文件 本项目通过OPENCV读取bmp文件为mat数据,并利用mat数据进行显示和存储 在imageDeal和imagePreDeal文件中,对由mat结构数据转换而来的二值化数组进行访问和处理。这些文件全部使用C语言编程,其中的程序可以直接拷贝到智能车的单片机项目中运行
资源推荐
资源详情
资源评论
收起资源包目录
 基于OPENCV和CVui的智能车图像处理 (219个子文件)
  imagePreDeal.cpp 12KB
 main.cpp 6KB
 imageDeal.cpp 6KB
 main.cpp 5KB
 main.cpp 5KB
 ui.cpp 5KB
 main.cpp 4KB
 main.cpp 4KB
 main.cpp 4KB
 main.cpp 4KB
 main.cpp 3KB
 main.cpp 3KB
 main.cpp 3KB
 main.cpp 3KB
 main.cpp 3KB
 main.cpp 3KB
 main.cpp 3KB
 main.cpp 2KB
 main.cpp 2KB
 main.cpp 2KB
 main.cpp 2KB
 main.cpp 2KB
 main.cpp 2KB
 main.cpp 2KB
 main.cpp 2KB
 main.cpp 1KB
 main.cpp 1KB
 main.cpp 1KB
 Class1.cpp 323B
 Class2.cpp 246B
 main.css 51KB
 sparkline.csv 15KB
 Doxyfile 104KB
 imageDeal.vcxproj.filters 2KB
 multiple-windows-complex-dynamic.filters 589B
 row-column.filters 589B
 multiple-windows-complex-mouse.filters 589B
 button-shortcode.vcxproj.filters 589B
 complex-layout.filters 589B
 multiple-windows-complex.filters 589B
 sparkline.filters 589B
 nested-rows-columns.filters 589B
 image-button.vcxproj.filters 589B
 ui-enhanced-window-component.vcxproj.filters 566B
 mouse.vcxproj.filters 492B
 mouse-complex-buttons.vcxproj.filters 492B
 ui-enhanced-canny.filters 492B
 canny.filters 492B
 main-app.vcxproj.filters 492B
 image-button.vcxproj.filters 492B
 multiple-files.filters 492B
 trackbar-complex.vcxproj.filters 492B
 mouse-complex.vcxproj.filters 492B
 trackbar-sparkline.vcxproj.filters 492B
 trackbar.vcxproj.filters 492B
 on-image.vcxproj.filters 492B
 multiple-windows.filters 492B
 canny.filters 492B
 hello-world.filters 492B
 iarea.gif 46KB
 trackbar.gif 22KB
 trackbar-discrete.gif 16KB
 .gitignore 713B
 cvui.h 99KB
 EnhancedWindow.h 2KB
 mainInclude.h 1KB
 ui.h 769B
 imageDeal.h 727B
 imagePreDeal.h 636B
 Class1.h 343B
 Class2.h 326B
 sidemenu.html 4KB
 default.html 3KB
 head.html 724B
 edit-github.html 276B
 navbar.html 223B
 fruits.jpg 80KB
 lena.jpg 47KB
 lena-face-red.jpg 18KB
 lena-face-gray.jpg 16KB
 lena-face.jpg 5KB
 usage.md 10KB
 README.md 6KB
 layout-introduction.md 6KB
 advanced-multiple-windows.md 5KB
 CHANGELOG.md 5KB
 layout-nesting.md 5KB
 examples.md 5KB
 trackbar.md 4KB
 advanced-mouse.md 4KB
 README.md 3KB
 button.md 2KB
 printf.md 2KB
 iarea.md 2KB
 rect.md 2KB
 build.md 2KB
 counter.md 1KB
 window.md 1KB
 sparkline.md 1KB
 checkbox.md 1KB
共 219 条
- 1
- 2
- 3
资源评论

薪薪代码
- 粉丝: 2w+
- 资源: 499
上传资源 快速赚钱
 我的内容管理
展开
 我的资源
快来上传第一个资源
 我的收益 登录查看自己的收益
 我的积分
登录查看自己的积分
 我的C币
登录后查看C币余额
 我的收藏
我的收藏  我的下载
我的下载  下载帮助
下载帮助

 前往需求广场,查看用户热搜
最新资源
资源上传下载、课程学习等过程中有任何疑问或建议,欢迎提出宝贵意见哦~我们会及时处理!
点击此处反馈


安全验证
文档复制为VIP权益,开通VIP直接复制
 信息提交成功