
## Cervical Cancer Object Detection
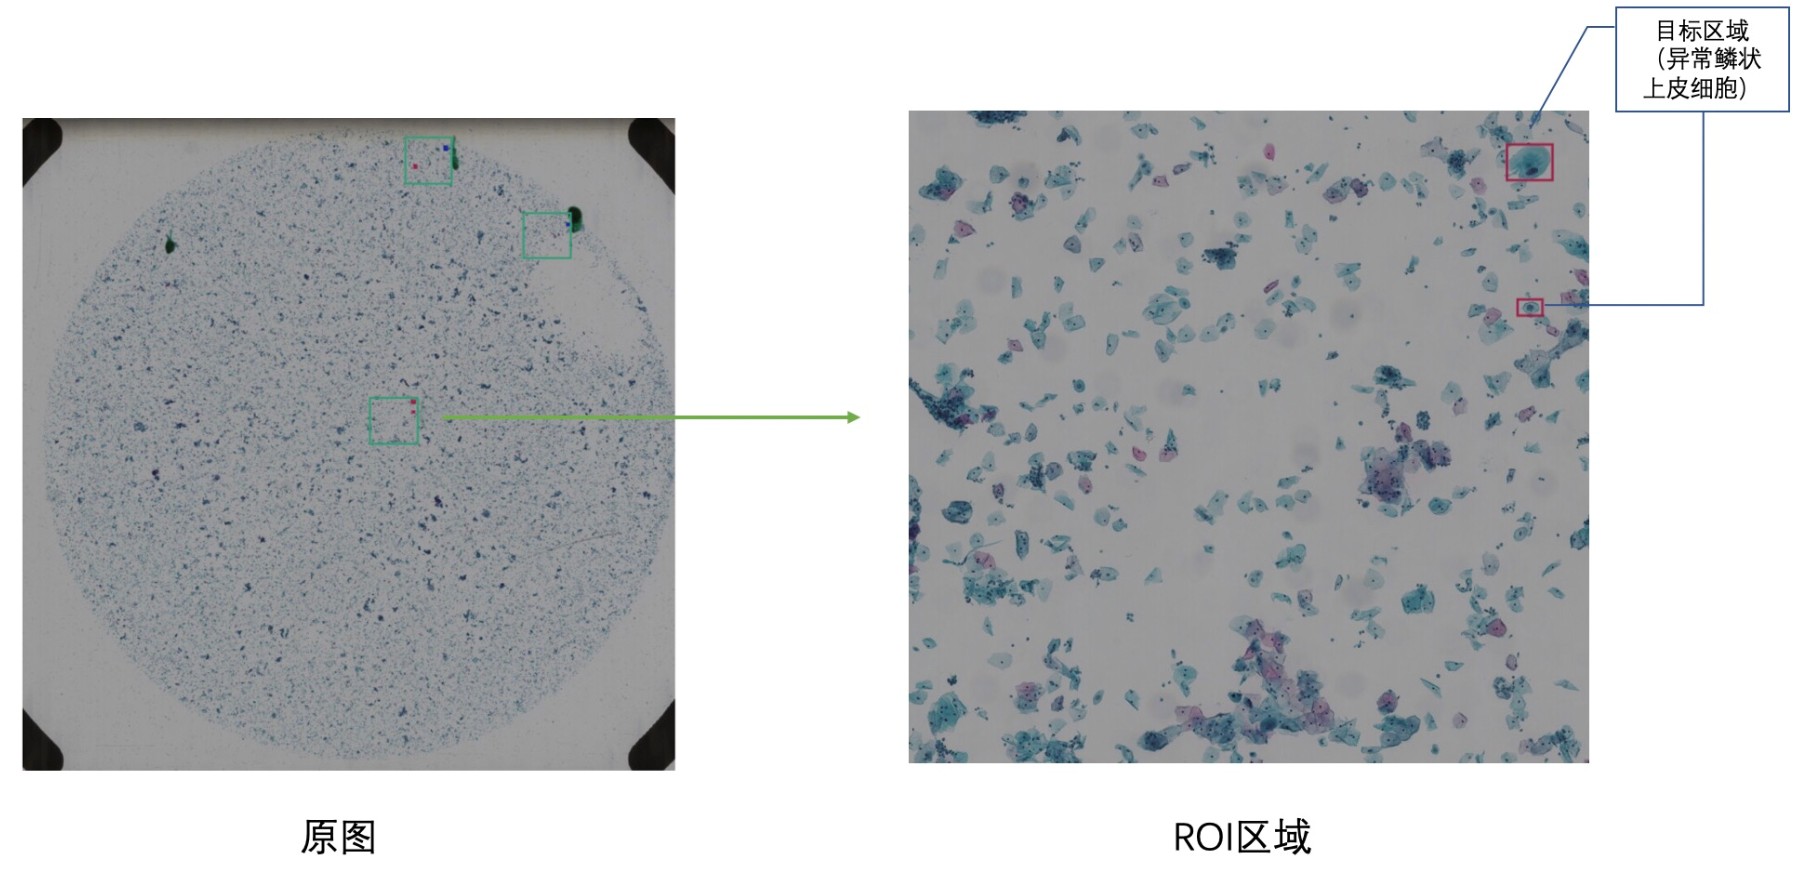
This code is for the competition of ['Digitized Human Body' Visual Challenge - Intelligent Diagnosis of Cervical Cancer Risk](https://tianchi.aliyun.com/competition/entrance/231757/introduction). The purpose of the competition is to provide large-scale thin-layer cell data of cervical cancer labeled by professional doctors. The competitors can propose and comprehensively use methods such as object detection and deep learning to locate abnormal squamous epithelial cells (i.e., ASC) of cervical cancer cytology and classify cervical cancer cells through images, which improve the speed and accuracy of model detection, and assist doctors in real diagnosis.
Note: Data and kfbreader is not allowed to be published, but [experiment details](https://mp.weixin.qq.com/s?__biz=MzUyNzA1OTcxNg==&mid=2247483668&idx=1&sn=e9c3d6afd96ebdd5c330825b6e5d5188&chksm=fa041f7fcd739669af9cc181ffcd9bf1bd3ed32c156d7c8adb860104ef4ac0a87cb5e8420140&token=1035786795&lang=zh_CN#rd) are pulished..
The object detection steps are shown as below:
### 1. Enviroment Preparation:
(1) **kfbreader**:
Since the kfb data need to be loaded by specified SDK (i.e., kfbreader), we have to setup kfbreader provided by the match orgnaisers. The specific tutorial can be visited by the [link](https://tianchi.aliyun.com/forum/postDetail?spm=5176.12586969.1002.3.76de2a3c3k6DZf&postId=83286).
Remember to add kfbreader to the below paths:
```
export PYTHONPATH=/home/admin/jupyter/kfbreader-linux:$PYTHONPATH
export LD_LIBRARY=/opt/conda/lib:/home/admin/jupyter/kfbreader-linux:$LD_LIBRARY_PATH
```
(2) **detectron2**:
More information, please visit [detectron2 install tutorial](https://github.com/AlvinAi96/cervical_cancer_object_detection/blob/master/detectron2/INSTALL.md)
Before downloading [fvcore](https://github.com/facebookresearch/fvcore) [cocoapi](https://github.com/cocodataset/cocoapi.git), make sure you have python >= 3.6 and pytorch 1.3.
Setup detecron2 by running the following commands. (Note: ``<ROOT>`` is the root path of detectron2 file path)
```
# setup fvcore
cd <ROOT>/fvcore-master
python setup.py --user
# setup cocoapi
cd <ROOT>/cocoapi-master/Pythonapi
python setup.py --user
# setup detectron2
cd <ROOT>/detectron2
python setup.py build develop --user
```
### 2. Data Preparation:
(1) put train/test dataset into ``<ROOT>/Data/Train`` and ``<ROOT>/Data/test`` respectively.
```
cd <ROOT>
mkdir /Data/Train
mkdir /Data/test
```
(2) Generate training dataset for model.
```
cd <ROOT>/Data
python roi_based_data_generation.py
# or
python pos_based_data_generation.py
```
(3) Generate extra rotated images with large bboxes and their labels.
```
python big_rotate_object.py
```
(4) Transfer prepared datasets from ``<ROOT>/Data`` to ``<ROOT>/detectron2/VOC2007``.
``<ROOT>/detectron2/VOC2007`` file structure follows the structure of Pascal VOC2007 data file:
```
VOC2007/
Annotations/
patch0.json
pathc1.json
...
ImageSets/
Main/
train.txt
val.txt
trainval.txt
JPEGImages/
patch0.jpg
patch1.jpg
...
```
In order to gain the above structure format, run the following commands:
```
cd <ROOT>/detectron2
mkdir /VOC2007/ImageSets
mkdir /VOC2007/ImageSets/Main
mkdir /VOC2007/Annotations
mkdir /VOc2007/JPEGImages
# split dataset for get train/val/trainval.txt
cd VOC2007
python split_dataset_produce_txt.py
```
Transfer dataset:
```
# Note: since the files are a lot, we cannot use 'cp' directly.
cd <ROOT>
# transfer train dataset
find Data/Train/train/ -name "*.jpg" | xargs -i cp {} detectron2/datasets/VOC2007/JPEGImages/
find Data/Train/label/ -name "*.json" | xargs -i cp {} detectron2/datasets/VOC2007/Annotations/
# transfer extra large rotated dataset
find Data/big_rotate_object/rotate_image/ -name "*large.jpg" | xargs -i cp {} detectron2/datasets/VOC2007/JPEGImages/
find Data/Tbig_rotate_object/rotate_label/ -name "*large.json" | xargs -i cp {} detectron2/datasets/VOC2007/Annotations/
# transfer test dataset
mkdir detectron2/datasets/VOC2007/test
find Data/test/ -name "*.kfb" | xargs -i cp {} detectron2/datasets/VOC2007/test
find Data/test/ -name "*.json" | xargs -i cp {} detectron2/datasets/VOC2007/test
```
### 3. Model Training and Evaluation:
You can visit [Model_Zoo](https://github.com/facebookresearch/detectron2/blob/master/MODEL_ZOO.md) to download ImageNet pretrained model weight file (e.g., X-101-32x8d.pkl), and then put pkl file under ``<ROOT>/detectron2/configs/ImageNetPretrained/MSRA/``. In this competition, we use X101-FPN model.
Modify hyperparameter setting file ``/detectron2/config/PascalVOC-Detection/<faster_rcnn_xxx.yaml>`` and then run:
```
cd <ROOT>/detectron2
python tools/train_net.py --num-gpus 2 --config-file configs/PascalVOC-Detection/faster_rcnn_X_101_FPN.yaml
```
``SOLVER.IMS_PER_BATCH`` and ``SOLVER.BASE_LR`` need to be changed if there is any change of the number of GPU. More information, please read the content of [Experiment Record 2](https://github.com/AlvinAi96/cervical_cancer_object_detection/blob/master/Experiment%20Record%202.md) in Dec. 7, 2019.
### 4. Prediction:
```
cd <ROOT>/detectron2
python tools/prediction_multiprocess.py --stride_proportion 0.25
```
Note: there are many arguments that is tunable:
(1)``--output_config``: config.yaml - hyperparameter setting file, default: ``./output/config.yaml``.
(2)``--model_weights_pth``: target the specified checkpoint pth file, default: ``final_model.pth``.
(3)``--final_nms_switch``: whether to do class-wise NMS, default: True.
(4)``--img_size``: image length/height, default: 1000。
(5)``--stride_proportion``: the sliding step / img_size, default: 0.25. If the sliding window size is 1000*1000, the stride step will be 500 (1000/2=500).
(6)``--save_path``: the saving path of predicted result, default: ``./output/submit_result/``.
(7)``--test_kfb_path``: the path of test dataset, default:, ``./datasets/VOC2007/test/``.
There are other setting inside the file so please read code carefully. Also, the code prediction with Soft NMS and the prediction based on the iamge with the uniform hue value are available. Here, we do not introduce furthure, you can take a look inside them.
### 5. Model Ensemble
If you want to ensemble different predicted results from different experimental setting, you can modify the file ``model_ensemble.py`` as your need and run it.
```
cd <ROOT>/detectron2
python tools/model_ensemble.py
```
### 6. Zip Result
```
cd <ROOT>/detectron2/output
zip -r submit_result.zip submit_result/*
```
 基于python的天池大赛项目-“数字人体”视觉挑战赛-宫颈癌风险智能诊断算法源码+项目说明.zip (387个子文件)
  setup.cfg 715B .clang-format 3KB ROIAlignRotated_cpu.cpp 16KB ROIAlign_cpu.cpp 14KB vision.cpp 3KB nms_rotated_cpu.cpp 2KB box_iou_rotated_cpu.cpp 1KB vision.cpp 449B deform_conv_cuda_kernel.cu 43KB deform_conv_cuda.cu 32KB ROIAlignRotated_cuda.cu 13KB SwapAlign2Nat_cuda.cu 13KB ROIAlign_cuda.cu 13KB nms_rotated_cuda.cu 5KB box_iou_rotated_cuda.cu 3KB cuda_version.cu 134B Dockerfile 2KB .flake8 276B .gitignore 426B .gitignore 7B box_iou_rotated_utils.h 9KB deform_conv.h 8KB ROIAlign.h 3KB ROIAlignRotated.h 3KB SwapAlign2Nat.h 1KB nms_rotated.h 976B box_iou_rotated.h 887B data_analyze.ipynb 9KB img.jpeg 201KB launch.json 448B Makefile 650B MODEL_ZOO.md 45KB Experiment Record 2.md 42KB Experiment Record.md 12KB datasets.md 10KB benchmarks.md 9KB README.md 7KB models.md 4KB compatibility.md 4KB TOOL_QUERY_DB.md 4KB README.md 4KB README.md 4KB TOOL_APPLY_NET.md 4KB GETTING_STARTED.md 3KB MODEL_ZOO.md 3KB INSTALL.md 3KB README.md 3KB data_loading.md 3KB extend.md 2KB README.md 2KB GETTING_STARTED.md 2KB README.md 2KB configs.md 2KB write-models.md 2KB README.md 1KB CONTRIBUTING.md 1KB README.md 1KB unexpected-problems-bugs.md 1KB training.md 928B feature-request.md 833B README_NEW.md 676B README.md 537B questions-help-support.md 530B README.md 417B README.md 395B README.md 347B README.md 314B changelog.md 312B README.md 304B README.md 291B CODE_OF_CONDUCT.md 244B pull_request_template.md 242B README.md 231B README.md 175B ISSUE_TEMPLATE.md 143B README.md 122B README.md 82B getting_started.md 24B install.md 16B lvis_v0_5_categories.py 219KB visualizer.py 44KB densepose_coco_evaluation.py 41KB arch.py 40KB roi_heads.py 30KB defaults.py 25KB densepose_head.py 24KB prediction_multiprocess_for_uniform_hue.py 24KB test_rotated_boxes.py 23KB prediction_multiprocess.py 23KB prediction_multiprocess_softnms.py 22KB densepose.py 22KB structures.py 20KB rpn_outputs.py 19KB coco_evaluation.py 19KB retinanet.py 19KB fast_rcnn.py 18KB rotated_boxes.py 18KB coco.py 18KB defaults.py 18KB build.py 16KB
共 387 条
- 1
- 2
- 3
- 4
资源评论

 纵使千般无奈9942024-03-13总算找到了自己想要的资源,对自己的启发很大,感谢分享~

土豆片片
- 粉丝: 1862
- 资源: 5867


最新资源
- 机器学习-bert模型
- 【毕业设计】基于Python的Django-html基于语音识别的智能垃圾分类系统源码(完整前后端+mysql+说明文档+LW+PPT).zip
- ERA5再分析数据根区土壤水分下载_era5土壤湿度-CSDN博客.html
- 【毕业设计】基于Python的Django-html基于小波变换的数字水印研究系统源码(完整前后端+mysql+说明文档+LW+PPT).zip
- 【毕业设计】基于Python的Django-html基于知识图谱的百科知识问答平台源码(完整前后端+mysql+说明文档+LW+PPT).zip
- 【毕业设计】基于Python的Django-html开放领域事件抽取系统源码(完整前后端+mysql+说明文档+LW+PPT).zip
- 【毕业设计】基于Python的Django-html旅游城市关键词分析系统源码(完整前后端+mysql+说明文档+LW+PPT).zip
- 【毕业设计】基于Python的Django-html基于知识图谱的医疗问答系统源码(完整前后端+mysql+说明文档+LW+PPT).zip
- 【毕业设计】基于Python的Django-html某大学学生影响力分析系统源码(完整前后端+mysql+说明文档+LW+PPT).zip
- Unity RPG地图场景资源
- 【毕业设计】基于Python的Django-html棉花数据平台建设与可视化系统源码(完整前后端+mysql+说明文档+LW+PPT).zip
- hymenoptera-data 数据集
- Java I/O流及其应用详解:字节流、字符流及相关工具类全面解析
- 机器学习-apriori算法-超市关联分析
- 【毕业设计】基于Python的Django-html企业物流管理系统源码(完整前后端+mysql+说明文档+LW+PPT).zip
- 【毕业设计】基于Python的Django-html某医院体检挂号系统源码(完整前后端+mysql+说明文档+LW+PPT).zip
资源上传下载、课程学习等过程中有任何疑问或建议,欢迎提出宝贵意见哦~我们会及时处理!
点击此处反馈


