


Part I: Basic Qt
1. Getting Started
l
Hello Qt
l
Making Connections
l
Laying Out Widgets
l
Using the Reference Documentation
This chapter shows how to combine basic C++ with the functionality provided by Qt to create a few small
graphical user interface (GUI) applications. This chapter also introduces two key Qt ideas: "signals and slots"
and layouts. In Chapter 2, we will go into more depth, and in Chapter 3, we will start building a more realistic
application.
If you already know Java or C# but have limited experience with C++, you might want to start by reading the
C++ introduction in Appendix D.
Hello Qt
Let's start with a very simple Qt program. We will first study it line by line, and then see how to compile and
run it.
1 #include <QApplication>
2 #include <QLabel>
3 int main(int argc, char *argv[])
4 {
5 QApplication app(argc, argv);
6 QLabel *label = new QLabel("Hello Qt!");
7 label->show();
8 return app.exec();
9 }
Lines 1 and 2 include the definitions of the
QApplication
and
QLabel
classes. For every Qt class, there is a
header file with the same name (and capitalization) as the class that contains the class's definition.
Line 5 creates a
QApplication
object to manage application-wide resources. The
QApplication
constructor
requires
argc
and
argv
because Qt supports a few command-line arguments of its own.
Page
1
of
132
Line 6 creates a
QLabel
widget that displays "Hello Qt!". In Qt and Unix terminology, a widget is a visual
element in a user interface. The term stems from "window gadget" and is the equivalent of both "control" and
"container" in Windows terminology. Buttons, menus, scroll bars, and frames are all examples of widgets.
Widgets can contain other widgets; for example, an application window is usually a widget that contains a
QMenuBar
, a few
QToolBar
s, a
QStatusBar
, and some other widgets. Most applications use a
QMainWindow
or
a
QDialog
as the application window, but Qt is so flexible that any widget can be a window. In this example,
the
QLabel
widget is the application window.
Line 7 makes the label visible. Widgets are always created hidden so that we can customize them before
showing them, thereby avoiding flicker.
Line 8 passes control of the application on to Qt. At this point, the program enters the event loop. This is a kind
of stand-by mode where the program waits for user actions such as mouse clicks and key presses. User actions
generate events (also called "messages") to which the program can respond, usually by executing one or more
functions. For example, when the user clicks a widget, a "mouse press" and a "mouse release" event are
generated. In this respect, GUI applications differ drastically from conventional batch programs, which
typically process input, produce results, and terminate without human intervention.
For simplicity, we don't bother calling
delete
on the
QLabel
object at the end of the
main()
function. This
memory leak is harmless in such a small program, since the memory will be reclaimed by the operating system
when the program terminates.
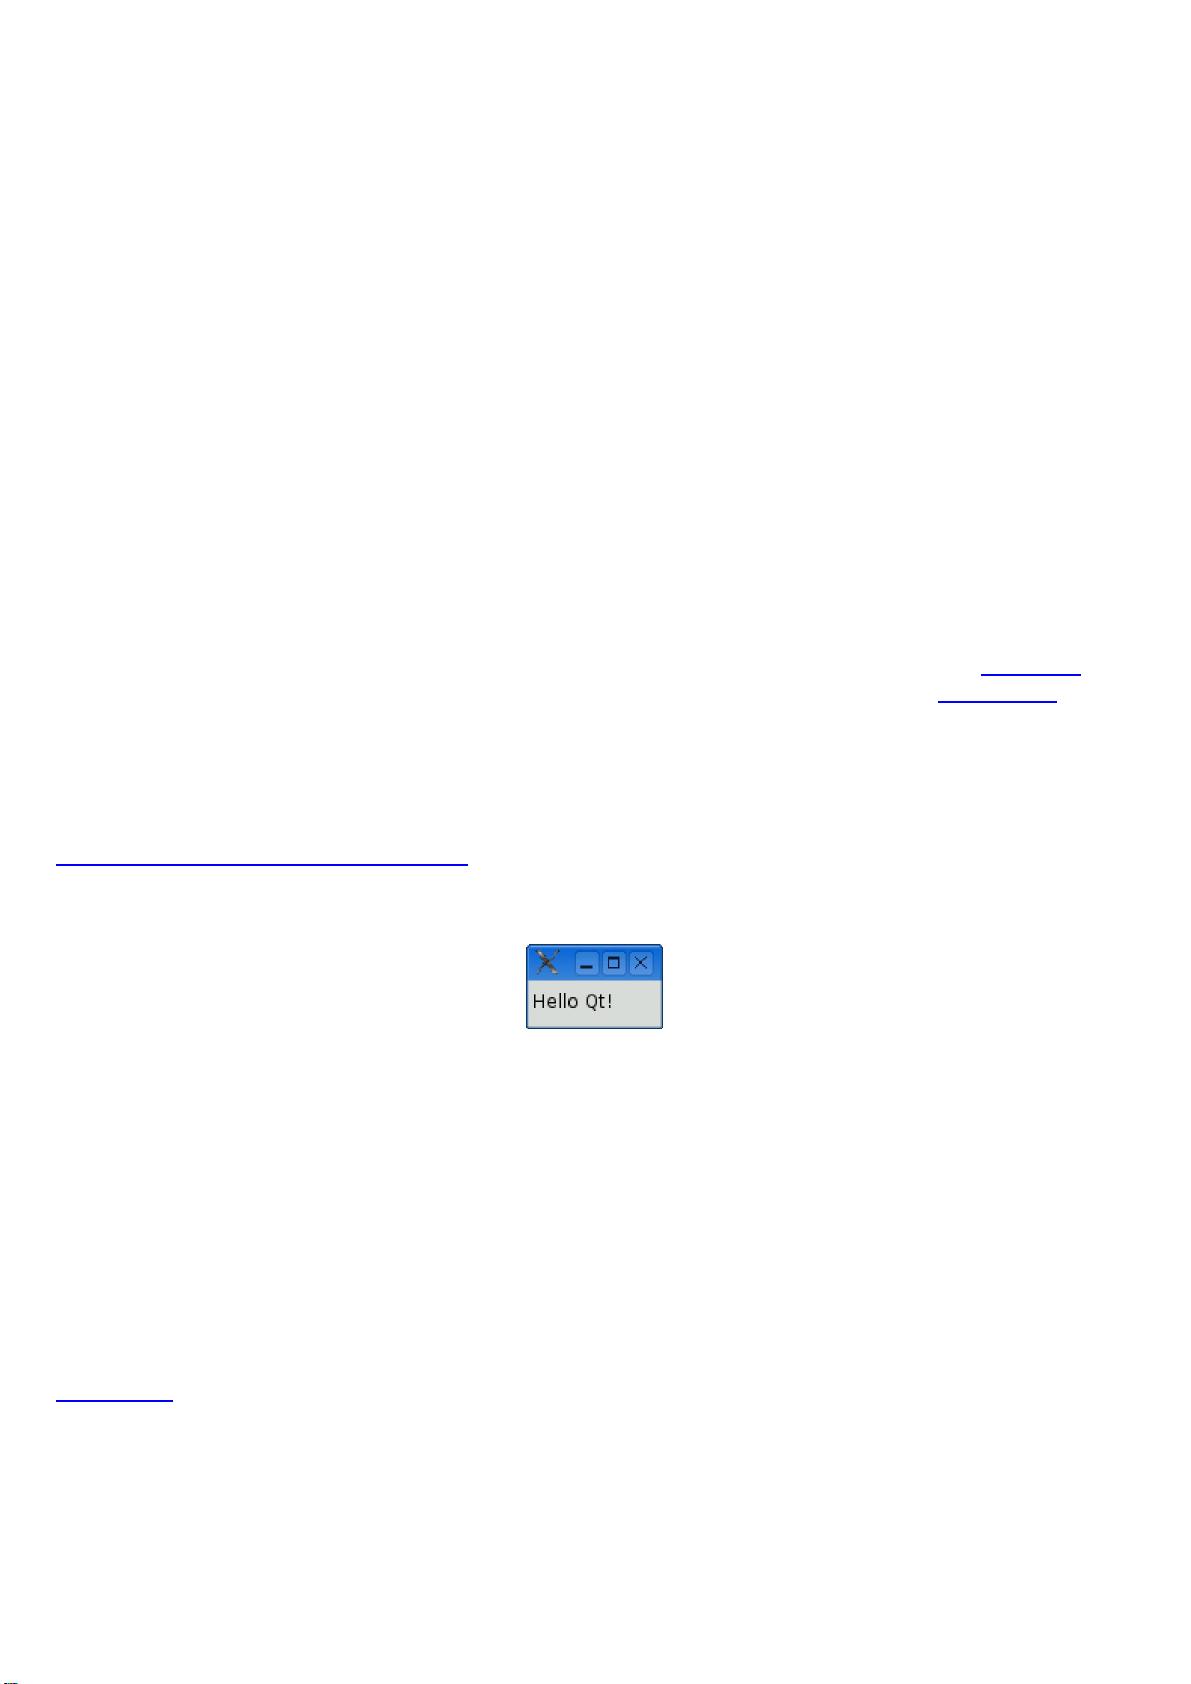
It is now possible to try the program on your own machine. It should look like the one shown in Figure 1.1.
First, you will need to install Qt 4.3.2 (or a later Qt 4 release), a process that is explained in Appendix A. From
now on, we will assume that you have a correctly installed copy of Qt 4 and that Qt's
bin
directory is in your
PATH
environment variable. (On Windows, this is done automatically by the Qt installation program.) You will
also need the program's code in a file called
hello.cpp
in a directory called
hello
. You can type in
hello.cpp
yourself or copy it from the examples that accompany this book, where it is available as
examples/chap01/hello/hello.cpp
. (All the examples are available from the book's web site,
http://www.informit.com/title/0132354160.)
Figure 1.1. Hello on Linux
From a command prompt, change the directory to
hello
, and type
qmake -project
to create a platform-independent project file (
hello.pro
), and then type
qmake hello.pro
to create a platform-specific makefile from the project file. (The
qmake
tool is covered in more detail in
Appendix B.) Type
make
to build the program. Run it by typing
hello
on Windows,
./hello
on Unix, and
open hello.app
on Mac OS X. To terminate the program, click the close button in the window's title bar.
If you are using Windows and have installed the Qt Open Source Edition and the MinGW compiler, you will
have a shortcut to an MS-DOS Prompt window that has all the environment variables correctly set up for Qt. If
you start this window, you can compile Qt applications within it using
qmake
and
make
as described previously.
The executables produced are put in the application's
debug
or
release
folder (e.g.,
C:\examples\chap01
\hello\release\hello.exe
).
Page
2
of
132
If you are using Microsoft Visual C++ with a commercial version of Qt, you will need to run
nmake
instead of
make
. Alternatively, you can create a Visual Studio project file from
hello.pro
by typing
qmake -tp vc hello.pro
and then build the program in Visual Studio. If you are using Xcode on Mac OS X, you can generate an Xcode
project using the command
qmake -spec macx-xcode hello.pro
Before we go on to the next example, let's have some fun: Replace the line
QLabel *label = new QLabel("Hello Qt!");
with
QLabel *label = new QLabel("<h2><i>Hello</i> "
"<font color=red>Qt!</font></h2>");
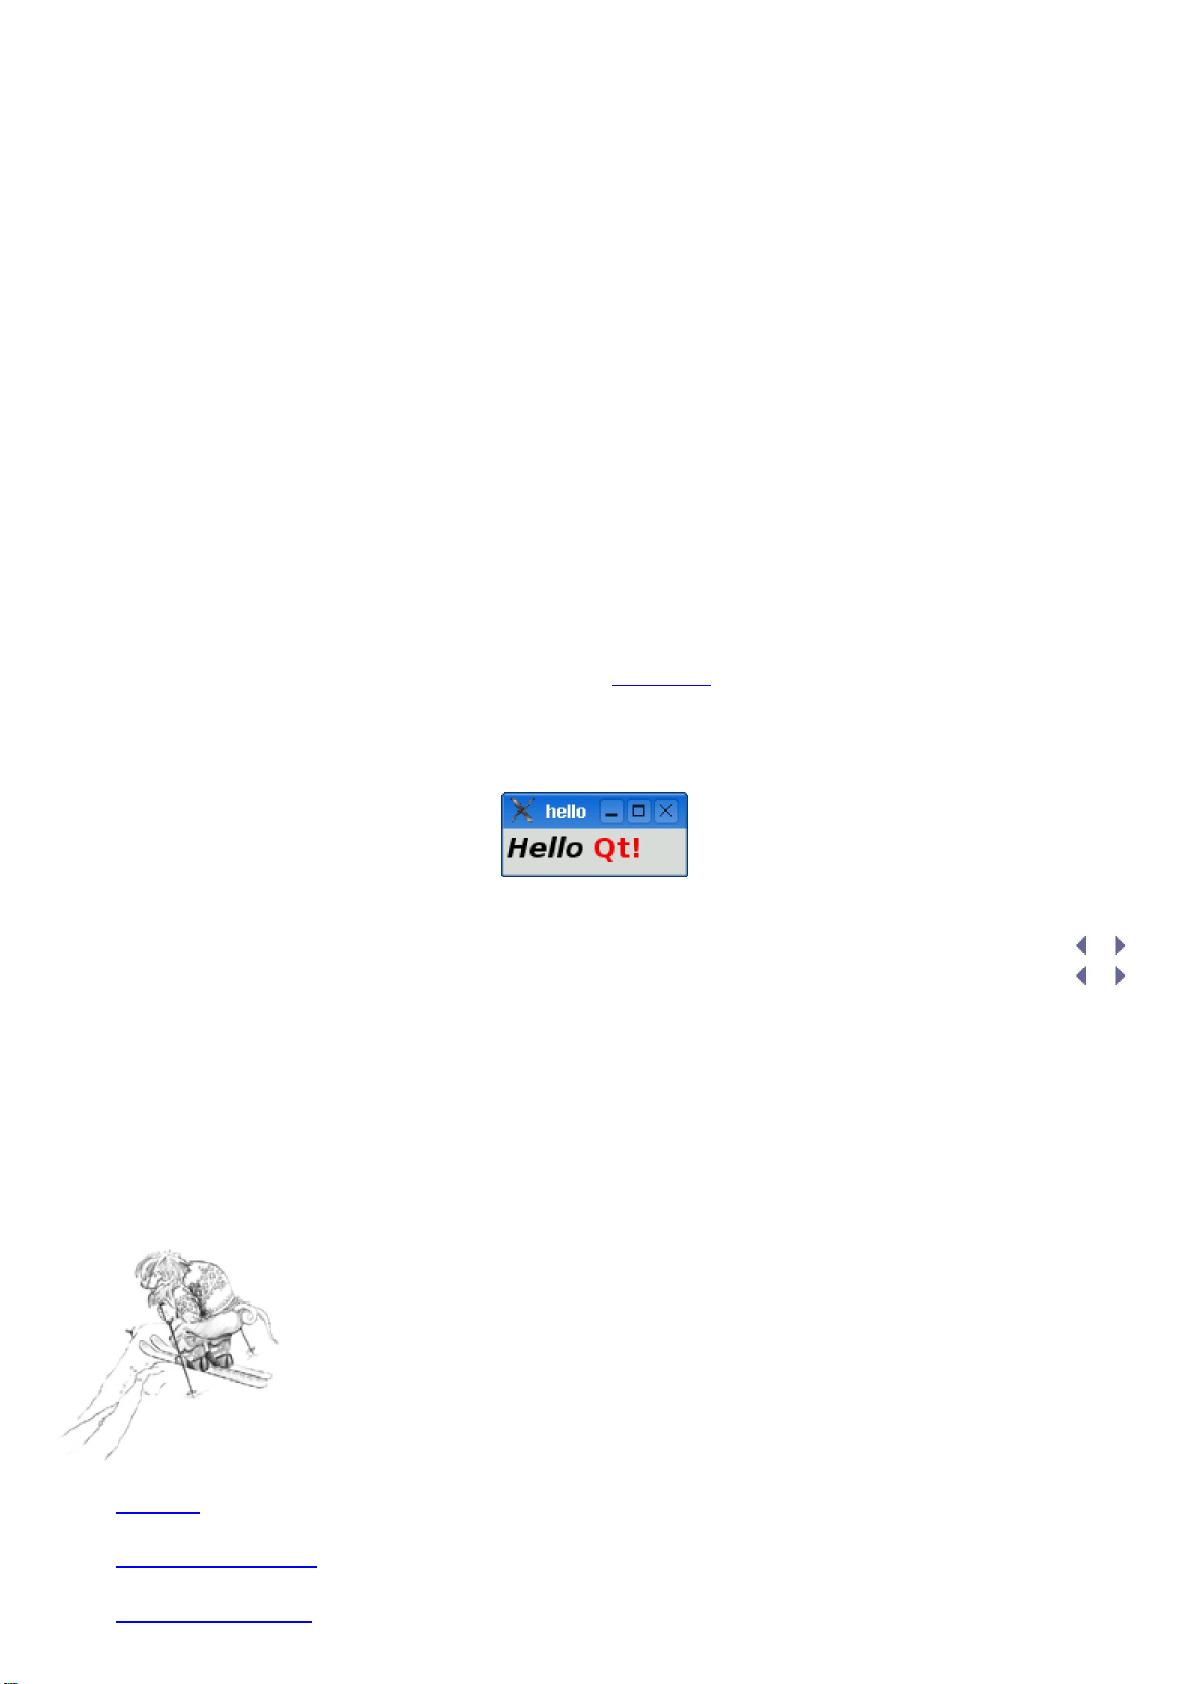
and rebuild the application. When run, it should look like Figure 1.2. As the example illustrates, it's easy to
brighten up a Qt application's user interface using some simple HTML-style formatting.
Figure 1.2. A label with basic HTML formatting
Part I: Basic Qt
1. Getting Started
l
Hello Qt
l
Making Connections
l
Laying Out Widgets
Page
3
of
132
l
Using the Reference Documentation
This chapter shows how to combine basic C++ with the functionality provided by Qt to create a few small
graphical user interface (GUI) applications. This chapter also introduces two key Qt ideas: "signals and slots"
and layouts. In Chapter 2, we will go into more depth, and in Chapter 3, we will start building a more realistic
application.
If you already know Java or C# but have limited experience with C++, you might want to start by reading the
C++ introduction in Appendix D.
Hello Qt
Let's start with a very simple Qt program. We will first study it line by line, and then see how to compile and
run it.
1 #include <QApplication>
2 #include <QLabel>
3 int main(int argc, char *argv[])
4 {
5 QApplication app(argc, argv);
6 QLabel *label = new QLabel("Hello Qt!");
7 label->show();
8 return app.exec();
9 }
Lines 1 and 2 include the definitions of the
QApplication
and
QLabel
classes. For every Qt class, there is a
header file with the same name (and capitalization) as the class that contains the class's definition.
Line 5 creates a
QApplication
object to manage application-wide resources. The
QApplication
constructor
requires argc and argv because Qt supports a few command-line arguments of its own.
Line 6 creates a
QLabel
widget that displays "Hello Qt!". In Qt and Unix terminology, a widget is a visual
element in a user interface. The term stems from "window gadget" and is the equivalent of both "control" and
"container" in Windows terminology. Buttons, menus, scroll bars, and frames are all examples of widgets.
Widgets can contain other widgets; for example, an application window is usually a widget that contains a
QMenuBar
, a few
QToolBar
s, a
QStatusBar
, and some other widgets. Most applications use a
QMainWindow
or
a
QDialog
as the application window, but Qt is so flexible that any widget can be a window. In this example,
the
QLabel
widget is the application window.
Line 7 makes the label visible. Widgets are always created hidden so that we can customize them before
showing them, thereby avoiding flicker.
Line 8 passes control of the application on to Qt. At this point, the program enters the event loop. This is a kind
of stand-by mode where the program waits for user actions such as mouse clicks and key presses. User actions
generate events (also called "messages") to which the program can respond, usually by executing one or more
functions. For example, when the user clicks a widget, a "mouse press" and a "mouse release" event are
generated. In this respect, GUI applications differ drastically from conventional batch programs, which
typically process input, produce results, and terminate without human intervention.
For simplicity, we don't bother calling
delete
on the
QLabel
object at the end of the
main()
function. This
memory leak is harmless in such a small program, since the memory will be reclaimed by the operating system
when the program terminates.
It is now possible to try the program on your own machine. It should look like the one shown in Figure 1.1.
First, you will need to install Qt 4.3.2 (or a later Qt 4 release), a process that is explained in Appendix A. From
now on, we will assume that you have a correctly installed copy of Qt 4 and that Qt's
bin
directory is in your
PATH
environment variable. (On Windows, this is done automatically by the Qt installation program.) You will
Page
4
of
132

also need the program's code in a file called
hello.cpp
in a directory called
hello
. You can type in
hello.cpp
yourself or copy it from the examples that accompany this book, where it is available as
examples/chap01/hello/hello.cpp
. (All the examples are available from the book's web site,
http://www.informit.com/title/0132354160.)
Figure 1.1. Hello on Linux
From a command prompt, change the directory to
hello
, and type
qmake -project
to create a platform-independent project file (
hello.pro
), and then type
qmake hello.pro
to create a platform-specific makefile from the project file. (The
qmake
tool is covered in more detail in
Appendix B.) Type
make
to build the program. Run it by typing
hello
on Windows,
./hello
on Unix, and
open hello.app
on Mac OS X. To terminate the program, click the close button in the window's title bar.
If you are using Windows and have installed the Qt Open Source Edition and the MinGW compiler, you will
have a shortcut to an MS-DOS Prompt window that has all the environment variables correctly set up for Qt. If
you start this window, you can compile Qt applications within it using
qmake
and
make
as described previously.
The executables produced are put in the application's
debug
or
release
folder (e.g.,
C:\examples\chap01
\hello\release\hello.exe
).
If you are using Microsoft Visual C++ with a commercial version of Qt, you will need to run
nmake
instead of
make
. Alternatively, you can create a Visual Studio project file from
hello.pro
by typing
qmake -tp vc hello.pro
and then build the program in Visual Studio. If you are using Xcode on Mac OS X, you can generate an Xcode
project using the command
qmake -spec macx-xcode hello.pro
Before we go on to the next example, let's have some fun: Replace the line
QLabel *label = new QLabel("Hello Qt!");
with
QLabel *label = new QLabel("<h2><i>Hello</i> "
"<font color=red>Qt!</font></h2>");
and rebuild the application. When run, it should look like Figure 1.2. As the example illustrates, it's easy to
brighten up a Qt application's user interface using some simple HTML
-
style formatting.
Page
5
of
132


评论3
最新资源