500行python代码写一个3D图像生成模型.pdf
版权申诉
199 浏览量
2023-02-11
09:58:25
上传
评论
收藏 1.08MB PDF 举报


2/11/23, 9:56 AM
500 Lines or Less | A 3D Modeller
https://aosabook.org/en/500L/a-3d-modeller.html
1/11
A 3D Modeller
Erick Dransch
Erick is a software developer and 2D and 3D computer graphics enthusiast. He has worked on video games, 3D special effects software, and computer aided design tools. If it involves simulating
reality, chances are he'd like to learn more about it. You can find him online at erickdransch.com.
Introduction
Humans are innately creative. We continuously design and build novel, useful, and interesting things. In modern times, we write software to assist in the design and creation process. Computer-
aided design (CAD) software allows creators to design buildings, bridges, video game art, film monsters, 3D printable objects, and many other things before building a physical version of the
design.
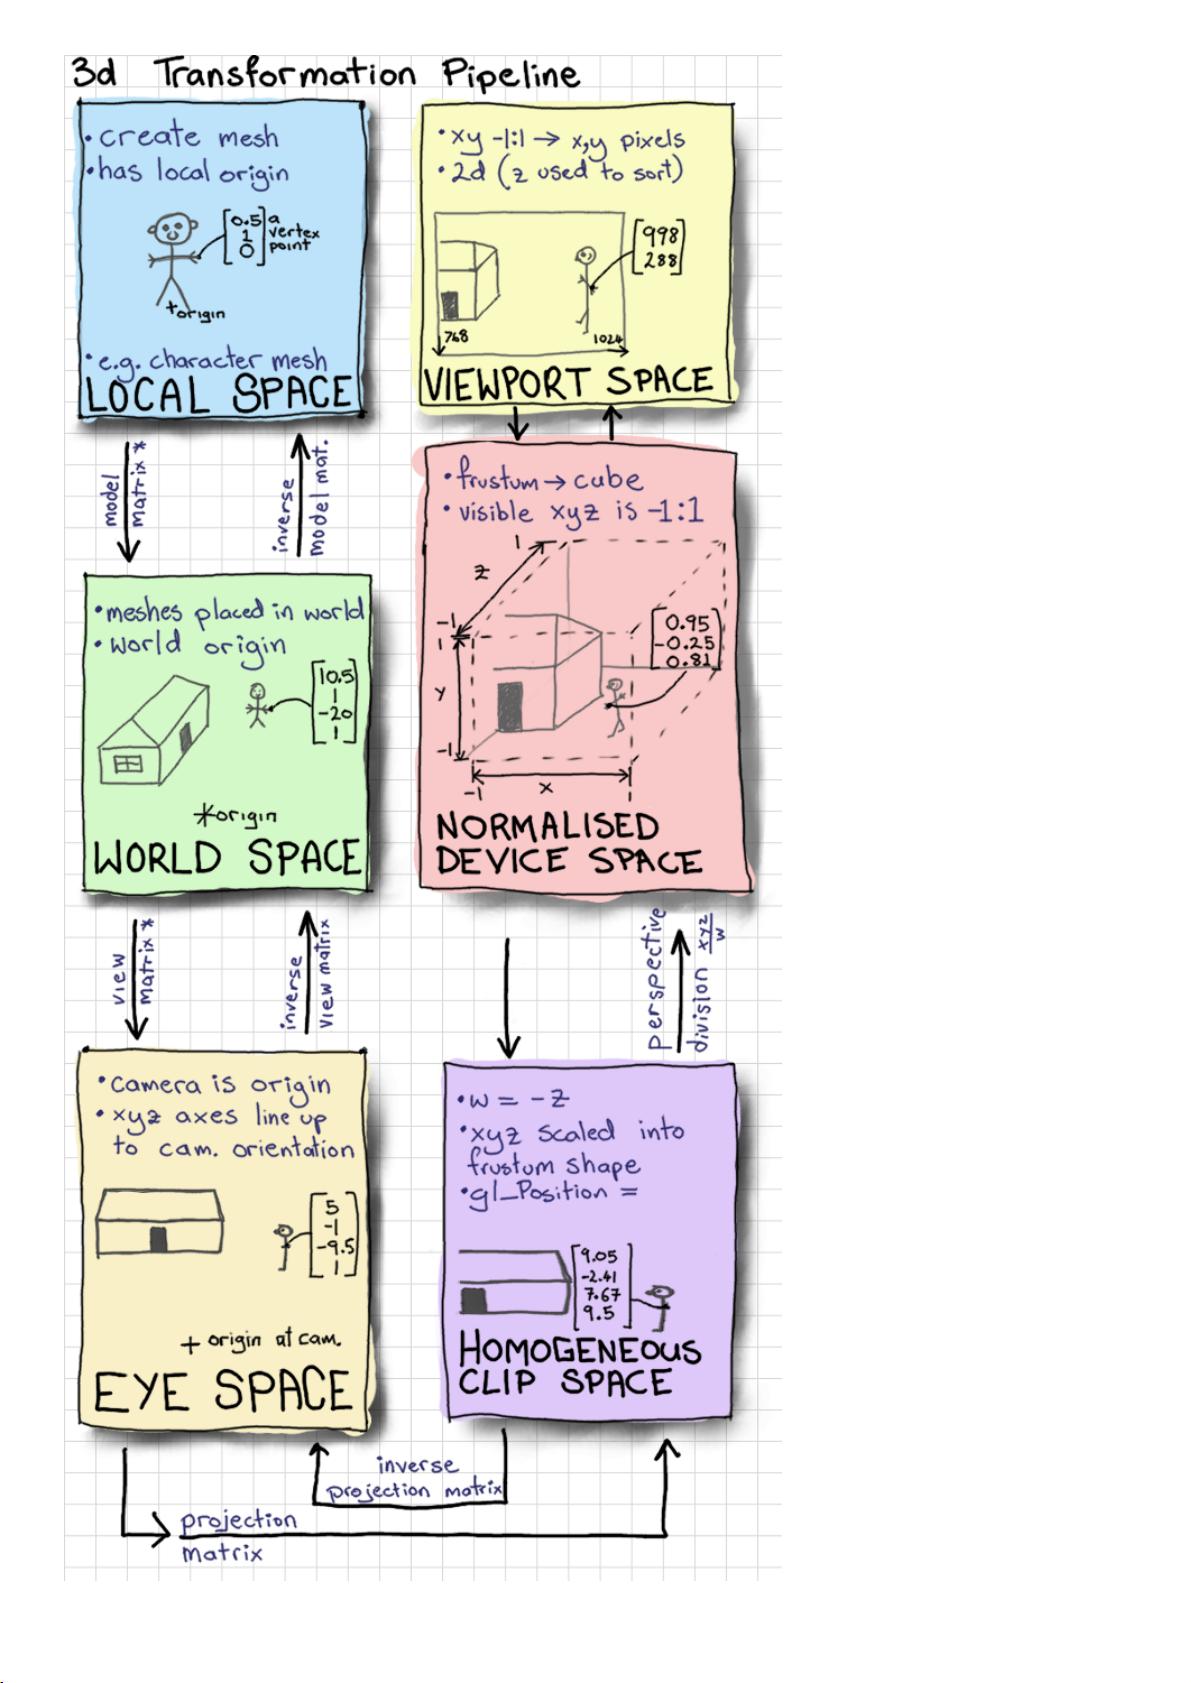
At their core, CAD tools are a method of abstracting the 3-dimensional design into something that can be viewed and edited on a 2-dimensional screen. To fulfill that definition, CAD tools must
offer three basic pieces of functionality. Firstly, they must have a data structure to represent the object that's being designed: this is the computer's understanding of the 3-dimensional world that the
user is building. Secondly, the CAD tool must offer some way to display the design on the user's screen. The user is designing a physical object with 3 dimensions, but the computer screen has only
2 dimensions. The CAD tool must model how we perceive objects, and draw them to the screen in a way that the user can understand all 3 dimensions of the object. Thirdly, the CAD tool must
offer a way to interact with the object being designed. The user must be able to add to and modify the design in order to produce the desired result. Additionally, all tools would need a way to save
and load designs from disk so that users can collaborate, share, and save their work.
A domain-specific CAD tool offers many additional features for the specific requirements of the domain. For example, an architecture CAD tool would offer physics simulations to test climate
stresses on the building, a 3D printing tool would have features that check whether the object is actually valid to print, an electrical CAD tool would simulate the physics of electricity running
through copper, and a film special effects suite would include features to accurately simulate pyrokinetics.
However, all CAD tools must include at least the three features discussed above: a data structure to represent the design, the ability to display it to the screen, and a method to interact with the
design.
With that in mind, let's explore how we can represent a 3D design, display it to the screen, and interact with it, in 500 lines of Python.
Rendering as a Guide
The driving force behind many of the design decisions in a 3D modeller is the rendering process. We want to be able to store and render complex objects in our design, but we want to keep the
complexity of the rendering code low. Let us examine the rendering process, and explore the data structure for the design that allows us to store and draw arbitarily complex objects with simple
rendering logic.
Managing Interfaces and the Main Loop
Before we begin rendering, there are a few things we need to set up. First, we need to create a window to display our design in. Secondly, we want to communicate with graphics drivers to render to
the screen. We would rather not communicate directly with graphics drivers, so we use a cross-platform abstraction layer called OpenGL, and a library called GLUT (the OpenGL Utility Toolkit) to
manage our window.
A Note About OpenGL
OpenGL is a graphical application programming interface for cross-platform development. It's the standard API for developing graphics applications across platforms. OpenGL has two major
variants: Legacy OpenGL and Modern OpenGL.
Rendering in OpenGL is based on polygons defined by vertices and normals. For example, to render one side of a cube, we specify the 4 vertices and the normal of the side.
Legacy OpenGL provides a "fixed function pipeline". By setting global variables, the programmer can enable and disable automated implementations of features such as lighting, coloring, face
culling, etc. OpenGL then automatically renders the scene with the enabled functionality. This functionality is deprecated.
Modern OpenGL, on the other hand, features a programmable rendering pipeline where the programmer writes small programs called "shaders" that run on dedicated graphics hardware (GPUs).
The programmable pipeline of Modern OpenGL has replaced Legacy OpenGL.
In this project, despite the fact that it is deprecated, we use Legacy OpenGL. The fixed functionality provided by Legacy OpenGL is very useful for keeping code size small. It reduces the amount
of linear algebra knowledge required, and it simplifies the code we will write.
About GLUT
GLUT, which is bundled with OpenGL, allows us to create operating system windows and to register user interface callbacks. This basic functionality is sufficient for our purposes. If we wanted a
more full-featured library for window management and user interaction, we would consider using a full windowing toolkit like GTK or Qt.
The Viewer
To manage the setting up of GLUT and OpenGL, and to drive the rest of the modeller, we create a class called Viewer. We use a single Viewer instance, which manages window creation and
rendering, and contains the main loop for our program. In the initialization process for Viewer, we create the GUI window and initialize OpenGL.
The function init_interface creates the window that the modeller will be rendered into and specifies the function to be called when the design needs to rendered. The init_opengl function sets up
the OpenGL state needed for the project. It sets the matrices, enables backface culling, registers a light to illuminate the scene, and tells OpenGL that we would like objects to be colored. The
init_scene function creates the Scene objects and places some initial nodes to get the user started. We will see more about the Scene data structure shortly. Finally, init_interaction registers
callbacks for user interaction, as we'll discuss later.
After initializing Viewer, we call glutMainLoop to transfer program execution to GLUT. This function never returns. The callbacks we have registered on GLUT events will be called when those
events occur.
class Viewer(object):
def __init__(self):
""" Initialize the viewer. """
self.init_interface()
self.init_opengl()
self.init_scene()
self.init_interaction()
init_primitives()
def init_interface(self):
""" initialize the window and register the render function """
glutInit()
glutInitWindowSize(640, 480)
glutCreateWindow("3D Modeller")
glutInitDisplayMode(GLUT_SINGLE | GLUT_RGB)
glutDisplayFunc(self.render)
def init_opengl(self):
""" initialize the opengl settings to render the scene """
self.inverseModelView = numpy.identity(4)
self.modelView = numpy.identity(4)
glEnable(GL_CULL_FACE)
glCullFace(GL_BACK)
glEnable(GL_DEPTH_TEST)
glDepthFunc(GL_LESS)
glEnable(GL_LIGHT0)
glLightfv(GL_LIGHT0, GL_POSITION, GLfloat_4(0, 0, 1, 0))

剩余10页未读,继续阅读
资源评论


小黑码蚁
- 粉丝: 2471
- 资源: 3557


最新资源
- 系统软件综合实训 - 银行家算法.zip
- 操作系统-银行家算法.zip
- 操作系统课程设计,包含进程调度模拟和银行家算法模拟.zip
- pot Windows屏幕文字识别插件
- 基于电影知识图谱和基于模板构建的问答系统python源码+项目说明+详细注释.zip
- 英特尔x86atom+ISL95837HRZ-T+RTL8111GS 电脑主板CADENCE原理图+PCB10层板文件
- 基于KNN+SVM+CNN+LSTM四种方法实现遥感图像识别python源码.zip
- 基于知识图谱和推荐系统的药物靶标相互作用预测python源码+运行说明.zip
- C#远程桌面实时监控(服务端+客户端)源码.zip
- 基于vgg网络和Resnet的白盒攻击pytorch实现项目源码.zip
资源上传下载、课程学习等过程中有任何疑问或建议,欢迎提出宝贵意见哦~我们会及时处理!
点击此处反馈


