没有合适的资源?快使用搜索试试~ 我知道了~
Ansible自动化运维参考实验手册-附带自动化部署zabbix和prometheus
需积分: 5 2 下载量 171 浏览量
2023-09-28
15:32:41
上传
评论
收藏 1.17MB PDF 举报
温馨提示
试读
100页
Ansible自动化运维参考实验手册-附带自动化部署zabbix和prometheus
资源推荐
资源详情
资源评论
Ansible自动化运维
1.自动化运维工具
1.chef
2.puppet
3.ansible
4.saltstack
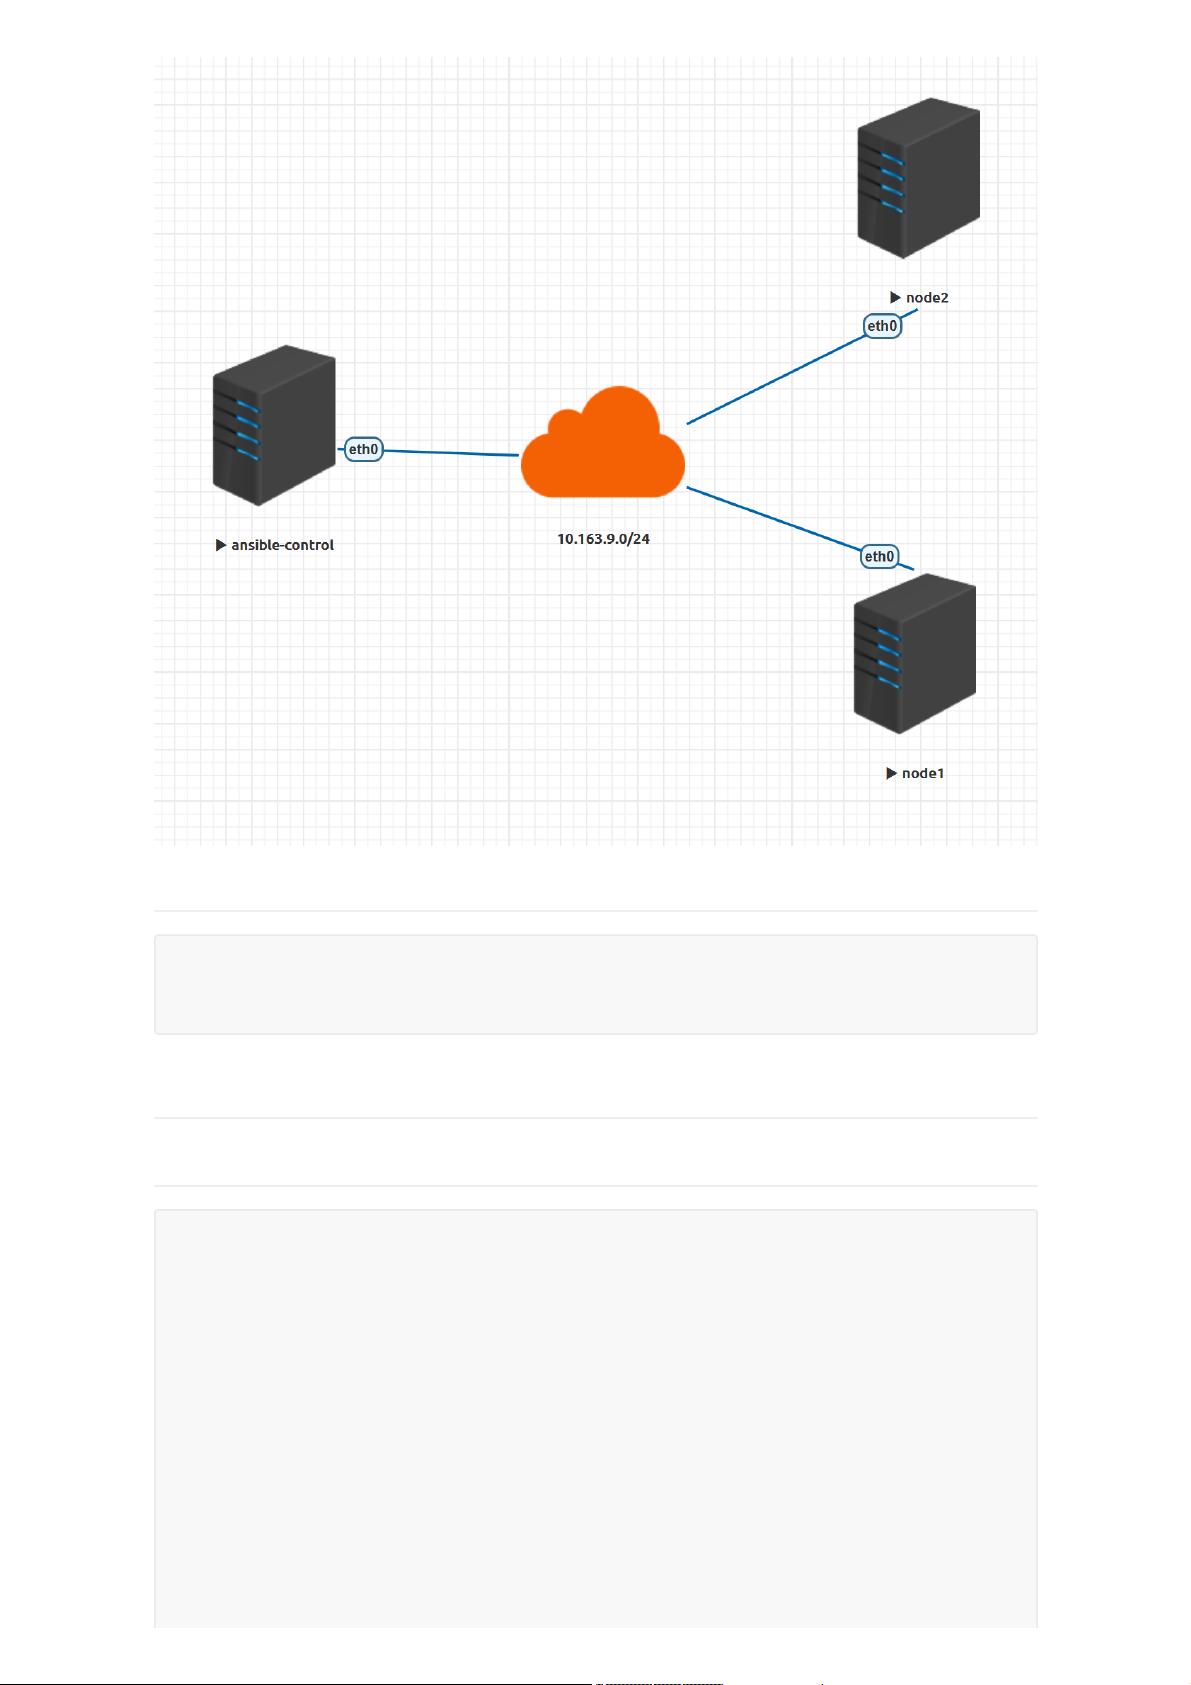
2.Ansible学习基础拓扑和ip design
1.拓扑
如果Ansible不采用0mq(ZeroMQ),在操作1000个以下的节点性能还可以,如果操作1000个以上的节点,性能就很
差。目前来说Ansible支持local,ssh,0mq。Ansible用ssh来管理被管理主机是最常见的方法。
saltstack简称salt,默认采用0mq(ZeroMQ),支持数万节点的操作。salt也支持salt-ssh,所谓salt-ssh也
是和ansible类似使用ssh来管理被管理主机。
2.ip design
3.控制节点Ansible安装
1.ansible安装
ansible-control:10.163.9.100/24
node1:10.163.9.101/24
node2:10.163.9.102/24
[root@eveng-home ~]# ssh 10.163.9.100
[root@localhost ~]# hostnamectl set-hostname control
[root@localhost ~]# exit
[root@eveng-home ~]# ssh 10.163.9.100
[root@control ~]#
[root@control ~]# rm -rf /etc/yum.repos.d/*
[root@control ~]# cat > /etc/yum.repos.d/repo.repo <<END
[baseos]
name=baseos
baseurl=https://mirrors.163.com/centos/8/BaseOS/x86_64/os/
gpgcheck=0
[appstream]
name=appstream
baseurl=https://mirrors.163.com/centos/8/AppStream/x86_64/os/
gpgcheck=0
2.ansible的安装文件的构成
4.Ansible的配置文件
1.配置文件的优先级
[epel]
name=epel
baseurl=https://mirrors.tuna.tsinghua.edu.cn/epel/8/Everything/x86_64/
gpgcheck=0
END
在CentOS8上Ansible的安装只需要集成epel源即可。
为了保证软件包下载的速度将baseos和appstream全都替换成国内的源
[root@control ~]# yum -y install ansible
[root@control ~]# ansible --version
ansible 2.9.13
config file = /etc/ansible/ansible.cfg
configured module search path = ['/root/.ansible/plugins/modules',
'/usr/share/ansible/plugins/modules']
ansible python module location = /usr/lib/python3.6/site-packages/ansible
executable location = /usr/bin/ansible
python version = 3.6.8 (default, May 21 2019, 23:51:36) [GCC 8.2.1 20180905 (Red Hat
8.2.1-3)]
1.使用命令查看ansible的安装文件
[root@control ~]# rpm -ql ansible
2.ansible的默认配置文件
[root@control ~]# ls /etc/ansible/ansible.cfg
/etc/ansible/ansible.cfg
3.ansible的python模块
[root@control ~]# ls /usr/lib/python3.6/site-packages/ansible
[root@control modules]# pwd
/usr/lib/python3.6/site-packages/ansible/modules
4.ansible的命令
[root@control ~]# rpm -ql ansible | grep -v 'python3.6' | grep -E 'man|share|etc' -v
/usr/bin/ansible
/usr/bin/ansible-config
/usr/bin/ansible-connection
/usr/bin/ansible-console
/usr/bin/ansible-doc
/usr/bin/ansible-galaxy
/usr/bin/ansible-inventory
/usr/bin/ansible-playbook
/usr/bin/ansible-pull
/usr/bin/ansible-test
/usr/bin/ansible-vault
2.配置文件的参数
Ansible的配置文件是有使用优先级
安装之后默认的配置文件是/etc/ansible/ansible.cfg
ansible配置文件的优先级如下:
①优先使用环境变量ANSIBLE_CONFIG指定的配置文件
②优先使用当前目录下的ansible.cfg配置文件
③优先使用当前用户家目录下的~/.ansible.cfg配置文件
④如果上面的配置文件都没有指定那么就会默认的全局配置文件/etc/ansible/ansible.cfg
通过ansible --version命令能知道当前正在使用哪个配置文件
1.刚安装结束之后,检查自己使用的配置文件
[root@control ~]# ansible --version
ansible 2.9.13
config file = /etc/ansible/ansible.cfg
2.用户家目录下的~/.ansible.cfg
[root@control ~]# touch ~/.ansible.cfg
[root@control ~]# ansible --version
ansible 2.9.13
config file = /root/.ansible.cfg
3.当前目录下的ansible.cfg
[root@control ~]# pwd
/root
[root@control ~]# touch ansible.cfg
[root@control ~]# ansible --version
ansible 2.9.13
config file = /root/ansible.cfg
4.ANSIBLE_CONFIG环境变量指定的ansible.cfg
[root@control ~]# touch /tmp/ansible.cfg
[root@control ~]# export ANSIBLE_CONFIG=/tmp/ansible.cfg
[root@control ~]# ansible --version
ansible 2.9.13
config file = /tmp/ansible.cfg
[root@control ~]# egrep -v '^#|^$' /etc/ansible/ansible.cfg
[defaults]
[inventory]
[privilege_escalation]
[paramiko_connection]
[ssh_connection]
[persistent_connection]
[accelerate]
[selinux]
[colors]
[diff]
每个方括号下的配置针对的是ansible的不同的配置,我们这里面最常用的配置部分就是[defaults]和
[privilege_escalation]
[defaults]是ansible的基础配置,包括远程连接被管理主机使用什么用户,远程连接被管理主机是否询问ssh密
码。Inventory文件的位置
一般来说我们的ansible远程执行可以使用root用户和普通用户两种,生产环境中为了保证安全,我们都会使用普通
用户来操作,但是普通用户要做对应的权限委派(修改/etc/sudoers)
3.配置文件用法生产环境举例
[privilege_escalation]这个部分表示的就是ansible在使用普通用户配置提权(提升权限)的部分,该部分常用
的参数
become表示提权
become_method表示提权方式
become_user表示提权到什么用户
become_ask_pass表示提权是否需要密码
1.一定要用过普通用户
[root@control ~]# useradd automan
[root@control ~]# su - automan
[automan@control ~]$ mkdir automation
[automan@control ~]$ cd automation/
[automan@control automation]$ touch ansible.cfg
[automan@control automation]$ which ansible
/usr/bin/ansible
[automan@control automation]$ pwd
/home/automan/automation
2.为什么要创建一个目录呢?
因为我们后面要做的ansible的配置文件就放在这个目录里面,包括我们后面用到的Inventory文件也要放在这个目
录里面,包括我们后面写的playbook,变量文件,task文件,ansible模板文件,我们都放在这个目录里面.
ansible.cfg
[automan@control automation]$ ansible --version
ansible 2.9.13
config file = /home/automan/automation/ansible.cfg
3.配置文件修改
[automan@control automation]$ cat ansible.cfg
[defaults]
remote_user=automan
[automan@control automation]$ cat hosts
10.163.1.101
10.163.1.102
4.ansible的执行
-i参数指定了Inventory
-m参数指定了module
在这里面我们使用了Inventory主机里面的10.163.9.101这个主机
在这里面我们使用了ping这个模块
(1)我们的运行遇到了第一个问题,ssh要求我们手工确认指纹,现在我们只是操作一个主机还好,如果是1000个主
机,难道我要yes一千次?为了让他能自动的接受被管理主机的指纹,我们需要进行ssh客户端配置文件的修改
[automan@control automation]$ ansible -i hosts 10.163.9.101 -m ping
The authenticity of host '10.163.9.101 (10.163.9.101)' can't be established.
ECDSA key fingerprint is SHA256:KVcOOEvIepa5pv2d5O7TQbwj2A3k1nppupCfKhyZIV4.
Are you sure you want to continue connecting (yes/no)?
root修改全局的ssh客户端配置文件,让其不进行指纹检查
[root@control ~]# sed -i 's/^#.*StrictHostKeyChecking.*/StrictHostKeyChecking no/'
/etc/ssh/ssh_config
[root@control ~]# egrep ^Stric /etc/ssh/ssh_config
StrictHostKeyChecking no
(2)run again
[automan@control automation]$ ansible -i hosts 10.163.9.101 -m ping
剩余99页未读,继续阅读
资源评论
shenpq2008
- 粉丝: 123
- 资源: 9
上传资源 快速赚钱
- 我的内容管理 展开
- 我的资源 快来上传第一个资源
- 我的收益 登录查看自己的收益
- 我的积分 登录查看自己的积分
- 我的C币 登录后查看C币余额
- 我的收藏
- 我的下载
- 下载帮助
最新资源
- 基于matlab实现对表面肌电信号进行归一化处理,并对归一化后的图形显示 .rar
- 基于matlab实现单级倒立摆的 T-S 模型 包括 LMI 程序源码
- 图书管理系统(struts+hibernate+spring+ext).rar
- 基于matlab实现此压缩包包含语音信号处理中的语音变声代码加音频.rar
- STM32使用PWM驱动舵机并通过OLED显示
- 基于matlab实现车辆路径规划;遗传算法;matlab代码.rar
- 图书管理系统(struts+hibernate+spring)130225.rar
- 基于matlab实现采用标量衍射理论,实现菲涅尔衍射和夫琅禾费衍射,对光波的波前传播和数字全息的应用有帮助.rar
- JavaScript版去除链表重复元素
- 微信小程序项目-功德木鱼(带设置面板-自定义文字、可选字体颜色、可选木鱼样式)
资源上传下载、课程学习等过程中有任何疑问或建议,欢迎提出宝贵意见哦~我们会及时处理!
点击此处反馈
安全验证
文档复制为VIP权益,开通VIP直接复制
信息提交成功