没有合适的资源?快使用搜索试试~ 我知道了~
Clarion歌乐VCZ625使用说明书.pdf
1.该资源内容由用户上传,如若侵权请联系客服进行举报
2.虚拟产品一经售出概不退款(资源遇到问题,请及时私信上传者)
版权申诉
0 下载量 126 浏览量
2023-02-11
08:52:14
上传
评论
收藏 881KB PDF 举报
温馨提示
试读
30页
歌乐设备说明书
资源推荐
资源详情
资源评论
Be sure to unfold and read the next page. / Veuillez déplier et vous référer à la page suivante.
/ Cerciórese de desplegar y de leer la página siguiente.
VCZ625 4VCZ625 38 VCZ625
2. PRECAUTIONS
1. When the inside of the car is very cold and
the player is used soon after switching on the
heater, moisture may form on the disc or the
optical parts of the player and proper play-
back may not be possible. If moisture forms
on the disc, wipe it off with a soft cloth. If mois-
ture forms on the optical parts of the player,
do not use the player for about one hour. The
condensation will disappear naturally allow-
ing normal operation.
2. Driving on extremely bumpy roads which
cause severe vibration may cause the sound
to skip.
3. This unit uses a precision mechanism. Even
in the event that trouble arises, never open
the case, disassemble the unit, or lubricate
the rotating parts.
!
WARNING
For your safety, the driver should not watch
the TV or operate the controls while driving.
Please note that watching and operating the
TV while driving are prohibited by law in
some countries. Also, while driving, keep the
volume to a level at which external sounds
can be heard.
This equipment has been tested and found
to comply with the limits for a Class B digi-
tal device, pursuant to Part 15 of the FCC
Rules. These limits are designed to provide
reasonable protection against harmful in-
terference in a residential installation. This
equipment generates, uses, and can radi-
ate radio frequency energy and, if not in-
stalled and used in accordance with the in-
structions, may cause harmful interference
to radio communications. However, there
is no guarantee that interference will not
occur in a particular installation. If this
equipment does cause harmful interfer-
ence to radio or television reception, which
can be determined by turning the equip-
ment off and on, the user is encouraged to
consult the dealer or an experienced radio/
TV technician for help.
INFORMATION FOR USERS:
CHANGES OR MODIFICATIONS TO THIS PRODUCT NOT APPROVED BY THE MANUFACTURER
WILL VOID THE WARRANTY AND WILL VIOLATE FCC APPROVAL.
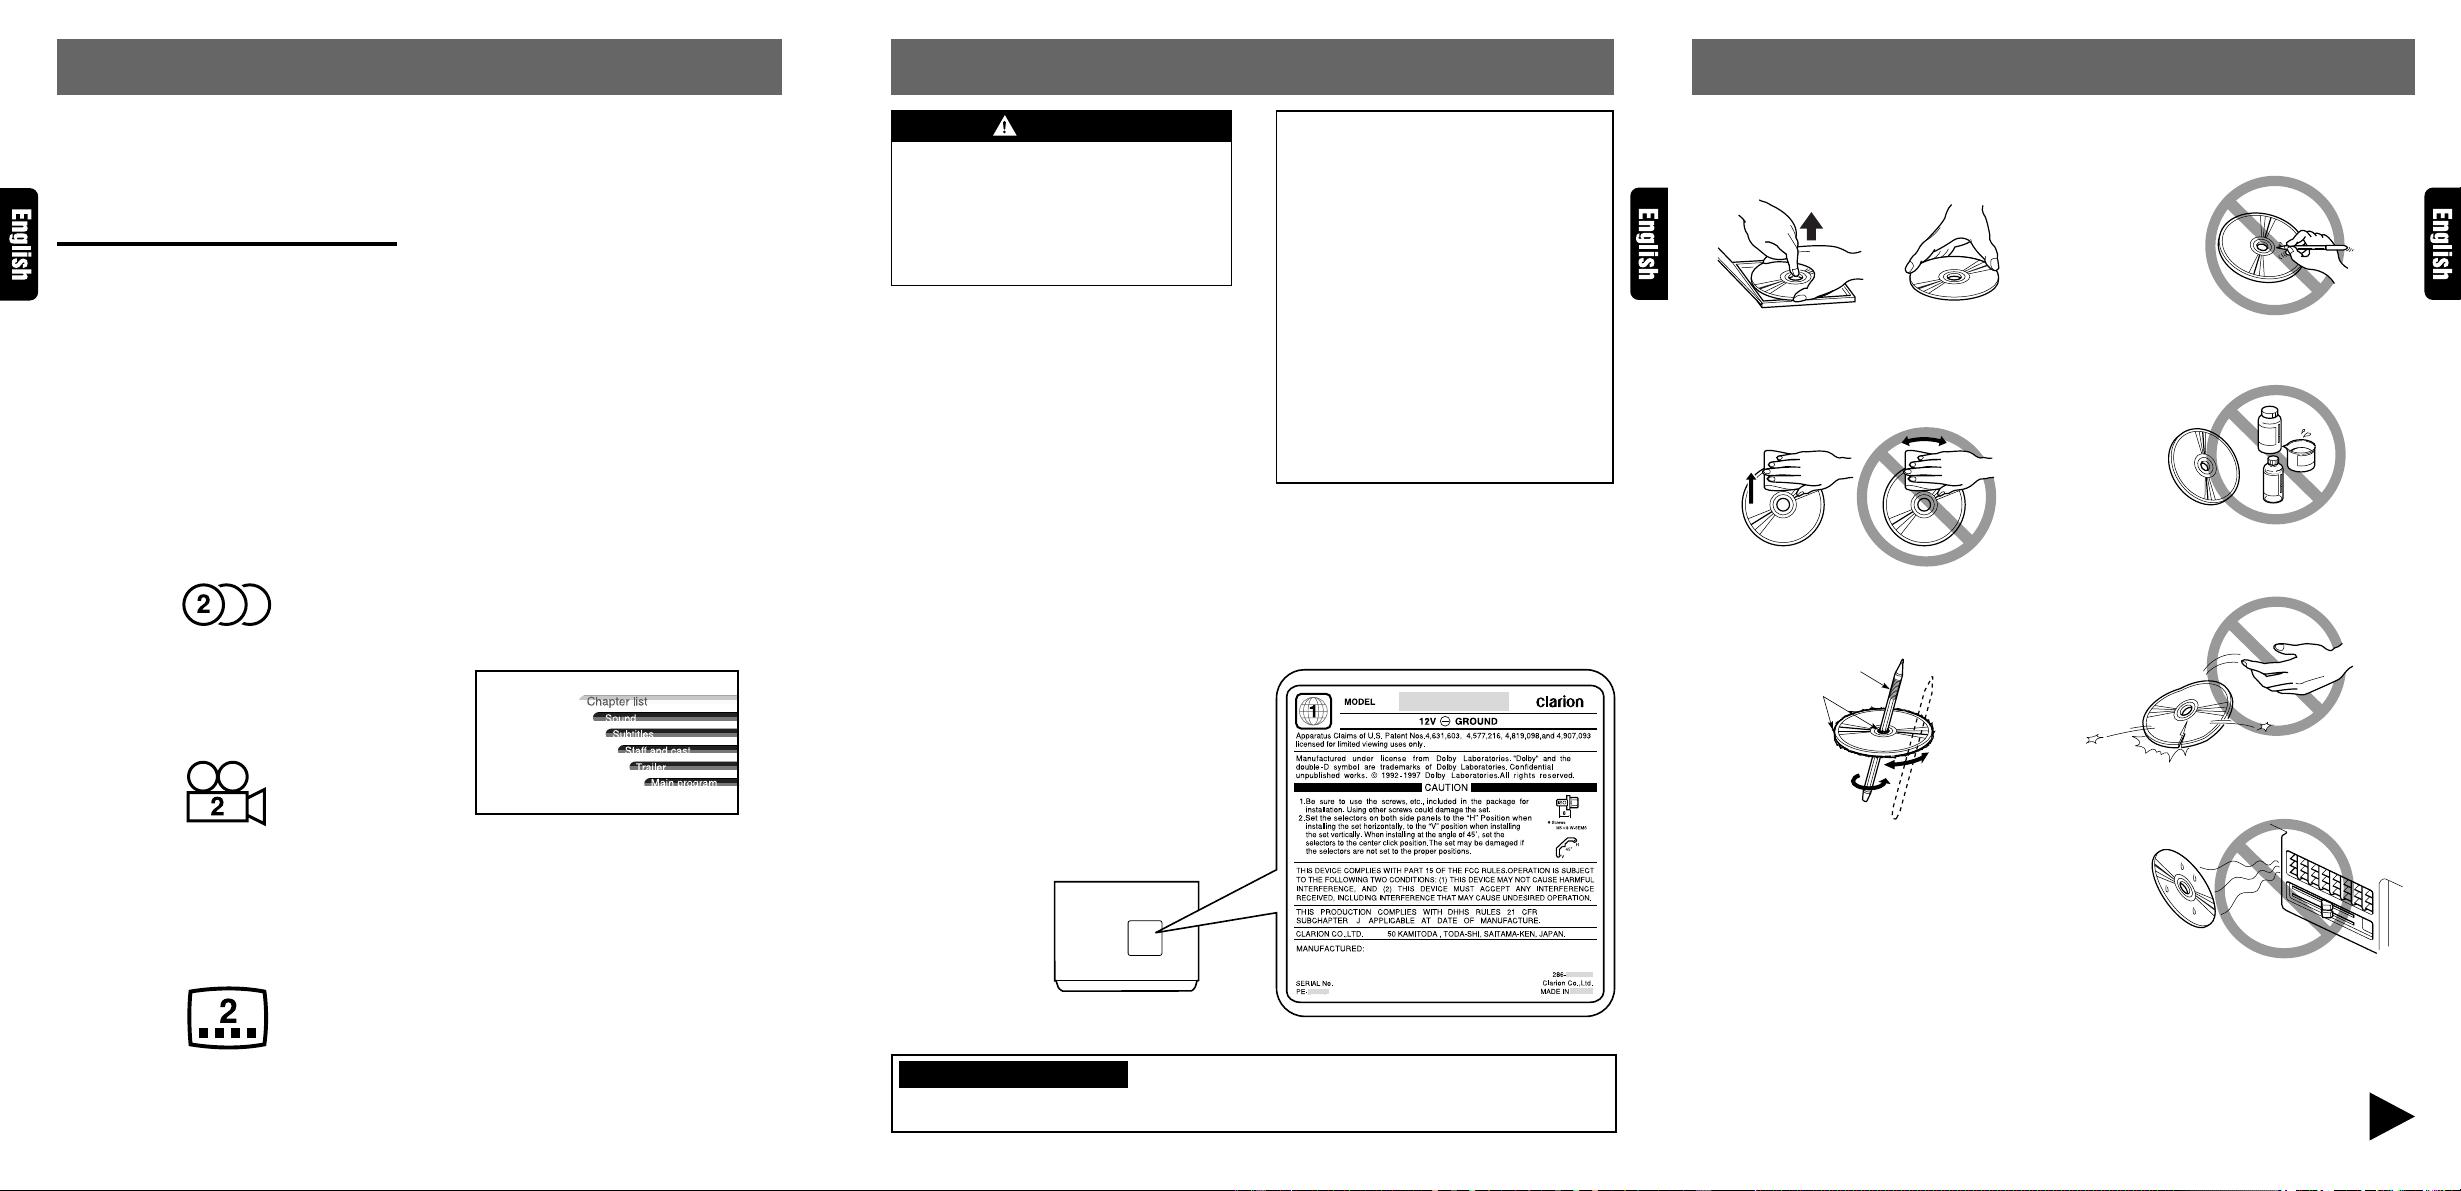
To remove the disc from its storage case, press
down on the centre of the case and lift the disc
out, holding it carefully by the edges.
Proper way to hold
the disc
Removing the disc
Always handle the disc by the edges. Never touch
the surface.
To remove fingermarks and dust, use a soft cloth,
and wipe in a straight line from the centre of the
disc to the circumference.
No
New discs may have some roughness around the
edges. The unit may not work or the sound may
skip if such discs are used. Use a ball-point pen,
etc. to remove roughness from the edge of the disc.
Ball-point pen
Roughness
Note on Discs
Never stick labels on the surface of the disc or
mark the surface with a pencil or pen.
No
Do not use any solvents such as commercially
available cleaners, anti-static spray, or thinner to
clean discs.
No
Do not use discs that have large scratches, are
misshapen, or cracked, etc. Use of such discs will
cause misoperation or damage.
No
Do not expose discs to direct sunlight or any heat
source.
No
Note:
• Do not use commercially available disc protection sheets or discs equipped with stabilizers, etc. These
may get caught in the internal mechanism and damage the disc.
3. HANDLING DISCS6. DVD VIDEO SYSTEM
DVD video is a high-quality digital video source
that provides crisp and clear images. One 12 cm
disc contains either one film or four hours of
music.
DVD Video Features
This unit provides the following functions in ad-
dition to the high image quality and sound qual-
ity of DVD video.
Notes:
• The functions described in the section, “Features”,
for example, the recorded language, subtitles,
angles, etc. differ with the DVD video disc. Refer
to the instructions provided with the DVD video.
• Some disc functions may operate differently than
described in this manual.
Multi-sound function
DVD video can store up to 8 languages for one
film; select the language of your preference.
• The languages stored on the disc are indicated by
the icon shown below.
Multi-angle function
A DVD video that is filmed from multiple angles
allows you to select the angle of choice.
• The number of recorded angles are indicated by
the icon shown below.
Subpicture (subtitles) function
A DVD video can record subtitles for up to 32
languages and you can select the language of
the subtitles you wish to see.
• The number of recorded subtitle languages are
indicated by the icon shown below.
Multi-story function
When a DVD video contains more than one story
for a film, you can select the story you wish to
enjoy. The operation procedures vary with the
disc; observe the instructions for selecting a story
provided during playback.
Dolby digital
Dolby digital enables up to 5.1 independent multi-
channel audio reproduction, the same type of
surround system that is also used in movie the-
aters.
DTS
DTS (Digital Theater System) is a sound system
that differs from the Dolby digital system. DTS
provides a larger amount of data than Dolby
digital enabling high-quality surround playback
and incorporates a DTS-CD software for music
like a DVD software allows 5.1 channel
independent multi-channel audio reproduction.
Menu screens
Menus can be called up during DVD video play-
back to perform menu setting.
• Example showing menu display
Main Menu
5 VCZ625 6 VCZ625 VCZ625 7
[FUNC/POWER] button
✱
(Used for CeNET only)
[NTSC/PAL] [BAND/DISC UP] button
✱
(Video output select button)
Used to switch among NTSC, PAL, and
MULTI by pressing the button for 1 second
or longer.
*When a disc is changed, initial setting is
returned.
[CeNET] switch (Mode select switch)
Set this switch to the left side for standalone
mode or right side for CeNET connection.
[MUTE] button
✱
Turns mute on and off.
[VOLUME] buttons
✱
Press “+” button to increase the volume.
Press “-” button to decrease the volume.
[P. TIME] button
Used to switch among play time displays.
[ ] button (STOP button)
Stops video and audio playback.
[ ] button (Play/pause button)
✱
Press this button to play or pause a disc
[ 0~9 ] buttons (Ten-key buttons)
Used to input numbers.
[DISC SEL] button
Used to change the disc.
Enter with this key and numeric keys.
[MENU] button
V-CD (with PBC): Displays the PBC menu.
MP3: Returns the cursor to the default
position and displays the track select screen.
DVD VIDEO: Displays the menu screen.
[RTN] button
Returns to the previous menu.
[ ] [ ] [ ] [ ] buttons (cursor buttons)
When selecting the menu items shown in the
monitor screen, use the cursor buttons to
move the cursor up and down, left and right.
[FUNC/POWER] button
[BAND/DISC UP] button
[MUTE] button
[VOLUME] button
[
] button
[SCAN] [PS/AS] button
[RPT] [AF] button
[RDM] [PTY] button
[ P.CH ] buttons
[ ] , [ ] buttons
Mode Switching/Power On/off
Band Switching/Disc up
Mute On/off
Volume Adjustment
Play/Pause
Auto Store/Preset Scan
Repeat/AF On/off
Random/PTY On/off
Search Up/Down
Fast Forward/Fast Rewind
5. COMPONENTS AND FUNCTIONS
CONTROLS / COMMANDES / CONTROLES
4. REMOTE CONTROL / TÉLÉCOMMANDE /
CONTROLADOR REMOTO
Source unit
Remote control receiver
[CeNET]
[MUTE]
[VOLUME]
[P.TIME]
[ ]
[ ]
[DISC SEL]
[0~9]
[FUNC/POWER]
[NTSC/PAL]
[BAND/DISC UP]
[SEARCH MODE]
[RTN]
[ ] [ ] [ ] [ ]
[ENT]
[SET UP]
[ P.CH ]
[SCAN] [PS/AS]
[RPT] [AF]
[AUDIO]
[SUB TITLE]
[MENU]
[TITLE]
[ ] [ ]
[PBC]
[RDM] [PTY]
[SLOW]
[ANGLE]
Open slide lever
Magazine insertion slot
[EJECT] button
*Ejects the magazine.
DISC indicator
Lights on in red for DVD-Video discs
Lights on in green for CD/V-CDs and MP3
Reset button
Used to reset the unit.
[POWER] button
Turns on/off the unit while in standalone mode.
Receiver for
remote control unit
✱
When the unit is connected to the center unit and the [CeNET] switch is set to the CeNET position,
some functions of the center unit can be controlled from this unit.
● When the power source is turned on, the
illumination lights.
When the power source and the ACC are
turned off, the illumination lights for a while.
Remote control unit
[ENT] button
Press this button to enter the setup item.
[TITLE] button
DVD VIDEO: Displays the title screen.
[SET UP] button
Displays the setup screen of the unit.
[ P.CH ] buttons
✱
Used to search for a scene or track.
[ ] [ ] buttons (Fast forward and Fast
rewind buttons)
✱
While the button is kept pressed, fast
forward/fast rewind is performed.
[SCAN] [PS/AS] button
✱
Turns on/off scan playback.
[RPT] [AF] button
✱
Turns on/off repeat playback.
[RDM] [PTY] button
✱
Turns on/off random playback.
[PBC] button
Turns on/off the playback control (PBC)
function for V-CDs equipped with it
[AUDIO] button
DVD VIDEO: Switches among languages for
audio (for DVDs with two or more
languages).
V-CD: Switches among audio output
methods.
[SUB TITLE] button
Switches among languages for the subtitle.
[ANGLE] button
Switches among angles while in DVD
playback.
(This button is available only on multiple
angles DVDs.)
[SLOW] button
While the button is kept pressed, slow play
is performed.
[SEARCH MODE] button
After this button is pressed, enter numbers
using Ten-key buttons.
DVD VIDEO: Performs searching with a title/
chapter number.
MP3: FOLDER/TRACK number.
V-CD (key inputs are accepted only when
the PBC is turned off.): TRACK number
CD: TRACK number.
([FNC] button)
([BND] button)
([MUTE] button)
([ROTARY] Knob)
([
] button)
([SC] button)
([RP] button)
([RD] button)
([
] , [ ] buttons)
(Press and hold the [ ] , [ ]
buttons for 1 second or longer)
Operating button
• For a detailed information, refer to the Owner’s Manual provided with the center unit.
Function
VCZ625 9
Playable discs
This DVD video player can play the following
discs.
Playable disc
DVD video discs
Audio CDs
video CDs
R
Note:
• When you play a CD Extra disc, only the first
session will be recognizesd.
About CD Extra discs
A CD Extra disc is a disc in which a total of two
sessions have been recorded. The first session
is Audio session and the sedond session Data
sessioin.
Your personally-created CDs with more than 2
data sessions recorded cannot be played on this
DVD video player.
About playing a CD-R/CD-RW disc
This player can play CD-R/CD-RW discs
previously recorded in music CD format or video
CD format.
Discs that cannot be played back
This DVD video player cannot play back DVD-R,
DVD-RAM, Photo CDs, etc.
Notes:
• It may also not be possible to play back CDs
recorded on a CD-R unit and CD-RW unit.
(Cause: disc characteristics, cracks, dust/dirt,
dust/dirt on playerís lens, etc.)
• If a CD-R or CD-RW disc that has not been
finalized is played, it will take a long time to
start playing. Also, it may not be possible to
play depending on its recording conditions.
Discs
Note on region numbers
The DVD video system assigns a region number
to DVD video players and DVD discs by sales
area. DVD video players sold in the United States
can play back DVD discs with the region number
“ALL”, “1” or any combination of numbers that also
incorporate a “1”.
The DVD video region number is marked on the
disc jacket as shown below.
ALL
1
4
6
1
NTSC NTSC
NTSC
TV color system
This DVD player plays NTSC discs and PAL discs
only and cannot be used for playback of SECAM
discs.
About MP3 playback
This unit can play back CD-R/CD-RW discs on
which MP3 music data have been recorded.
For a detailed information, see the page entitled
“Listening to an MP3”
Auto disc change
This unit auto disc changes only audio CDs.
For example:
If an audio CD is loaded in the DISC 1 slot, a DVD
disc in the DISC 2 slot and an audio CD in the DISC
3 slot, disc change is performed shown below.
DISC 1
DISC 2
DISC 3
10 VCZ625
• This product incorporates copyright protection
technology that is protected by method claims
of certain U.S. patents and other intellectual
property rights owned by Macrovision
Corporation and other rights owners. Use of this
copyright protection tecnology must be
authorized by Macrovision Corporation, and is
intended for home and other limited viewing
uses only unless otherwise authorized by
Macrovision Corporation. Reverse engineering
or disassembly is prohibited.
Notes:
Using batteries improperly can cause them to ex-
plode. Take note of the following points:
• When replacing batteries, replace both batteries
with new ones.
• Do not short-circuit, disassemble or heat batter-
ies.
• Do not dispose of batteries into fire or flames.
• Dispose of spent batteries properly.
Replacing the batteries
1. Open the rear battery cover.
Rear cover
2. Insert the two supplied size AA batteries ori-
enting the plus and minus poles of the batter-
ies as shown by the and symbols inside
the battery compartment. Close the battery
cover.
Remote control
• Manufactured under license from Dolby Labo-
ratories.
“Dolby” and the duble-D symbol are trademarks
of Dolby Laboratories. Confidential Unpublished
Works.©1992-1997 Dolby Laboratories,Inc. All
rights reserved.
• Manufactured under license from Digital Theater
Systems, Inc. US Pat. No. 5,451,942, 5,956,674,
5,974,380, 5,978,762 and other world-wide
patents issued and pending.
About the registered marks etc.
Signal transmitter
Operating range
: 30˚ in all directions
VCZ625 11
7. PREPARATION (Setting a Disc)
Inserting the disc
1. Put your finger on the disc holder release knob
and draw out the disc holder.
2. Insert a disc into the concave portion of the
disc holder with its label side (printed side with
a title, etc.) facing up.
3. Press in on the disc holder until it locks
securely into the magazine. After loading a
disc, make sure that it is correctly loaded.
CAUTION
Look through the magazine opening and
check whether or not the disc is tilted.
If the disc holder does not slide in fully, or
slides with difficulty, it is possible that the disc
is not correctly loaded. Reload in such cases.
Setting a disc into the magazine
CAUTION
Pulling strongly on the disc holder may cause
it to come out of the magazine. In such cases,
press in on the disc holder tabs and re-insert
into the magazine. Be sure that the disc holder
is correctly inserted.
Extracting the disc
Take out the disc after pulling out the disc holder.
Note:
• When taking out the disc do not let your fingers
touch the signal side of the disc.
■
Setting the Magazine into the Unit
Inserting the Magazine
1. Slide the open slide lever to right (to open the
front door).
2. When using the unit in a vertical position, open
the front door completely by hand.
Magazine
Disc holder
Release
knob
Lever
Release
knob
Magazine
Disc Holder
Label side
剩余29页未读,继续阅读
资源评论
qingguo1979
- 粉丝: 28
- 资源: 7300
上传资源 快速赚钱
- 我的内容管理 展开
- 我的资源 快来上传第一个资源
- 我的收益 登录查看自己的收益
- 我的积分 登录查看自己的积分
- 我的C币 登录后查看C币余额
- 我的收藏
- 我的下载
- 下载帮助
最新资源
- 教学内容及补充-cha7.rar
- 设计1.ms14
- vscode-1.64.1.tar源码文件
- vscode-1.64.0.tar源码文件
- vscode-1.52.0.tar源码文件
- Music-Player +PlayerActivity+ rockplayer+ SeeJoPlayer 播放器JAVA源码
- vscode-1.46.0.tar源码文件
- 最近很火植物大战僵尸杂交版2.08苹果+安卓+PC+防闪退工具V2+修改工具+高清工具+通关存档整合包更新
- 超级好用的截图工具PixPin,可录制Gif图
- Screenshot_2024-05-21-17-06-42-64_2332cb9b27b851b548ba47a91682926c.jpg
资源上传下载、课程学习等过程中有任何疑问或建议,欢迎提出宝贵意见哦~我们会及时处理!
点击此处反馈
安全验证
文档复制为VIP权益,开通VIP直接复制
信息提交成功