没有合适的资源?快使用搜索试试~ 我知道了~
Novation诺维逊 MiniNova 英文说明书.pdf
1.该资源内容由用户上传,如若侵权请联系客服进行举报
2.虚拟产品一经售出概不退款(资源遇到问题,请及时私信上传者)
2.虚拟产品一经售出概不退款(资源遇到问题,请及时私信上传者)
版权申诉
0 下载量 51 浏览量
2022-07-09
14:07:50
上传
评论
收藏 10.48MB PDF 举报
温馨提示

试读
39页
Novation诺维逊 MiniNova 英文说明书.pdf
资源推荐
资源详情
资源评论

1
USE R GUIDE
Version 1.01
2
Novation
A division of Focusrite Audio Engineering Ltd.
Windsor House,
Turnpike Road,
Cressex Business Park,
High Wycombe,
Bucks,
HP12 3FX.
United Kingdom
Tel: +44 1494 462246
Fax: +44 1494 459920
e-mail: sales@novationmusic.com
Web: novationmusic.com
Trademarks
The Novation trademark is owned by Focusrite Audio Engineering Ltd. All other brand,
product and company names and any other registered names or trademarks mentioned in
this manual belong to their respective owners.
Disclaimer
Novation has taken all possible steps to ensure the information given here is both correct
and complete. In no event can Novation accept any liability or responsibility for any loss or
damage to the owner of the equipment, any third party, or any equipment which may result
from use of this manual or the equipment which it describes. The information provided
in this document may be modified at any time without prior warning. Specifications and
appearance may differ from those listed and illustrated.
IMPORTANT SAFETY
INSTRUCTIONS
1. Read these instructions.
2. Keep these instructions.
3. Heed all warnings.
4. Follow all instructions.
5. Clean only with dry cloth.
6. Do not install near any heat sources such as radiators, heat registers, stoves, or other
apparatus (including amplifiers) that produce heat.
7. Do not defeat the safety purpose of the polarized or grounding-type plug. A polarized
plug has two blades with one wider than the other. A grounding type plug has two blades
and a third grounding prong. The wide blade or the third prong are provided for your safety.
If the provided plug does not fit into your outlet, consult an electrician for replacement of
the obsolete outlet.
8. Protect the power cord from being walked on or pinched particularly at plugs,
convenience receptacles, and the point where they exit from the apparatus.
9. Only use attachments/accessories specified by the manufacturer.
10. Use only with the cart, stand, tripod, bracket, or table specified by the manufacturer, or
sold with the apparatus. When a cart is used, use caution when moving the cart/apparatus
combination to avoid injury from tip-over.
11. Unplug this apparatus during lightning storms or when unused for long periods of time.
12. Refer all servicing to qualified service personnel. Servicing is required when the
apparatus has been damaged in any way, such as power-supply cord or plug is damaged,
liquid has been spilled or objects have fallen into the apparatus, the apparatus has been
exposed to rain or moisture, does not operate normally, or has been dropped.
No naked flames, such as lighted candles, should be placed on the apparatus.
WARNING: Excessive sound pressure levels from earphones and headphones can cause
hearing loss.
WARNING: This equipment must only be connected to USB 1.1 or 2.0 type ports.
ENVIRONMENTAL DECLARATION
This device complies with part 15 of the FCC Rules. Operation is subject to the following
two conditions: (1) This device may not cause harmful interference, and (2) this device
must accept any interference received, including interference that may cause undesired
operation.
For USA
To the User:
1. Do not modify this unit! This product, when installed as indicated in the instructions
contained in this manual, meets FCC requirements. Modifications not expressly approved
by Novation may void your authority, granted by the FCC, to use this product.
2. Important: This product satisfies FCC regulations when high quality shielded cables
are used to connect with other equipment. Failure to use high quality shielded cables or
to follow the installation instructions within this manual may cause magnetic interference
with appliances such as radios and televisions and void your FCC authorization to use this
product in the USA.
3. Note: This equipment has been tested and found to comply with the limits for a Class
B digital device, pursuant to part 15 of the FCC Rules. These limits are designed to
provide reasonable protection against harmful interference in a residential installation.
This equipment generates, uses and can radiate radio frequency energy and, if not
installed and used in accordance with the instructions, may cause harmful interference
to radio communications. However, there is no guarantee that interference will not occur
in a particular installation. If this equipment does cause harmful interference to radio
or television reception, which can be determined by turning the equipment off and on,
the user is encouraged to try to correct the interference by one or more of the following
measures:
• Reorient or relocate the receiving antenna.
• Increase the separation between the equipment and receiver.
• Connect the equipment into an outlet on a circuit different from that to which the receiver
is connected.
• Consult the dealer or an experienced radio/TV technician for help.
For Canada
To the User:
This Class B digital apparatus complies with Canadian ICES-003
Cet appareil numérique de la classe B est conforme à la norme NMB-003 du Canada.
CAUTION:
The normal operation of this product may be affected by a strong electrostatic discharge
(ESD). In the event of this happening, simply reset the unit by powering off and on again.
Normal operation should return.
COPYRIGHT AND LEGAL NOTICES
Novation is a registered trademark of Focusrite Audio Engineering Limited.
MiniNova is a trademark of Focusrite Audio Engineering Limited.
VST is a trademark of Steinberg Media Technologies GmbH.
Audio Units (AU) is a trademark of Apple, Inc.
RTAS is a trademark of Avid, Inc.
2012 © Focusrite Audio Engineering Limited. All rights reserved.
Compliance Information Statement: Declaration of Compliance procedure
Product Identification: Novation MiniNova
Responsible party: American Music & Sound
Address: 4325 Executive Drive
Suite 300
Southhaven, MS 38672
Telephone: (800) 431-2609
RoHS Notice
Focusrite Audio Engineering Limited has conformed and this product conforms, where
applicable, to the European Union’s Directive 2002/95/EC on Restrictions of Hazardous
Substances (RoHS) as well as the following sections of California law which refer to
RoHS, namely sections 25214.10, 25214.10.2, and 58012, Health and Safety Code;
Section 42475.2, Public Resources Code.
FA0743-02

3
CONTENTS
INTRODUCTION ............................................4
Key Features: ...............................................4
About this manual ..........................................4
What’s in the box? ..........................................4
Registering your MiniNova .................................................. 4
Power requirements ....................................................... 4
Hardware Overview .........................................5
Top view – controls ........................................................ 5
Rear view – connections ................................................... 6
Getting Started .............................................6
Standalone and computer operation – a foreword .............................. 6
Standalone operation – audio and MIDI connections ........... 6
Using headphones ........................................................ 7
A word about Menu Navigation ............................... 7
Scrolling through Patches .................................................. 7
Searching through Types or Genres. . . . . . . . . . . . . . . . . . . . . . . . . . . . . . . . . . . . . . . . . . 7
Using the FAVORITE button to load Patches .................................. 7
Assigning a Patch to a Pad ................................................. 7
Loading a Patch from a Pad ................................................. 7
Demo Mode .............................................................. 7
Modifying Sounds - using the performance controls ...........7
Parameter Controls ........................................................ 7
Rows 1 and 2 – Tweak and (FX) Tweak controls ............................ 8
Rows 3 to 6 – Fixed Tweak controls ...................................... 8
The Filter knob ............................................................ 8
Using the Pads as performance controls ...................................... 8
The Arpeggiator ........................................................... 8
The Vocoder .............................................................. 8
Pitch and Mod wheels ..................................................... 8
Octave Shift .............................................................. 9
Storing a Patch ........................................................... 9
Updating the MiniNova’s Operating System ................................... 9
Synthesis Tutorial ...........................................9
Synth Menus – Reference section ...........................13
Top Menu: Audio In ....................................................... 13
Top Menu: Global ........................................................ 13
Top Menu: Arp ........................................................... 14
Top Menu: Chord .........................................................15
Top Menu: Edit ........................................................... 15
Edit menu - Submenu 1: Tweaks ........................................15
Edit menu - Submenu 2: Osc ...........................................15
Per-Oscillator parameters ..............................................15
Common Oscillator parameters .........................................16
Edit menu - Submenu 3: Mixer .......................................... 17
Edit menu - Submenu 4: Filter .......................................... 17
Per-Filter parameters ..................................................18
Common Filter parameters ............................................. 18
Edit menu - Submenu 5: Voice ..........................................20
Edit menu - Submenu 6: Env ............................................21
Amplitude Envelope ...................................................21
What is Legato? ......................................................22
Common Envelope Parameter ..........................................23
Filter Envelope. . . . . . . . . . . . . . . . . . . . . . . . . . . . . . . . . . . . . . . . . . . . . . . . . . . . . . . . 23
Envelopes 3 to 6 ...................................................... 24
Edit menu - Submenu 7: LFO ...........................................25
Edit menu - Submenu 8: ModMatrx ......................................26
Edit menu - Submenu 9: Effects. . . . . . . . . . . . . . . . . . . . . . . . . . . . . . . . . . . . . . . . . 27
EQ Menu ............................................................29
Compressor Menu ....................................................29
Distortion Menu ......................................................30
Delay Menu ..........................................................30
Reverb Menu .........................................................30
Chorus Menu .........................................................31
Gator Menu ..........................................................31
Edit menu -Submenu 10: VoxTune .......................................32
Edit menu - Submenu 11: Vocoder ......................................33
Submenu: Vocoder ...................................................33
Top Menu: Dump .........................................................34
Waveform Table ..........................................................35
Sync Values Table ....................................................35
LFO Waveforms Table .................................................36
Modulation Matrix Sources Table ......................................36
Modulation Matrix Destinations Table ..................................37
Tweak Parameters Table ..............................................37
Filter Table ...........................................................39
Arp Mode Table ......................................................39
Gator Modes Table ...................................................39
Effects Type Table ....................................................39
Firmware updates ..........................................39
4
INTRODUCTION
Thank you for purchasing the MiniNova synthesiser. The MiniNova is a powerful compact
digital synthesiser equally at home in live performance or a recording environment.
NOTE: The MiniNova is capable of generating audio with a large dynamic range, the
extremes of which can cause damage to loudspeakers or other components, and also to
your hearing!
KEY FEATURES:
• Full polyphony, with up to 18 voices
• Classic analogue synth waveforms
• 36 wavetables
• 14 filter types
• Built-in digital FX section with compression, panning, EQ, reverb, delay, distor-
tion, chorus and gator effects
• Four assignable rotary controls for immediate access to up to 24 primary sonic
parameters
• 8 performance pads for arpeggiator control and adding expression while playing
• 12-band Vocoder with dynamic gooseneck microphone (supplied)
• VocalTune processor
• 37-note velocity-sensitive keyboard
• MIDI input and output
• LCD display
The following features are available in addition to the appropriate MiniNova/Novation
software (downloadable):
• MiniNova Editor (VST™, AU™, RTAS™ plug-in) for DAW
• Mac/Windows-based librarian software for management of patches
ABOUT THIS MANUAL
We don’t know whether you’ve got years of experience with electronic keyboards, or if this
is your first synth. In all probability, you’re somewhere between the two. So we’ve tried to
make this manual as helpful as possible for all types of user, and this inevitably means more
experienced users will want to skip over certain parts of it, while relative novices will want
to avoid certain parts of it until they’re confident they’ve mastered the basics.
However, there are a few general points useful to know about before you continue reading
this manual. We’ve adopted some graphical conventions within the text, which we hope all
types of user will find helpful in navigating through the information to find what they need to
know quickly:
Abbreviations, conventions, etc.
As the four rotary controls in the PERFORM area of the control panel are referred to
throughout the manual, we’ve abbreviated them to RCn, where n is a number between 1
and 4, referring to the control in question.
Where top panel controls or rear panel connectors are referred to, we’ve used a number
thus: [x] to cross-reference to the top panel diagram, and thus: {x} to cross-reference to the
rear panel diagram. (See page 5 and page 6 )
We’ve used BOLD CAPS to name top panel controls or rear panel connectors. We’ve
used LCD dot-matrix text to denote text which appears on the LCD at the
beginning of each parameter description and within the parameter tables, but Bold to
indicate this text within the main manual paragraphs.
Tips
These do what it says on the tin: we include bits of advice, relevant to the topic
being discussed that should simplify setting up the MiniNova to do what you want.
It’s not mandatory you follow them, but generally they should make life easier.
Extra Info
These are additions to the text of interest to the more advanced user and can
generally be avoided by the novice. They are intended to provide a clarification or
explanation of a particular area of operation.
Performance Parameter
P
MiniNova has a fantastic degree of flexibility in tailoring sounds, as you will see in
the second part of this manual where each individual parameter available in the
menu system is described. However, to avoid navigating menus during live
performance, the most useful and commonly-needed parameters are immediately available
for adjustment by the four rotary controls in the PERFORM area of the control panel. We
have clearly indicated these parameters within the parameter descriptions.
WHAT’S IN THE BOX?
The MiniNova has been carefully packed in the factory and the packaging was designed to
withstand rough handling. Should the unit appear to have been damaged in transit, do not
discard any of the packing material and notify your music dealer.
Save all the packing materials for future use if you ever need to ship the unit again.
Please check the list below against the contents of the packaging. If any items are missing
or damaged, contact the Novation dealer or distributor where you purchased the unit.
• MiniNova synthesiser
• Gooseneck microphone
• DC power supply unit (PSU)
• USB cable
• Software download card
Registering your MiniNova
You can register your MiniNova online using the registration card. You will then be able to
download the additional software you are entitled to as a MiniNova purchaser.
Power requirements
The MiniNova is shipped with a 9 V DC, 900 mA power supply. The centre pin of the
coaxial connector is the positive (+ve) side of the supply. The MiniNova can either be
powered by this AC-to-DC mains adaptor, or by the USB connection to a computer. To
obtain the best possible audio performance from the MiniNova we recommend using the
supplied adaptor.
There are two versions of the PSU, your MiniNova will be supplied with the one appropriate
to your country. The PSU comes with detachable adaptors; use the one that fits your
country’s AC outlets. When powering the MiniNova from the mains PSU, please ensure
your local AC supply is within the range of voltages required by the adaptor – i.e., 100 to
240 VAC - BEFORE you plug it into the mains.
We recommend you only use the supplied PSU. Failure to do so will invalidate your
warranty. Power supplies for your Novation product can be purchased form your music
dealer if you have lost yours.
If you power the MiniNova via the USB connection you should be aware that
although the USB specification agreed by the IT industry states a USB port should
be able to supply 0.5 A at 5 V, some computers - particularly laptops – are unable
to supply this current. When powering the MiniNova from a laptop’s USB port, it is strongly
recommended that the laptop is powered from AC mains rather than its internal battery.
5
HARDWARE OVERVIEW
12
3
45 6
7
8
9
10
15
16
17
18
21
22
23
24
11
12
13
14
20
19
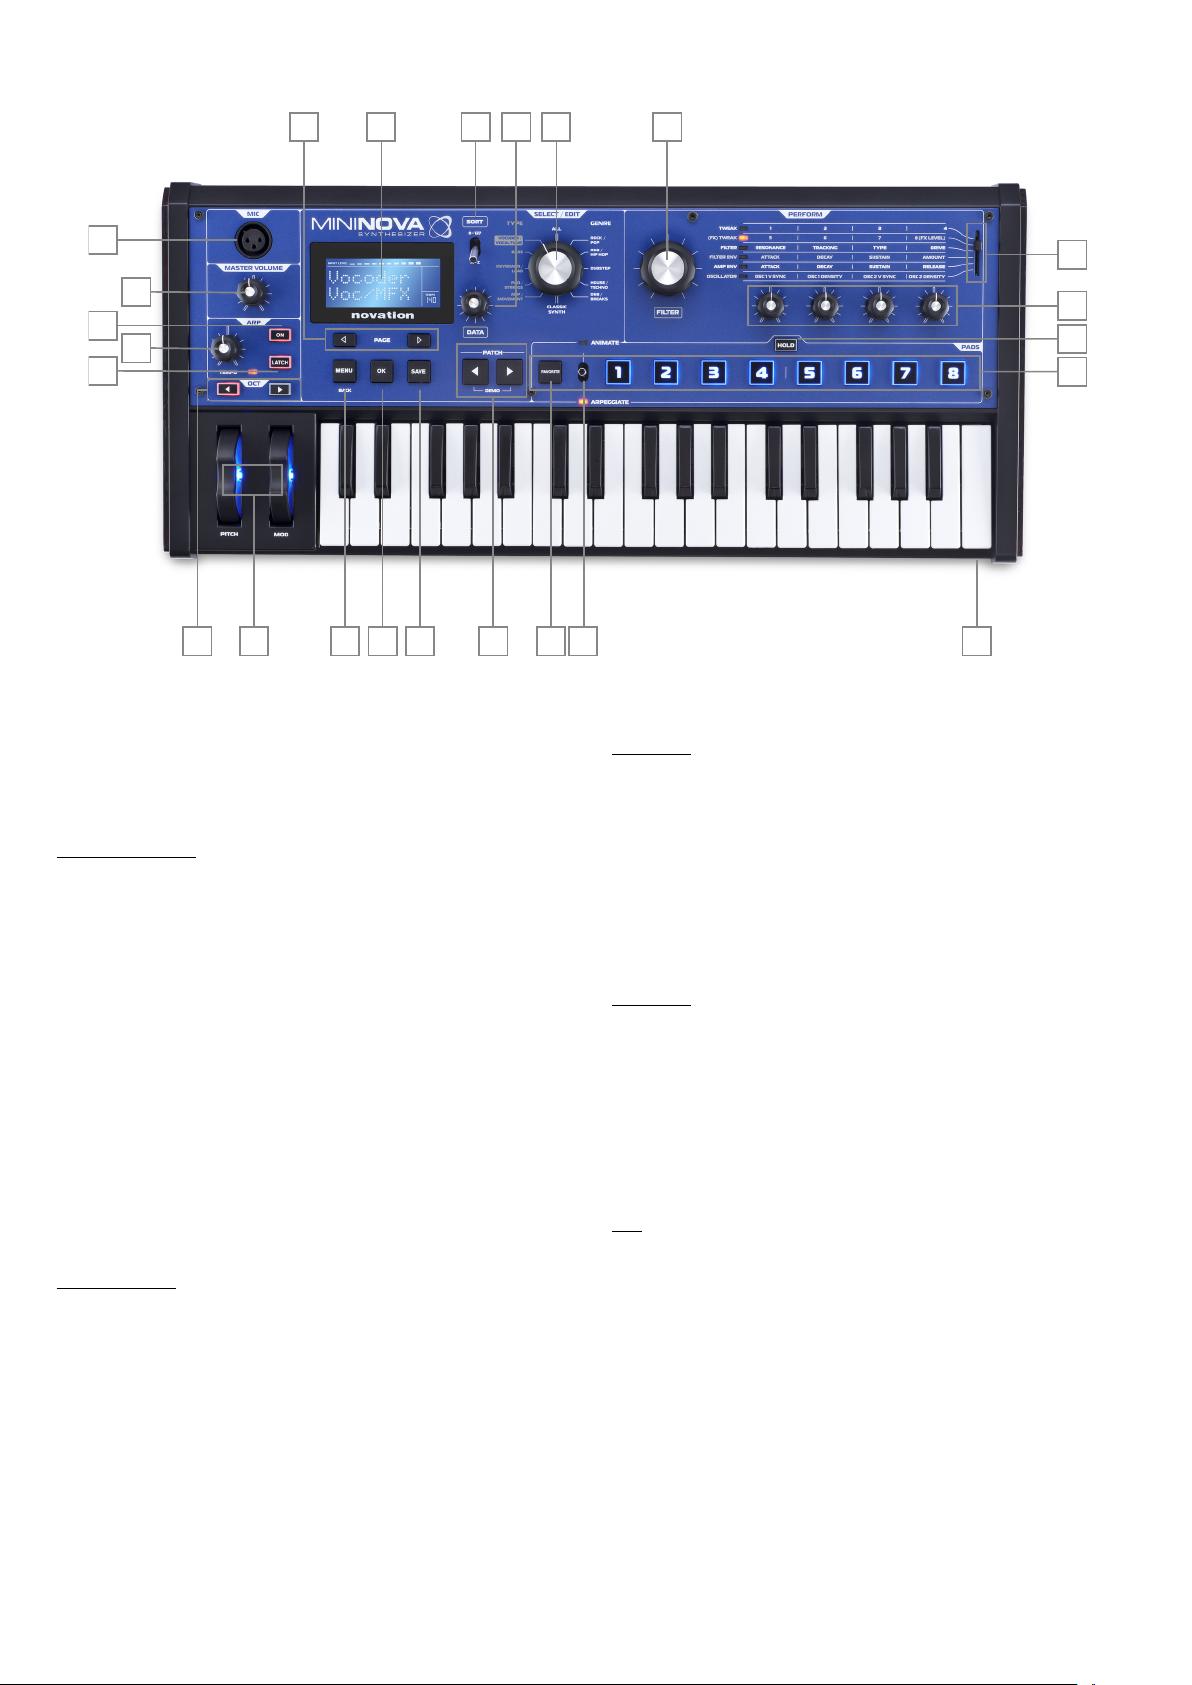
Top view – controls
1. 37-note (3 octaves) keyboard with velocity sensing.
2. PITCH and MOD wheels: The PITCH wheel will return to the centre position
when released.
SELECT/EDIT section
3. Custom 2-row x 8-character LCD dot matrix display for patch selection and
menu access. The LCD also has a bargraph meter showing audio input signal
level, tempo indication in BPM and other status information.
4. TYPE/GENRE selector: Use this to select a subset of available patches.
5. SORT switch: allows you to order your set of patches by patch number or
alphabetically by name.
6. DATA detented rotary control: Used in patch selection, and to alter parameter
values within menus.
7. PAGE I and H buttons: these are used to step forwards and backwards
between menu pages.
8. MENU/BACK button: Press to enter menu system; within the menu system,
pressing again will jump back to the previous menu level. A ‘long’ press (> 1
sec) will exit the menu system entirely.
9. OK button: Used within the menu system for navigation (goes to next menu
level), and to confirm data entry.
10. SAVE button: Used to save alterations to patches.
11. Patch I and H : dedicated buttons to scroll through the currently available
patches. Pressing both buttons simultaneously for at least one second enters
DEMO mode.
PERFORM section
12. Rotary controls: 4 rotary “Tweak” controls for parameter adjustment. The
function of each control is determined by the setting of the PERFORM ROW
selector [13]. (Use of a rotary control in the manual text is indicated by ‘RCn’,
where n is the number of the control; e.g., ‘RC1’ refers to rotary control 1).
13. Perform Row selector: This 6-way switch determines the functions of the
four rotary controls [12]. An LED indicates the currently selected row, and the
parameters then available for adjustment are printed on the MiniNova’s top
panel. Moving the switch allows you to select any row of the table printed on
the panel. The first two rows assign the Tweak controls to parameters which
have been factory-selected by the Novation programming team for each Patch,
giving you immediate access to the most useful and striking sonic variations.
14. FILTER: this is a large rotary control intended to aid more expressive
performance when playing live. It always adjusts Filter 1’s cut-off frequency.
PAD section
15. PADS 1 to 8: a set of eight backlit, multicolour, pressure-sensitive pads,
which may be used in two primary ways – Animate or Arpeggiate. Additionally,
in conjunction with the FAVORITE button [17], they may be used as “Quick
Load” buttons to recall preferred patches.
16. ANIMATE/ARPEGGIATE switch: A 2-position switch (spring-loaded to
return-to-centre), which assigns the pads [15] to act as Animate controls or
Arpeggiator pads.
17. FAVORITE button: used to store and recall preferred patches in conjunction
with the eight pads [15].
18. HOLD button: modifies the action of a pad [15] in Animate mode by “locking”
it in an “On” state.
ARP section
19. ON: backlit button to switch the Arpeggiator on and off. When selected ‘On’,
the eight pads [15] enter Arpeggiator mode and the Arpeggiator LED in the
Pads section illuminates.
20. LATCH button: applies the Arpeggiator effect to the last note(s) played
continuously, until a subsequent key is pressed. LATCH can be pre-selected
so it is effective as soon as the Arpeggiator is enabled.
21. TEMPO control: sets the tempo of the Arpeggiator pattern being played. An
adjacent LED blinks to give a visual indication of the tempo, and the actual
BPM value is displayed on the LCD.
Misc
22. Dynamic Mic Input: an XLR socket for the connection of the supplied
gooseneck microphone, or alternative dynamic microphone (i.e., a mic not
requiring phantom power to operate). The mic can be used with the MiniNova’s
vocoder and VocalTune features, or routed to the audio outputs. This input is
overridden when a jack plug is plugged in to EXT IN {8} on the rear panel.
23. MASTER VOLUME: the level control for the main audio outputs and the
headphone output.
24. OCTAVE + and – buttons: these transpose the keyboard up or down one
octave each time they are pressed. Associated multicolour LEDs confirm a
transposition has been applied.
剩余38页未读,继续阅读
资源评论


qingguo1979
- 粉丝: 28
- 资源: 7298
上传资源 快速赚钱
 我的内容管理
展开
我的内容管理
展开
- 我的资源
快来上传第一个资源
 我的收益 登录查看自己的收益
 我的积分
登录查看自己的积分
我的积分
登录查看自己的积分
 我的C币
登录后查看C币余额
我的C币
登录后查看C币余额
 我的收藏
我的收藏  我的下载
我的下载  下载帮助
下载帮助

 前往需求广场,查看用户热搜

安全验证
文档复制为VIP权益,开通VIP直接复制
 信息提交成功