没有合适的资源?快使用搜索试试~ 我知道了~
Novation诺维逊 Remote LE用户说明书.pdf
1.该资源内容由用户上传,如若侵权请联系客服进行举报
2.虚拟产品一经售出概不退款(资源遇到问题,请及时私信上传者)
版权申诉
0 下载量 123 浏览量
2022-07-09
14:04:24
上传
评论
收藏 923KB PDF 举报
温馨提示
试读
25页
Novation诺维逊 Remote LE用户说明书.pdf
资源推荐
资源详情
资源评论
ReMOTE LE
user guide
handbuch
manuel d'utilisation
manuale utente
guía del usario
Novation Digital Music Systems Ltd.
Lincoln Road, Cressex Business Park
High Wycombe, Bucks, HP12 3FX, England
Tel: +44 (0)1494 462246
Fax: +44 (0)1494 459920
Email: sales@novationmusic.com
www.novationmusic.com
C
M
Y
CM
MY
CY
CMY
K
cover copy.pdf 14/3/05 3:21:30 pmcover copy.pdf 14/3/05 3:21:30 pm
1
Contents
Introduction.......................................................................................1
Using this manual.........................................................................1
Main features ................................................................................2
Conventions used in this manual.............................................2
Quick Start Guide............................................................................3
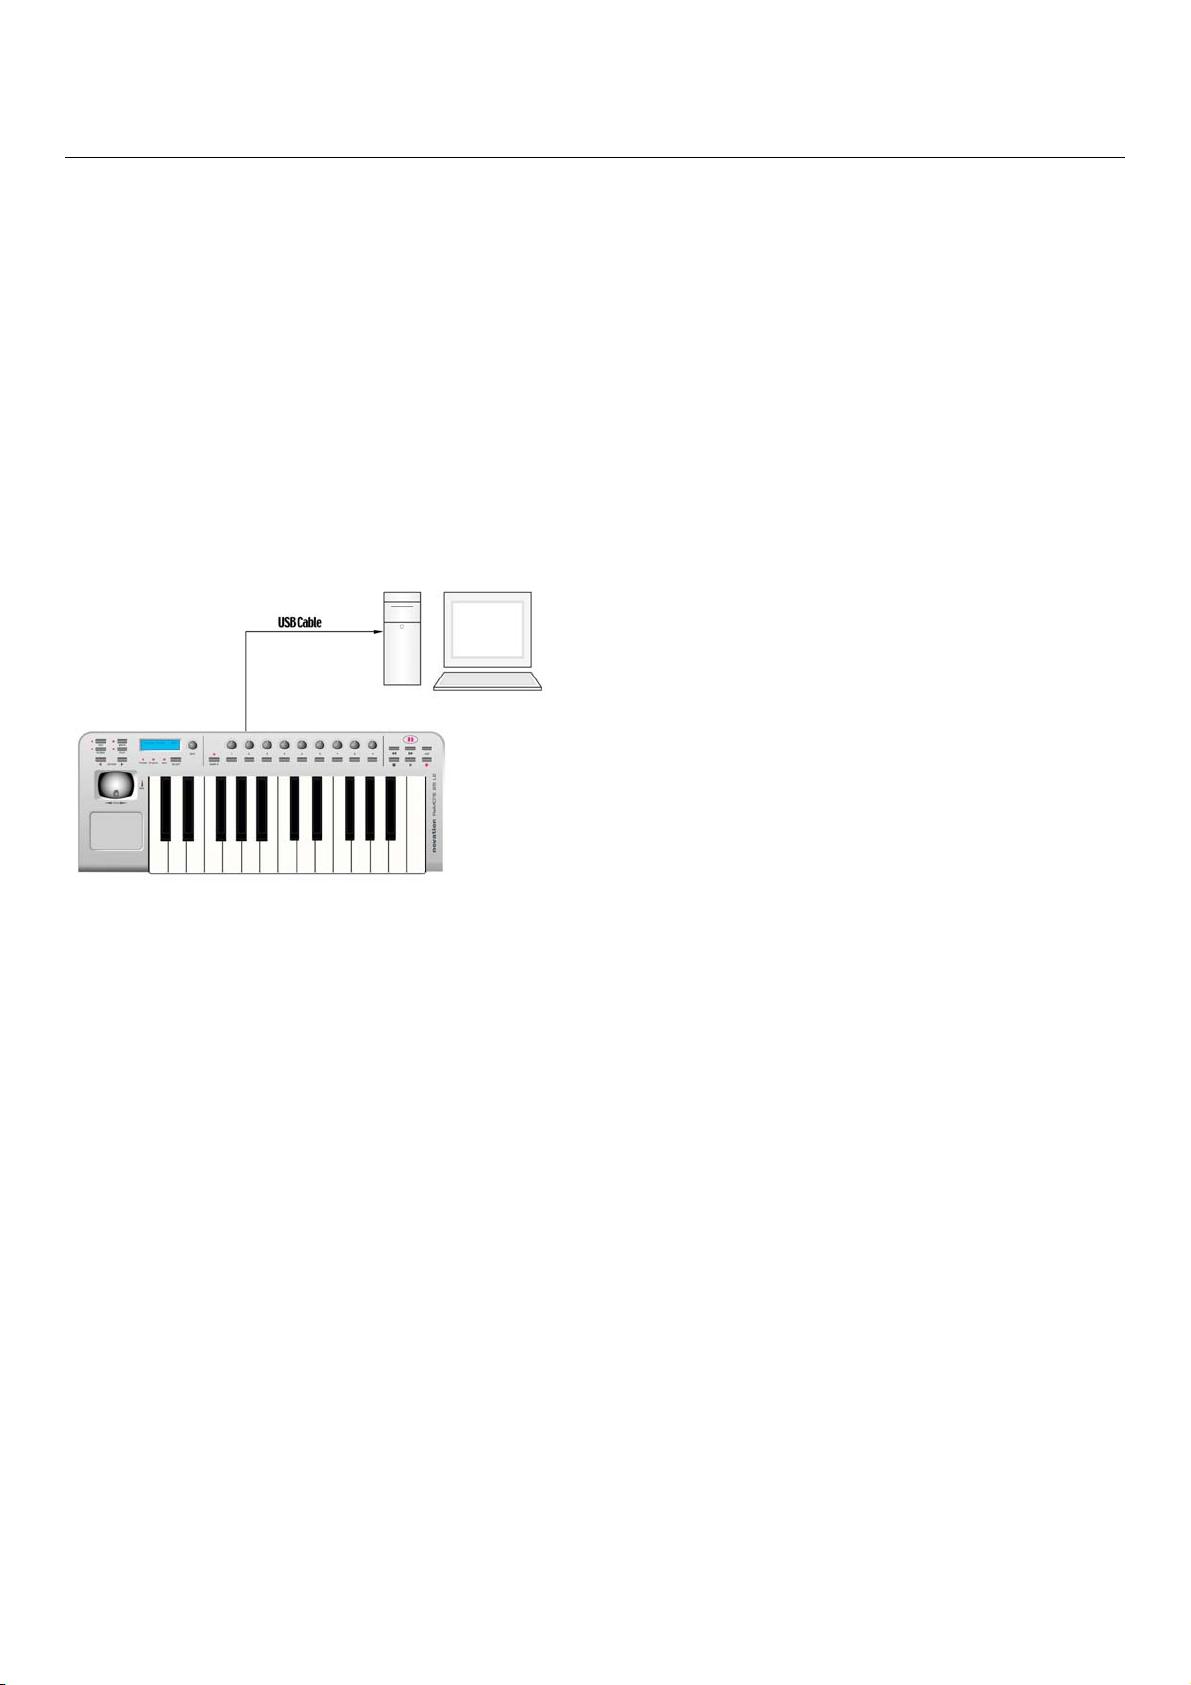
Connecting the ReMOTE LE....................................................3
Connecting to a computer using the USB Port...................3
Driver Installation........................................................................3
Playing and controlling software synthesizers from the
ReMOTE LE ..................................................................................3
Controlling a sequencer ............................................................4
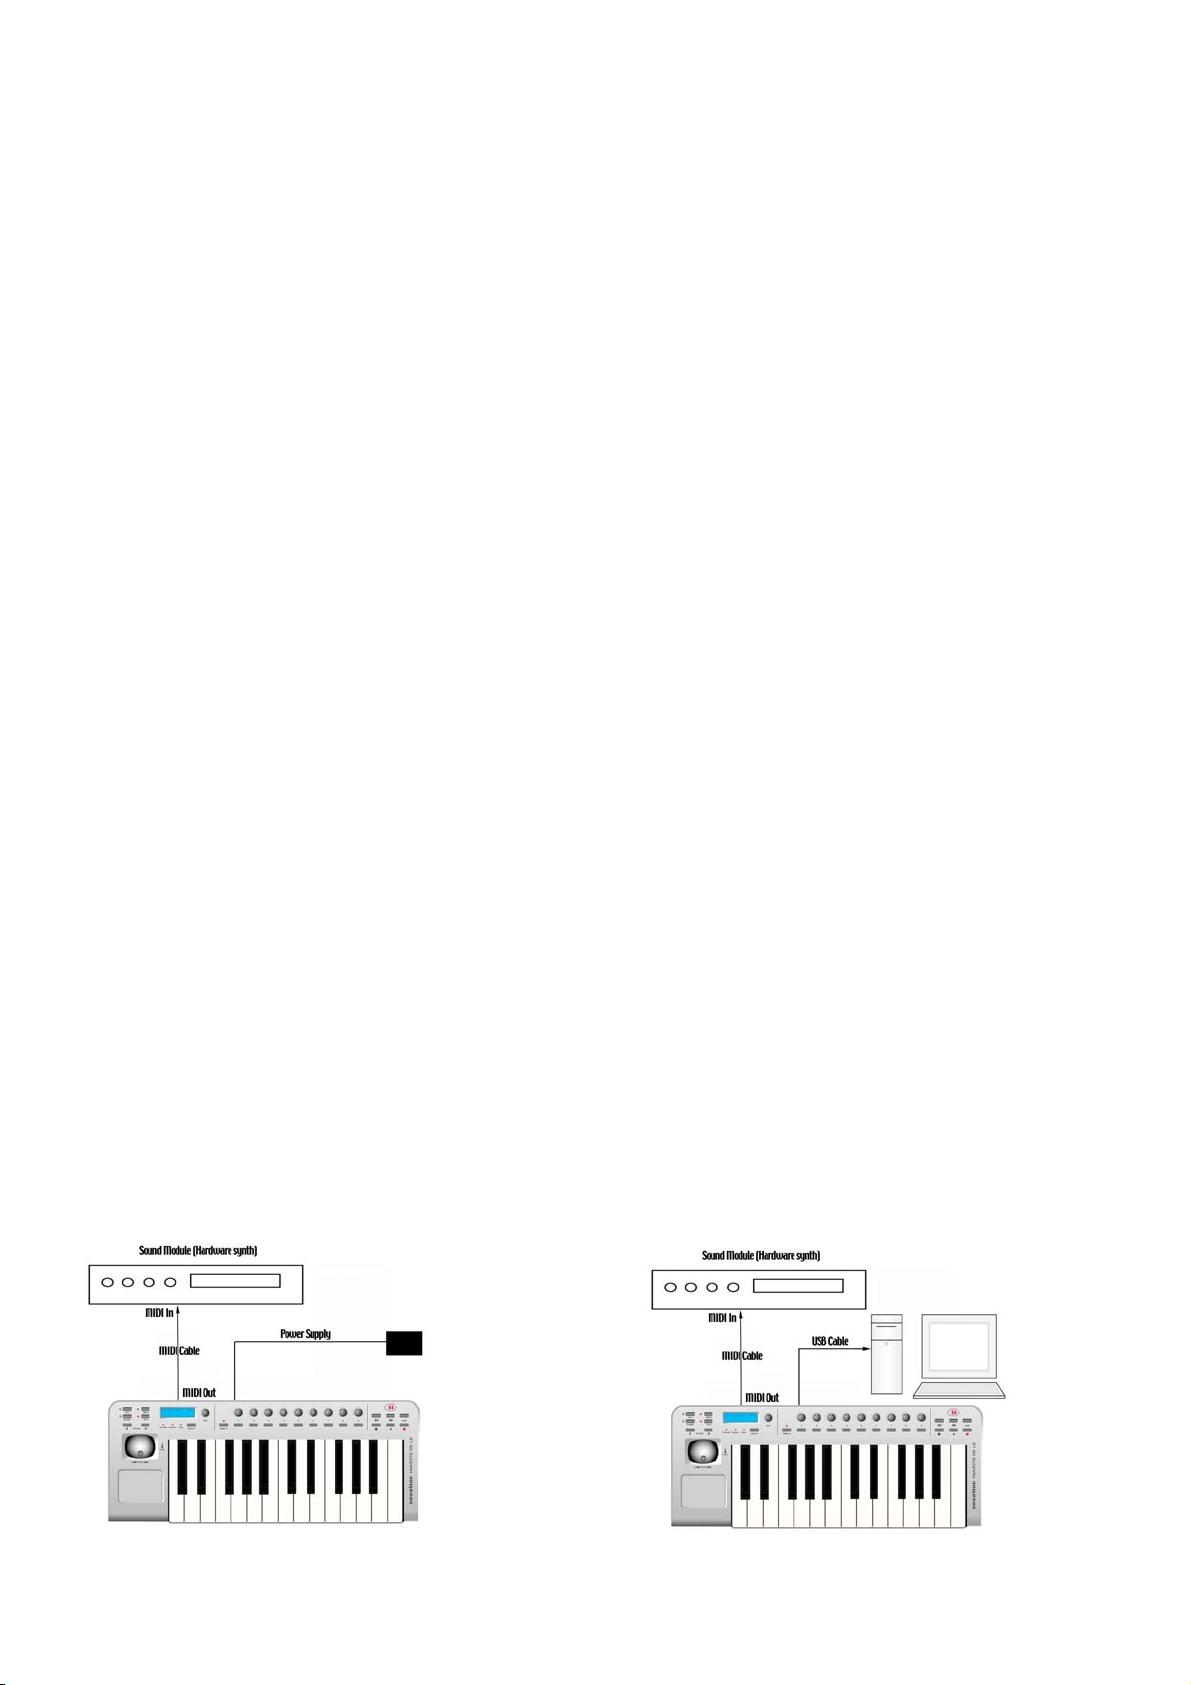
Power supply or battery operation ........................................4
Connecting to equipment using the MIDI Out port ..........4
Connecting to equipment using the MIDI Out port AND
connecting to a computer using the USB port....................4
What is a Template? ...................................................................5
MIDI Tutorial ....................................................................................5
Introduction..................................................................................5
MIDI ports.....................................................................................5
MIDI messages..............................................................................6
Main Features and Operation .......................................................8
Front panel layout .......................................................................8
Rear panel connections..............................................................9
Modes and menus........................................................................9
Using menus – PLAY mode ....................................................10
Using menus – EDIT mode .....................................................11
Individual Template Edit 'CC' menu options......................11
Individual Template Edit 'NRPN' menu options................13
Individual Template Edit 'RPN' menu options....................13
Individual Template Edit 'MMC' menu options..................14
Individual Template Edit 'Note On/Off' menu options....14
Individual Template Edit 'Program Change' menu options
........................................................................................................15
Individual Template Edit 'Pitch Bend' menu options ........15
Individual Template Edit 'Aftertouch' menu options........15
Common Template Edit menu options (e.g. setting
keyboard velocity).....................................................................16
Using the X/Y touchpad ..........................................................17
Using a sustain pedal.................................................................18
Using the transport buttons ...................................................18
Using the OCTAVE UP/DOWN buttons...........................18
Saving a Template to memory ...............................................18
Advanced Settings..........................................................................20
GLOBAL edit mode..................................................................20
Updating the operating system ..............................................20
Troubleshooting.............................................................................21
Appendix I – Specifications..........................................................22
Appendix I1 – MIDI Implementation Chart ............................23
Appendix III – Approvals Information ......................................24
Introduction
Thank you for purchasing the Novation ReMOTE LE
controller keyboard. This device may be used to control
sequencers, popular software virtual instrument applications
(on a computer) or traditional hardware instruments via
either a USB connection or a standard MIDI interface. The
ReMOTE LE front panel provides nine knobs and nine
buttons (with a Group B switch that doubles the controls
for each template), along with an X/Y touchpad and
pitch/mod joystick, all of which can be easily configured
exactly the way you want and saved/instantly recalled using
the onboard Template Memories.
Whether used live or in the studio to control virtual or
hardware instruments, its comprehensive range of controls
may be used to dynamically alter any sound parameters
precisely and in real time.
Using this manual
This manual consists of six sections: Introduction, Quick
Start Guide, MIDI Tutorial, Main Features and Operation,
Advanced Settings and Troubleshooting. An Appendix is
also provided containing reference data.
It is assumed that the reader already has a basic knowledge
of MIDI in order to configure Templates. Those with limited
MIDI experience may find the MIDI Tutorial useful.
However, very little MIDI knowledge is required to use the
ReMOTE LE with the factory preset Templates. It is simply
a case of importing the relevant files from the resource CD
(only required for software without a fixed MIDI spec) then
selecting the Template that corresponds to the
software/hardware being used (if one is available either
onboard or on the website) and tweaking away.
In order to become familiar with the many useful features of
the ReMOTE LE and get the most out of its MIDI
controlling capabilities, it is recommended that this manual
be read in its entirety. For anyone wanting simple and
speedy instructions before delving deeper, the Quick Start
Guide provides brief information on setting up the ReMOTE
LE and a quick overview on selecting and using factory
preset Templates.
Enjoy!
2
Main features
•
Two-octave semi-weighted velocity-sensitive keyboard
with combined pitch bend and modulation joystick. The
keyboard is transposable up or down across the entire
MIDI note range.
•
MIDI or USB operation. USB and MIDI may be used
simultaneously. A MIDI Out port and a sustain pedal
socket are both available.
•
Can be powered by the USB port, batteries or a 9V
DC adaptor (not supplied).
•
Generous selection of front panel controls including an
X/Y touchpad, nine knobs and nine buttons (Group A
and B; 18 knobs and 18 buttons in total), all of which
can be individually configured.
•
Comprehensive MIDI specification. Any front panel
control may be configured to transmit on any MIDI
channel to any destination. Available options include
Controller numbers, NRPNs, RPNs, MMC commands,
Note On/Off and Program Change messages.
•
16 onboard Template memories – 12 preset with more
available on the Novation website. Each Template
contains definitions for all front panel controls.
Templates may be individually named for easy
reference.
•
Template memories may be saved as System Exclusive
bulk dumps to an external sequencer, MIDI data filer or
the Template Editor.
Conventions used in this manual
The word 'Template' refers to a collection of knob and
button settings (all assigned with specific MIDI data) and the
function of the pedal and X/Y touchpad. Each Template is
individually named and numbered from 1 to 16 and can be
saved in the ReMOTE LE's onboard memory.
The word 'preset' refers to a Template configured at the
factory to showcase some of the ReMOTE LE's powerful
control possibilities. Preset Templates may be overwritten
by new settings.
The word 'control' refers to any of the front panel knobs,
assignable buttons, user's sustain pedal (not supplied),
joystick or the X/Y touchpad. Within a single Template,
each control may be individually configured to transmit
various types of MIDI information to the USB port and/or
MIDI Out.
Text in CAPITALS refers to a front panel control or legend
(even though the name of the control may actually be in
lower case on the front panel). It could be a knob, button
or rotary encoder.
3
Quick Start Guide
Connecting the ReMOTE LE
The ReMOTE LE may be connected to a system in three
different ways:
1.
Connection to a computer using the USB port.
2.
Connection to MIDI equipment using the MIDI Out
port.
3.
Connection to MIDI equipment using the MIDI Out
port AND to a computer using the USB port.
Connecting to a computer using the
USB Port
The illustration below shows a typical arrangement:
NB: The computer must be running Mac OS X or Windows
XP.
Connect the ReMOTE LE to the computer using the
supplied USB cable. Connect a sustain pedal (not supplied) if
required. Since power is being supplied from the computer
via the USB cable, it is not necessary to have batteries or an
external PSU fitted.
Driver Installation
Before the ReMOTE LE can be used to control sequencers
and software synthesizers, the ReMOTE LE MIDI drivers
must be installed on the computer.
Windows XP Installation
Insert the Novation driver CD into the CD-ROM drive of
the computer. Connect the ReMOTE LE to the computer
(if this has not already been done) using the supplied USB
cable. A small pop-up box will appear at first followed by a
large dialogue box titled ‘Found New Hardware Wizard’. If
using SP2, the first screen will ask, 'Can Windows connect
to Windows Update to search for software?'. Click, 'No,
not this time' followed by the 'Next' button. The remainder
of the process is identical to the process for SP1 users, now
asking what you want the wizard to do. Select 'Install from a
list or specific location (advanced)' then click 'Next'. The
next screen asks to choose your search and installation
options, click 'Don't search, I will choose the driver to
install' then click 'Next'. The next screen allows you to
select the driver from a list, ignore the list and click 'Have
disk'. A separate install from disk float window will now
open, click the 'Browse' button to search for the driver file
on the Novation CD yourself. Browse to the CD and select
the ReMOTE LE driver folder and open the file inside by
clicking 'Open' once the file is selected. Now click 'OK' in
the install from disk window. The process then returns back
to the driver select window. The next screen will inform
that the USB logo has not been tested by Microsoft, click
‘Continue Anyway’. Do not be alarmed by the message
since the driver has been tested. Windows will now confirm
that the installation is complete. Click the ‘Finish’ button.
Then reboot the computer.
Mac OSX Installation
Insert the Novation driver CD into the CD-ROM drive of
the computer. Drag the driver install file (ending .pkg) onto
the desktop. Double click the icon once on your desktop
and the installation will be carried out. You can delete the
.pkg file once the drivers have been installed.
Now, all that is required is to open up the recording
software/sequencer you wish to control and then ensure
that the ReMOTE LE is selected within the MIDI
preferences of that software application. Consult the
documentation supplied with the software package if unsure
of how to set up a MIDI controller for it.
Playing and controlling software
synthesizers from the ReMOTE LE
Numerous software synthesizers may be controlled using
the ReMOTE LE. To make this straightforward, Templates
(memories that contain the specific control information for
individual synthesizers assigned to the ReMOTE LE's
controls) have already been constructed for most popular
software/hardware. The ReMOTE LE has 12 preset
Templates onboard and additional Templates available at
www.novationmusic.com. See page 22 for a list of preset
Templates.
To select a Template for a particular software synthesizer,
make sure that the ReMOTE LE is in PLAY - Template
Select Mode (PLAY LED and Template LED both lit). This
mode will be active when the unit is powered up but if
another mode is active then press the PLAY button (Menu
not Transport) on the left of the unit so that the LED
beside it is lit and then press the SELECT button below the
ReMOTE LE screen (repeatedly if necessary) until the
Template LED is lit. Now the DATA encoder can be used
to scroll to the desired Template. If some or all of the
controls on the ReMOTE LE don’t seem to work when the
correct Template is selected then the software synthesizer
may not have a defined MIDI spec. In this case the relevant
file will need to be imported from the resource CD (see
‘controlling a sequencer’ section for details).
4
If a template for the software synthesizer is not available
then one can easily be constructed either on the hardware
(see EDIT Mode section on page 11 for details) or using the
Template Editor (available for download from
novationmusic.com). Even without a template, the ReMOTE
LE keyboard and pitch/mod joystick can be used to play
sounds and the Program and Bank modes within PLAY
mode can be used to call up a different sound on the
software synth (see page 10 for details).
Controlling a sequencer
Even though the ReMOTE LE contains a Template for a
sequencer such as Cubase, simply calling up the Template
using the DATA encoder will not mean that all controls are
automatically mapped to the sequencer (e.g. the Transport
controls will not work). This is because, when software
does not have a defined MIDI spec, the MIDI data assigned
to the controls on the ReMOTE LE needs to be learned by
the software, which may be simple or complex depending
on the software. To overcome this and make it a simple
process, Novation provide a learn/resource file on an
accompanying CD-ROM to import into the relevant
software. Read the text file in the relevant software folder
on the CD-ROM for instructions on how to do this. This
may also apply to some software synthesizers, for example
the Pro-53.
FOR MORE INFO ON THE ONBOARD
TEMPLATES VISIT NOVATIONMUSIC.COM
Power supply or battery operation
The ReMOTE LE may be powered by an external power
supply (Novation PSU6, not supplied) or by 6 x 'AA'
batteries.
Fitting batteries
Turn the ReMOTE LE upside down and unclip the battery
compartment by squeezing the two clips and gently raising
the lid. Observe the connection diagram imprinted on the
plastic casing for 6 x 'AA' cells and fit the cells as shown.
Connecting to equipment using the
MIDI Out port
This is referred to as the 'stand alone' or 'live' set-up. The
illustration below shows a typical arrangement:
Ensure power is off on all equipment. Connect the MIDI
Out of the ReMOTE LE to the MIDI In of a suitable sound
module. If batteries are not fitted then an external power
supply (Novation PSU6) must be connected - see previous
section for information. Connect any other equipment such
as a sustain pedal to the ReMOTE LE. Switch on the power
to all devices.
Playing a sound module or hardware
synthesizer from the ReMOTE LE
Set the receiving MIDI channel of the sound module to
Channel 1 or OMNI (this should be the default). The
keyboard and pitch/modulation joystick will be active and
the sound module will respond to the MIDI information
being sent from the ReMOTE LE.
To select a Template for a particular hardware synthesizer,
make sure that the ReMOTE LE is in PLAY - Template
Select Mode (PLAY LED and Template LED both lit). This
mode will be active when the unit is powered up but if
another mode is active then press the PLAY button (Menu
not Transport) on the left of the unit so that the LED
beside it is lit and then press the SELECT button below the
ReMOTE LE screen (repeatedly if necessary) until the
Template LED is lit. Now the DATA encoder can be used
to scroll to Template No. 10 'General MIDI 2' or the
corresponding Template for that sound module (if one is
available, check the website for hardware Templates). With
the Template selected, the ReMOTE LE's knobs and buttons
will map to relevant controls on the sound module. If a
Template for the hardware synthesizer is not available then
one can easily be constructed either on the hardware (see
EDIT Mode section on page 11 for details) or using the
Template Editor (available for download from
novationmusic.com). Even without a template, the ReMOTE
LE keyboard and pitch/mod joystick can be used to play
sounds and the Program and Bank modes within PLAY
mode can be used to call up a different sound on the
hardware synth (see page 10 for details).
Connecting to equipment using the
MIDI Out port AND connecting to a
computer using the USB port
This is an advanced setup where the ReMOTE LE is
connected to an external sound module/hardware
synthesizer using the MIDI Out port as well as being
connected to a computer via USB:
剩余24页未读,继续阅读
资源评论
qingguo1979
- 粉丝: 28
- 资源: 7299
上传资源 快速赚钱
- 我的内容管理 展开
- 我的资源 快来上传第一个资源
- 我的收益 登录查看自己的收益
- 我的积分 登录查看自己的积分
- 我的C币 登录后查看C币余额
- 我的收藏
- 我的下载
- 下载帮助
最新资源
- Python 程序语言设计模式思路-结构型模式:组合模式:将对象组合成树形结构
- 毕业设计基于python矩阵分解的推荐算法研究源码+详细文档+全部数据资料 高分项目.zip
- 基于网络的入侵检测系统源码+数据集+详细文档(高分毕业设计).zip
- 微信小程序源码 旅行故事分享 - 面包旅行App界面设计与文本展示资源下载
- 微信小程序源码 创意互动游戏 - 你画我猜App下载
- 摸底考试_学生版20230305.py
- 课程设计基于FPGA数字钟课程设计源码+课设报告(95分以上).zip
- 基于Java的企业家申报系统设计源码
- Cesium案例,集成各种模型,推演,各种Cesium效果
- 基于Python的Struts2全漏洞扫描利用工具设计源码
资源上传下载、课程学习等过程中有任何疑问或建议,欢迎提出宝贵意见哦~我们会及时处理!
点击此处反馈
安全验证
文档复制为VIP权益,开通VIP直接复制
信息提交成功