没有合适的资源?快使用搜索试试~ 我知道了~
CETK Tux DLL_LAB WinCE CETK学习资料
3星 · 超过75%的资源 需积分: 9 8 下载量 149 浏览量
2011-05-09
15:29:43
上传
评论
收藏 3.68MB DOC 举报
温馨提示
试读
61页
1. How to prepare the OS? (以模拟OS为例讲解怎么BUILD一个OS) 2. Creating a custom TUX dll 3. Building the Tux Dll 4. Using CETK to run a Tux Dll 5. Connecting the CETK to an Emulate OS 6. Demo CETK test (Keyboad test, and so on) 7. Adding a test case to a Tux Dll 8. Getting back to the Tux Dll source... 9. Linking a library to the Tux Dll 10. ....
资源推荐
资源详情
资源评论
TUTORIAL
Writing a Tux Dll with the Windows CE
Test Kit
1
Objective
To learn how to create an automated test suite using a Tux Dll and run it using the Windows CE
Test Kit (CETK). This lab will cover creating an emulator platform, creating a tux dll, using the Tux
dll with the CETK, and adding test cases to the Tux dll.
..............................................................................................................................................1
TUTORIAL..........................................................................................................................1
Writing a Tux Dll with the Windows CE Test Kit..............................................................1
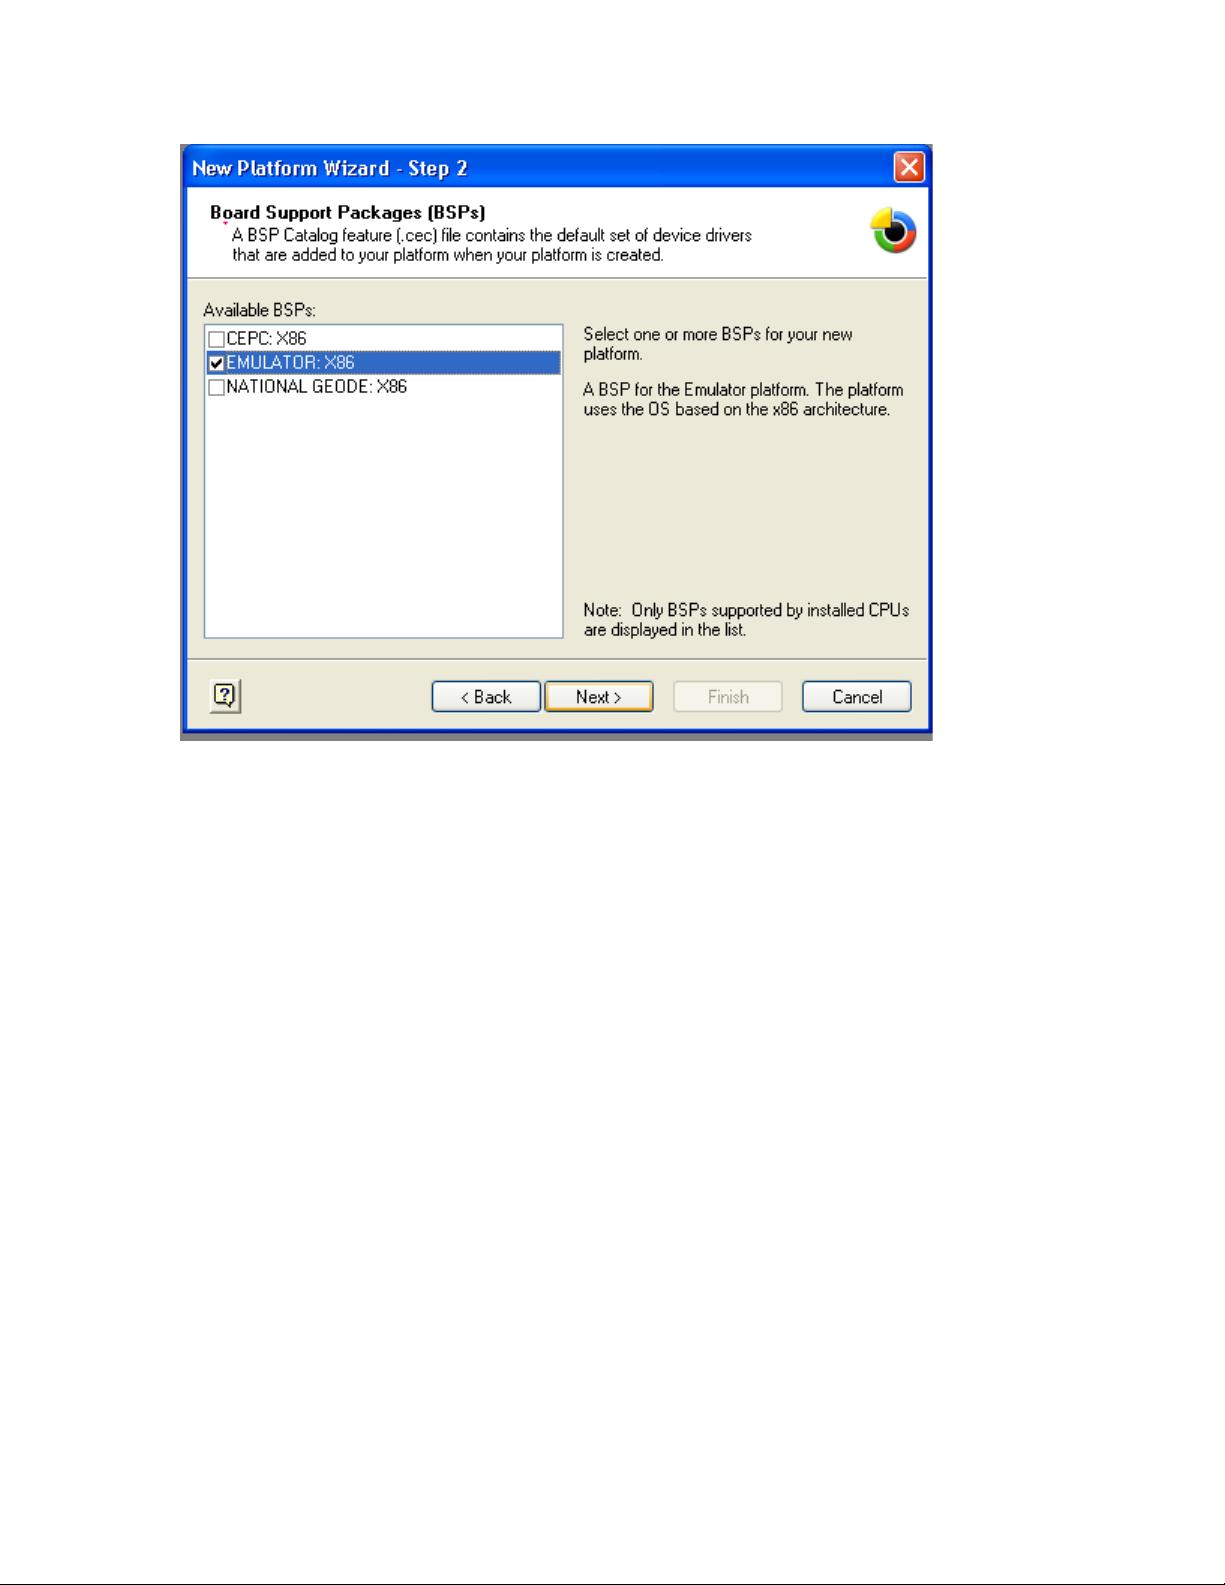
Part 1 – Creating a Web Pad Emulator Platform.............................................................4
....................................................................................................................................15
Part 1 – Summary...........................................................................................................18
Part 2 – Creating a custom Tux. dll...............................................................................19
Part 2 – Summary...........................................................................................................23
Part 3 – Using the CETK to run a Tux Dll....................................................................24
Step 2: Running the Keyboard Test...........................................................................28
Step 3: Viewing and understanding the results from tests.........................................30
Part 3 – Summary...........................................................................................................42
Part 4 – Adding a test case to a Tux Dll........................................................................42
....................................................................................................................................55
Part 4 – Summary...........................................................................................................61
2
Agenda
There are four parts to the lab. The complete lab will take around 60 minutes to complete.
In this lab, we will:
Part 1 – Creating a Web Pad Emulator platform
Creating a Web Pad image and adding the Microsoft Windows CE Test Kit
Building the image
Downloading the image to the Emulator
Shutting down the Emulator
Part 2 – Creating and building a Tux Dll project
Creating a Tux Dll project using the New Project Wizard
Building the project
Understanding the output
Part 3 – Using the CETK to run our Tux Dll
Starting the CETK
Adding the Tux Dll using the User Defined Test Wizard
Running the Tux Dll
Viewing the Tux Dll results
Part 4 – Adding new test cases to the Tux Dll
Disconnecting the Emulator
Understanding the Tux Dll files
Adding a test case
Updating the CETK version of our Tux Dll
Reconnect the Emulator
Running the updated Tux Dll
Viewing the results
3
Part 1 – Creating a Web Pad Emulator Platform
Step 1: Start Platform Builder and use the wizard to create a Web Pad image with support
for the Windows CE Test Kit
We will now create a platform using the Platform Wizard. There are a number of preconfigured
platform configurations that can be used to create a device based on Windows CE .NET, these
can be considered to be a starting point for your platform, and once the Wizard is complete you
can add or remove components using the catalog and Feature View windows within Platform
Builder.
On the File menu, click New Platform.
The initial dialog box that is displayed outlines the process of creating a platform. There are a
number of steps to creating a new platform. Let us walk through these now.
Click Next.
Step 2 is to select the BSP for the device we are building an image for. In this case, we will use
the “EMULATOR: x86” BSP.
4
5
剩余60页未读,继续阅读
资源评论
- lwxjkk2013-01-08其实就是MSDN上贴过来的····
JXES智能生态系统
- 粉丝: 1w+
- 资源: 191
上传资源 快速赚钱
- 我的内容管理 展开
- 我的资源 快来上传第一个资源
- 我的收益 登录查看自己的收益
- 我的积分 登录查看自己的积分
- 我的C币 登录后查看C币余额
- 我的收藏
- 我的下载
- 下载帮助
最新资源
- 电力场景安全帽检测数据集VOC+YOLO格式295张2类别.7z
- MISC图片隐写MISC图片隐写MISC图片隐写MISC图片隐写MISC图片隐写.txt
- 七维大脑原理:探索人类心智的多元维度.txt
- 电力场景设备漏油检测数据集VOC+YOLO格式338张1类别.7z
- 基于yolov8+pyqt5实现精美界面支持图片视频和摄像检测源码.zip
- 用C语言为母亲节献上一份特别的祝福.zip
- LCD1602液晶显示屏的深入探索与实用指南.zip
- 基于Matlab人脸肤色定理的教师人数统计+源代码+全部数据+文档说明+详细注释+使用说明+截图(高分课程设计)
- 基于Matlab霍夫曼变换的表盘读数识别+源代码+全部数据+文档说明+详细注释+使用说明+截图(高分课程设计)
- 基于Matlab火灾烟雾检测源码带GUI界面+源代码+全部数据+文档说明+详细注释+使用说明+截图(高分课程设计)
资源上传下载、课程学习等过程中有任何疑问或建议,欢迎提出宝贵意见哦~我们会及时处理!
点击此处反馈
安全验证
文档复制为VIP权益,开通VIP直接复制
信息提交成功