没有合适的资源?快使用搜索试试~ 我知道了~
pybullet guide book
需积分: 50 5 下载量 176 浏览量
2022-04-04
20:14:37
上传
评论
收藏 1.41MB PDF 举报
温馨提示
试读
64页
pybullet guide book
资源详情
资源评论
资源推荐
PyBullet
Quickstart Guide
Erwin Coumans, Yunfei Bai, 2017/2018
Visit the forums.
Introduction 2
Hello pybullet World 3
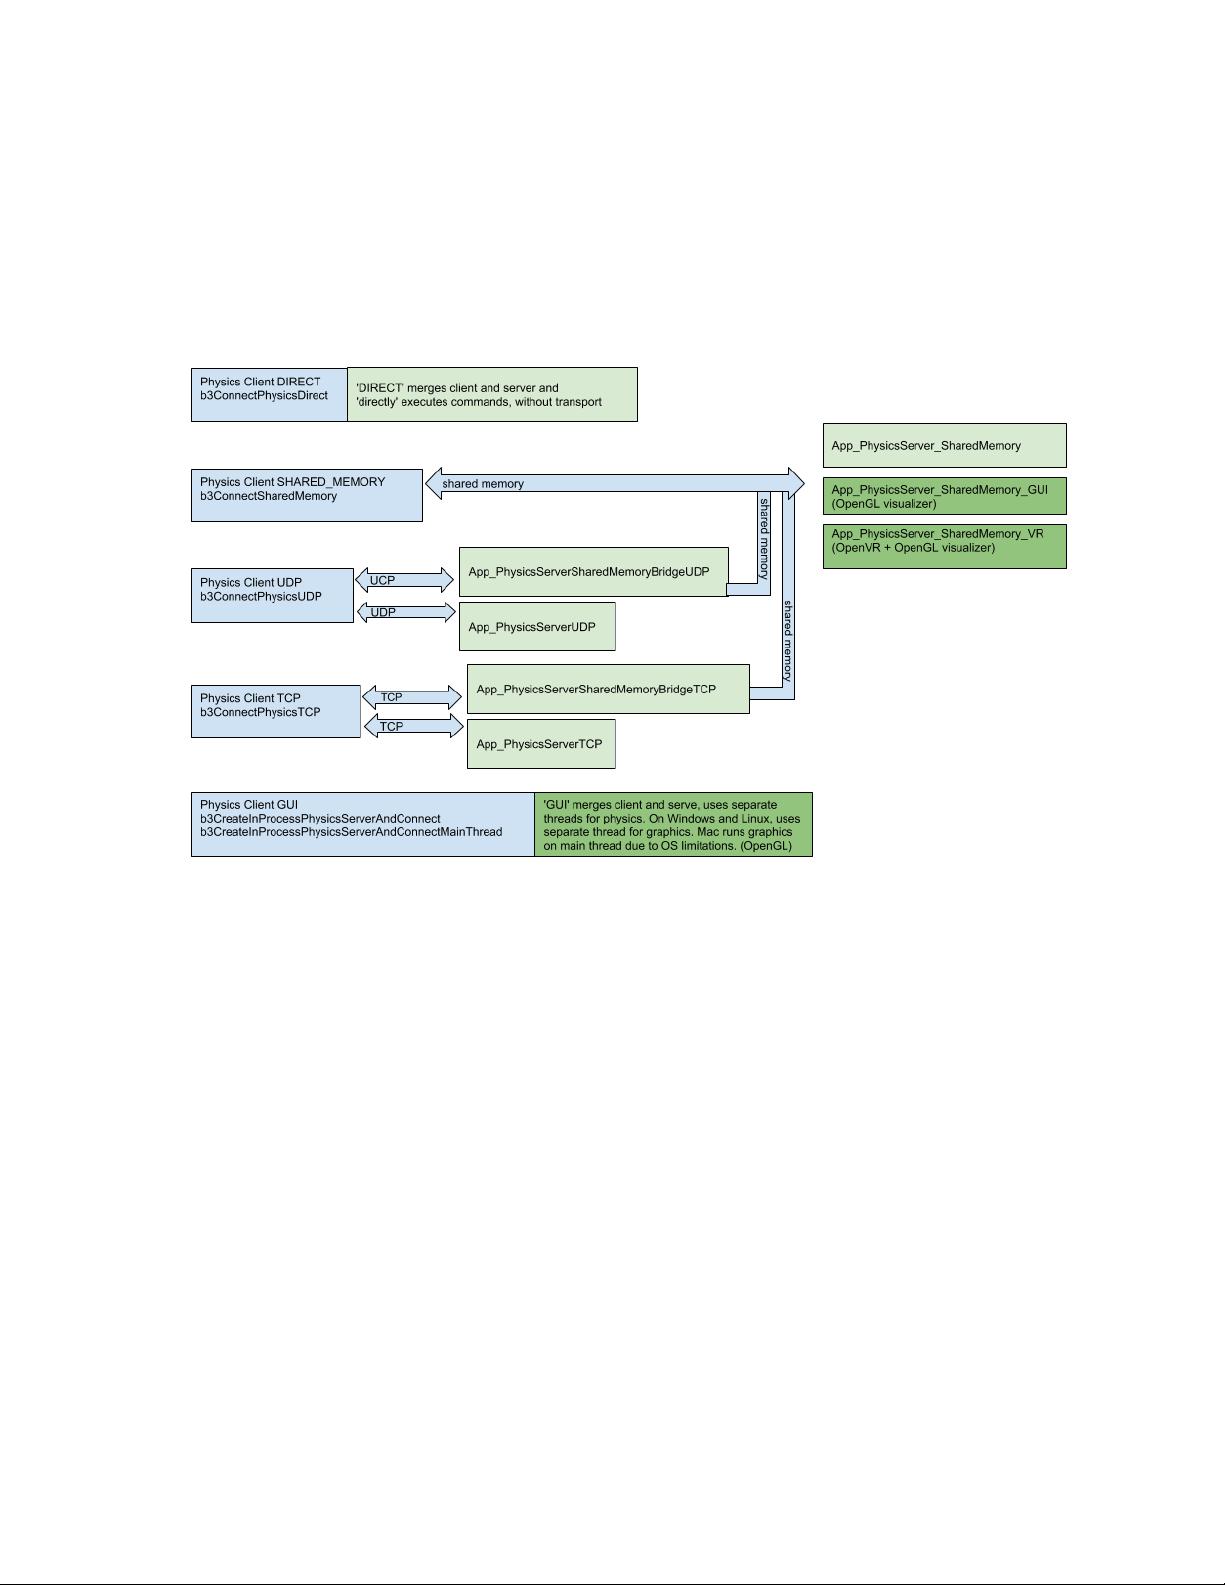
connect, disconnect 3
setGravity 7
loadURDF, loadSDF, loadMJCF 7
saveWorld 9
saveState, saveBullet, restoreState 9
createCollisionShape/VisualShape 10
createMultiBody 11
stepSimulation 13
setRealTimeSimulation 13
getBasePositionAndOrientation 14
resetBasePositionAndOrientation 14
Transforms: Position and Orientation 15
getAPIVersion 16
Controlling a robot 16
Base, Joints, Links 16
getNumJoints, getJointInfo 17
setJointMotorControl2/Array 18
getJointState(s), resetJointState 21
enableJointForceTorqueSensor 22
getLinkState 22
getBaseVelocity, resetBaseVelocity 24
applyExternalForce/Torque 25
getNumBodies, getBodyInfo,
getBodyUniqueId, removeBody 25
createConstraint, removeConstraint,
changeConstraint 26
getNumConstraints,
getConstraintUniqueId 27
getConstraintInfo/State 28
getDynamicsInfo/changeDynamics 28
setTimeStep 30
setPhysicsEngineParameter 30
resetSimulation 32
startStateLogging/stopStateLogging 32
Synthetic Camera Rendering 34
computeViewMatrix 34
computeViewMatrixFromYawPitchRoll
35
computeProjectionMatrix 35
computeProjectionMatrixFOV 35
getCameraImage 36
getVisualShapeData 37
changeVisualShape, loadTexture 38
Collision Detection Queries 39
getOverlappingObjects, getAABB 39
getContactPoints, getClosestPoints 40
rayTest, rayTestBatch 41
getCollisionShapeData 42
Inverse Dynamics, Kinematics 43
calculateInverseDynamics 43
calculateJacobian, MassMatrix 43
calculateInverseKinematics 45
Reinforcement Learning Gym Envs 46
Environments and Data 46
Train and Enjoy: DQN, PPO, ES 49
Virtual Reality 52
getVREvents,setVRCameraState 52
Debug GUI, Lines, Text, Parameters 54
addUserDebugLine, Text 54
addUserDebugParameter 55
setDebugObjectColor 56
configureDebugVisualizer 57
get/resetDebugVisualizerCamera 57
getKeyboardEvents, getMouseEvents 58
Build and install pybullet 59
Support, Tips, Citation 62
2
Introduction
pybullet is an easy to use Python module for physics simulation for robotics, games, visual
effects and machine learning. With pybullet you can load articulated bodies from URDF, SDF,
MJCF and other file formats. pybullet provides forward dynamics simulation, inverse dynamics
computation, forward and inverse kinematics, collision detection and ray intersection queries.
The Bullet Physics SDK includes pybullet robotic examples such as a simulated Minitaur
quadruped, humanoids running using TensorFlow inference and KUKA arms grasping objects.
Aside from physics simulation, there are bindings to rendering, with a CPU renderer
(TinyRenderer) and OpenGL visualization and support for Virtual Reality headsets such as HTC
Vive and Oculus Rift. pybullet also has functionality to perform collision detection queries
(closest points, overlapping pairs, ray intersection test etc) and to add debug rendering (debug
lines and text). pybullet has cross-platform built-in client-server support for shared memory,
UDP and TCP networking. So you can run pybullet on Linux connecting to a Windows VR
server.
pybullet wraps the new Bullet C-API, which is designed to be independent from the underlying
physics engine and render engine, so we can easily migrate to newer versions of Bullet, or use
3
a different physics engine or render engine. By default, pybullet uses the Bullet 2.x API on the
CPU. We will expose Bullet 3.x running on GPU using OpenCL as well. There is also a C++ API
similar to pybullet, see b3RobotSimulatorClientAPI.
pybullet can be easily used with TensorFlow and frameworks such as OpenAI Gym.
Researchers from Google Brain [1,2], X, Stanford AI Lab and OpenAI use pybullet/Bullet C-API.
The installation of pybullet is as simple as (sudo) pip install pybullet (Python 2.x), pip3 install
pybullet. This will expose the pybullet module as well as pybullet_envs Gym environments.
Hello pybullet World
Here is a pybullet introduction script that we discuss step by step:
import pybullet as p
import pybullet_data
physicsClient = p.connect(p.GUI)#or p.DIRECT for non-graphical version
p.setAdditionalSearchPath(pybullet_data.getDataPath()) #used by loadURDF
p.setGravity(0,0,-10)
planeId = p.loadURDF("plane.urdf")
cubeStartPos = [0,0,1]
cubeStartOrientation = p.getQuaternionFromEuler([0,0,0])
boxId = p.loadURDF("r2d2.urdf",cubeStartPos, cubeStartOrientation)
p.stepSimulation()
cubePos, cubeOrn = p.getBasePositionAndOrientation(boxId)
print(cubePos,cubeOrn)
p.disconnect()
connect, disconnect
After importing the pybullet module, the first thing to do is 'connecting' to the physics simulation.
pybullet is designed around a client-server driven API, with a client sending commands and a
physics server returning the status. pybullet has some built-in physics servers: DIRECT and
GUI. Both GUI and DIRECT connections will execute the physics simulation and rendering in
the same process as pybullet.
Note that in DIRECT mode you cannot access the OpenGL and VR hardware features, as
described in the "Virtual Reality" and "Debug GUI, Lines, Text, Parameters" chapters. DIRECT
mode does allow rendering of images using the built-in software renderer through the
'getCameraImage' API. This can be useful for running simulations in the cloud on servers
without GPU.
4
You can provide your own data files, or you can use the pybullet_data package that ships with
pybullet. For this, import pybullet_data and register the directory using
pybullet.setAdditionalSearchPath(pybullet_data.getDataPath()).
getConnectionInfo
Given a physicsClientId will return the list [isConnected, connectionMethod]
Diagram with various physics client (blue) and physics server (green) options. Dark green
servers provide OpenGL debug visualization.
connect using DIRECT, GUI
The DIRECT connection sends the commands directly to the physics engine, without using any
transport layer and no graphics visualization window, and directly returns the status after
executing the command.
The GUI connection will create a new graphical user interface (GUI) with 3D OpenGL rendering,
within the same process space as pybullet. On Linux and Windows this GUI runs in a separate
thread, while on OSX it runs in the same thread due to operating system limitations. On Mac
OSX you may see a spinning wheel in the OpenGL Window, until you run a 'stepSimulation' or
other pybullet command.
The commands and status messages are sent between pybullet client and the GUI physics
simulation server using an ordinary memory buffer.
5
It is also possible to connect to a physics server in a different process on the same machine or
on a remote machine using SHARED_MEMORY, UDP or TCP networking. See the section
about Shared Memory, UDP and TCP for details.
Unlike almost all other methods, this method doesn't parse keyword arguments, due to
backward compatibility.
The connect input arguments are:
required
connection mode
integer:
DIRECT,
GUI,
SHARED_
MEMORY,
UDP, TCP
DIRECT mode create a new physics engine and directly
communicates with it. GUI will create a physics engine with
graphical GUI frontend and communicates with it.
SHARED_MEMORY will connect to an existing physics engine
process on the same machine, and communicates with it over
shared memory. TCP or UDP will connect to an existing
physics server over TCP or UDP networking.
optional
key
int
in SHARED_MEMORY mode, optional shared memory key.
When starting ExampleBrowser or SharedMemoryPhysics_*
you can use optional command-line --shared_memory_key to
set the key. This allows to run multiple servers on the same
machine.
optional
UdpNetworkAddress
(UDP and TCP)
string
IP address or host name, for example "127.0.0.1" or "localhost"
or "mymachine.domain.com"
optional
UdpNetworkPort
(UDP and TCP)
integer
UDP port number. Default UDP port is 1234, default TCP port
is 6667 (matching the defaults in the server)
optional
options
string
command-line option passed into the GUI server. At the
moment, only the --opengl2 flag is enabled: by default, Bullet
uses OpenGL3, but some environments such as virtual
machines or remote desktop clients only support OpenGL2.
Only one command-line argument can be passed on at the
moment.
connect returns a physics client id or -1 if not connected. The physics client Id is an optional
argument to most of the other pybullet commands. If you don't provide it, it will assume physics
client id = 0. You can connect to multiple different physics servers, except for GUI.
For example:
pybullet.connect(pybullet.DIRECT)
pybullet.connect(pybullet.GUI, options="--opengl2")
pybullet.connect(pybullet.SHARED_MEMORY,1234)
pybullet.connect(pybullet.UDP,"192.168.0.1")
pybullet.connect(pybullet.UDP,"localhost", 1234)
pybullet.connect(pybullet.TCP,"localhost", 6667)
剩余63页未读,继续阅读
w515142
- 粉丝: 0
- 资源: 1
上传资源 快速赚钱
- 我的内容管理 展开
- 我的资源 快来上传第一个资源
- 我的收益 登录查看自己的收益
- 我的积分 登录查看自己的积分
- 我的C币 登录后查看C币余额
- 我的收藏
- 我的下载
- 下载帮助
安全验证
文档复制为VIP权益,开通VIP直接复制
信息提交成功
评论0