


eyeOS Web System
User Manual

Contents
1. Introduction
1.1. Logging in
1.2. Creating a new user
2. The Desktop: First Steps
2.1. The Applications Dock
2.2. The default Desktop Icons
2.2.1. Home Icon
2.2.2. The Software Icon
2.2.3. The Trash Icon
2.3. The System Bar
2.4. The Bottom Bar
3. Base Applications
3.1. eyeFiles: The file manager
3.1.1. Common Actions
3.1.1.1. Example on using an action
3.1.1.2. Uploading files
3.1.1.3. Opening files
3.2. eyeDocs: The word processor
3.2.1. Creating a document
3.2.2. Saving a document
3.2.3. Opening a document
3.3. eyeCalendar
3.3.1. Adding an event
3.3.2. Moving an event
3.3.3. Editing an event
3.4. eyeContacts
3.4.1. Adding a new contact
3.4.2. Viewing, editing and deleting a contact
3.4.3. Importing and Exporting contacts
3.5. eyeBoard: The bulletin board
3.5.1. Sending a message
3.5.2. Cleaning the board
3.6. eyeMail: The e-mail client
3.6.1. Retrieving mail
3.6.2. Sending a new mail
3.7. eyeRSS: The feed reader
3.7.1. Adding a new feed
3.7.2. Reading a feed
3.7.3. Updating a feed
3.7.4. Deleting a feed
3.8. eyeProcess: The process manager
3.8.1. Closing an Application
3.9. eyeControl: The control center
3.9.1. Changing your Desktop preferences
3.9.2. Changing the System's behavior
3.9.2.1. General Administration
3.9.2.2. Managing Users
3.9.2.3. Managing Groups
3.9.2.4. Managing Repositories
3.9.2.5. Installing new software
This document is licensed under the Creative Commons BY-NC-ND 3.0 license.

1. Introduction
Welcome to the eyeOS User Manual. This HandBook does describe how to start
using the eyeOS Web System and the common usage of its bundled applications.
eyeOS is a Web Based System that lets you work and have fun with your files and
documents from everywhere an Internet connection is available. With eyeOS you can
organize and centralize your files and documents, play your media, work with Word
documents and much, much more. All you need to get started is a Web Browser. From
your PC, an Internet Tablet or any Internet-capable device!
In order to start using eyeOS you need the address of the server where eyeOS is
installed. If you do not have a private server (for example, the eyeOS Server provided
by your company or group of friends), you can use the eyeOS Public Server, which is
available from www.eyeOS.info.
1.1. Logging in
The first you have to do to use eyeOS is to type the address of your server in your
browser's address bar. You will be then in an eyeOS Login Screen. (see Illustration 1).
Illustration 1: eyeOS Login Screen

If you have already an account in this server, just type your Username and Password
and press “Enter” to log into your Desktop. Please proceed to the chapter 2 “The
Desktop: First Steps”.
If you do not have yet an eyeOS account for this server, and the server administrator
allows new users (so the “New User” text appears in the bottom left part of the Login
Box), you can create a new user. Please proceed to chapter 1.2 “Creating a new user”.
1.2. Creating a new user
To create a new user, press “New User” and fill the form with your desired Username
and Password. Note that the username must have at least 4 characters, and that you
have to introduce your password twice to ensure that you have not typed it wrong.
Once you have filled the username and the password, click on “Create account”
.
(see Illustration 2).
If everything was OK (and a message saying that your user has been created
successfully appears), you can log in now using the Login Box, introducing the
Username and Password you have just chosen while creating your user.
Illustration 2: Creating a new user
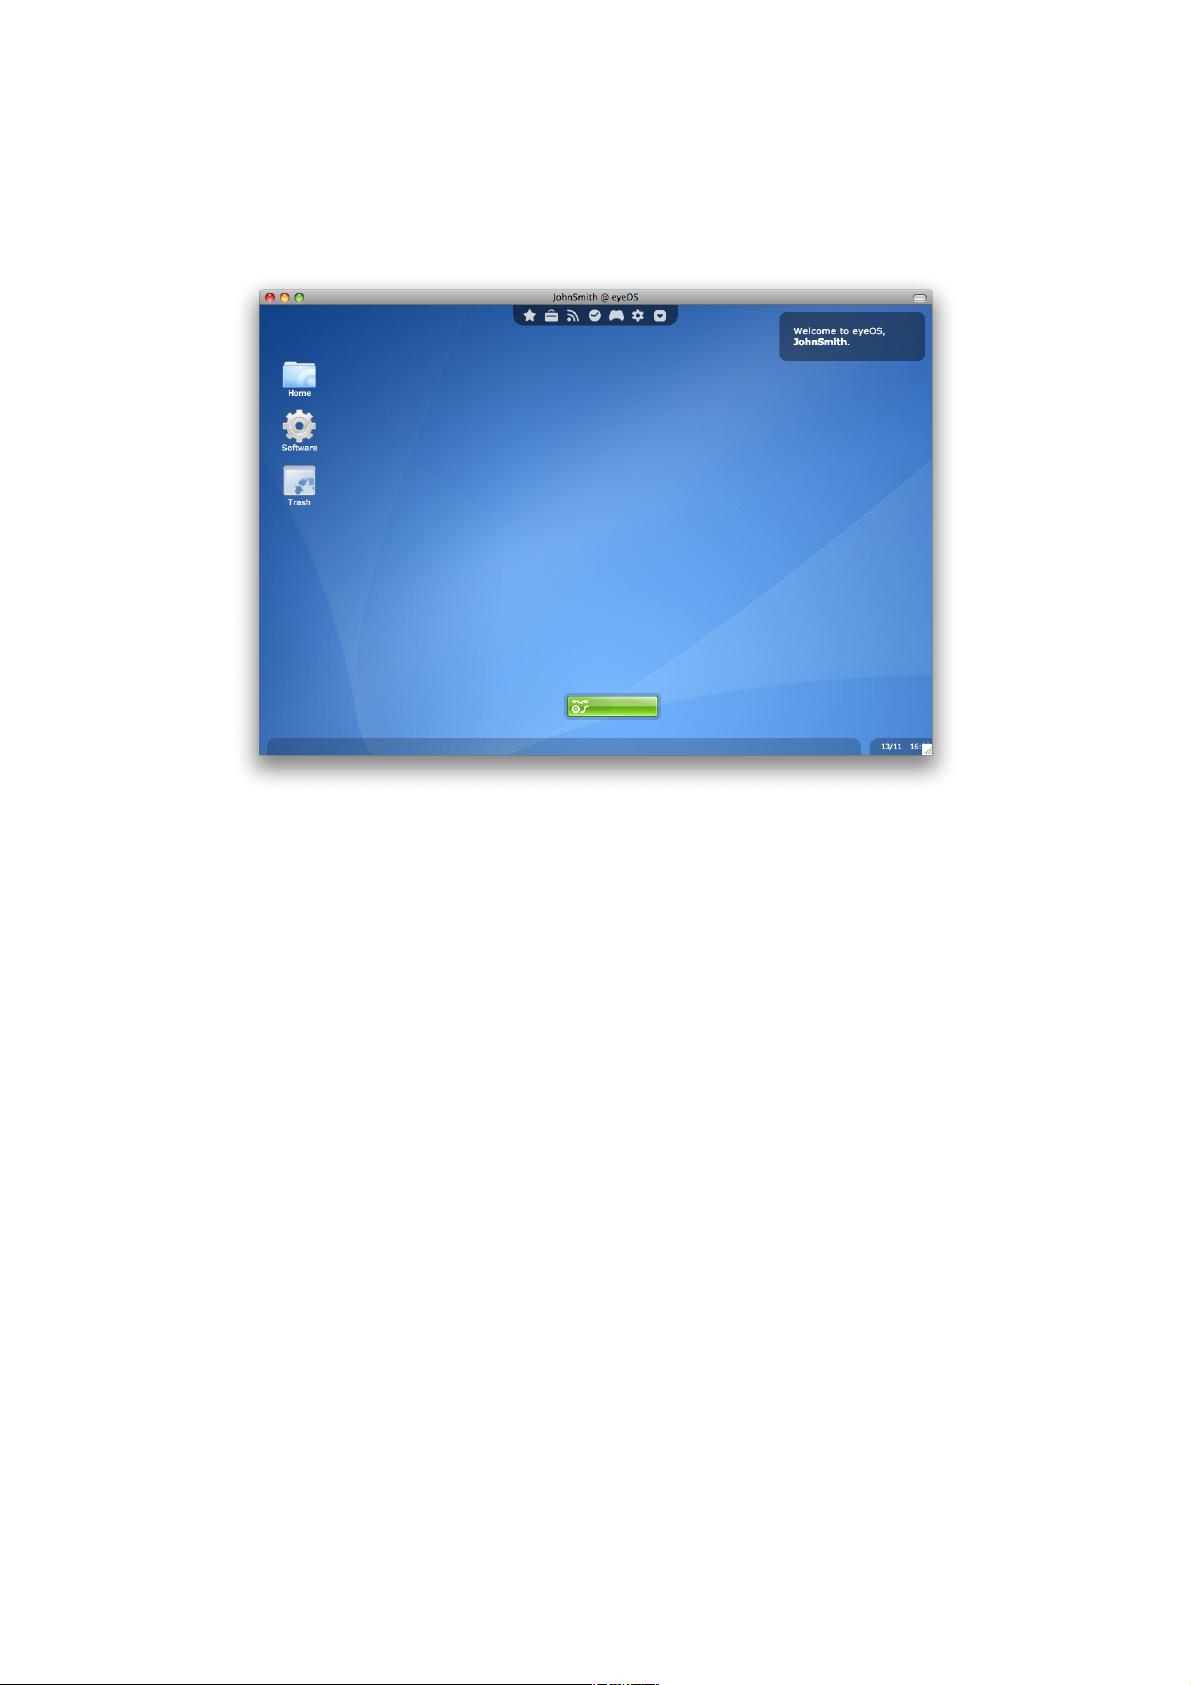
2. The Desktop: First Steps
Just after pressing the “Enter” button, the Login Box will fade off and your eyeOS
Desktop will fade in. You will be then in your eyeOS Desktop (see Illustration 3).
You are now in your eyeOS Desktop, which is divided in four zones: the Applications
Dock, the Desktop Icons, the System Bar and the Bottom Bar.
2.1. The Applications Dock
In the top of the Desktop you will see the Applications Dock (also known as
eyeDock), where you will find the base applications ordered by categories.
To see the applications in a category just click on the category's icon. To launch an
application, click on the application's icon or description. (see Illustration 4).
Note that the dock categories and icons can be edited from the “eyeManageApps”
application (you can launch it from System Bar – Launch App or by opening the
Software folder and clicking on the “Manage” button). Feel free to customize your
eyeDock!
Illustration 3: Default eyeOS Desktop


评论2