没有合适的资源?快使用搜索试试~ 我知道了~
SharePoint Development - Infopath form
需积分: 0 7 下载量 154 浏览量
2015-11-23
10:20:15
上传
评论
收藏 1.99MB PDF 举报
温馨提示
试读
41页
InfoPath form development under SharePoint 2013
资源推荐
资源详情
资源评论
Professional SharePoint 2013 Development
by Reza Alirezaei et al.
John Wiley & Sons (US). (c) 2013. Copying Prohibited.
Reprinted for Luis Lu, Hewlett Packard
qiu-sheng.lu@hp.com
Reprinted with permission as a subscription benefit of Skillport,
http://skillport.books24x7.com/
All rights reserved. Reproduction and/or distribution in whole or in part in electronic,paper or
other forms without written permission is prohibited.
Chapter 11: Using InfoPath with SharePoint 2013
WHAT'S IN THIS CHAPTER?
n Designing InfoPath forms
n Using features in InfoPath and InfoPath Forms Services 2013
n Applying InfoPath best practices
n Programatically working with InfoPath Forms
WROX.COM CODE DOWNLOADS FOR THIS CHAPTER
The wrox.com code downloads for this chapter are found at www.wrox.com/remtitle.cgi?isbn=1118495829 on the Download Code tab. The
code is in the chapter 11 download and individually named according to the names throughout the chapter.
Capturing and displaying data is a critical part of SharePoint. InfoPath helps end users modify those views quickly. The key advantage of
InfoPath is that it provides an easy-to-use interface for structured forms and provides rich developer functionality for adding business logic.
To create and display forms, SharePoint 2013 uses a service on the server called InfoPath Forms Services. This service is designed to
enable end users to use their browsers to fill out InfoPath forms and enable administrators to manage those forms. SharePoint provides a full
object model for the InfoPath client, InfoPath forms, and InfoPath server administration. This enables developers to build enterprise business
processes and forms that can be sophisticated yet easy to create. This has enabled the development of powerful business applications such
as dashboards, data capture forms, and many more.
InfoPath continues to improve the integration with the other Office 2013 products with changes to the look and buttons like the Insert Image
location. No new functionality or scenarios have been introduced, but InfoPath 2010 and SharePoint 2010 features are still supported and
highlighted for InfoPath 2013 and SharePoint 2013 developers.
The biggest change in InfoPath 2013 is the new way to write and edit code. When writing code for InfoPath 2013, InfoPath now requires Visual
Studio 2012 with the Microsoft Visual Studio Tools for Applications 2012 add-on to be installed. You will quickly notice that you need these
components as soon as you try to open the code editor. The programming experience and assembly references have not fundamentally
changed, but you now have the benefits of the most up-to-date version of Visual Studio when developing InfoPath forms.
INTRODUCING THE TRAINING MANAGEMENT APPLICATION
In this chapter, you use an example of a Training Management application built for a fictitious company named Adventure Works, which
illustrates the capabilities of InfoPath 2013 and Forms Services 2013. There have not been many large changes between InfoPath 2010 and
InfoPath 2013, so many of these examples would work in both systems. First, walk through the application and how it works from the user's
perspective.
Scenario: The Human Resources (HR) Department at Adventure Works uses SharePoint and InfoPath to implement a training-course system.
You can think of the Training Management application as a set of three use cases as follows:
n New training creation use case
n Training registration use case
n Increment stat counter use case
The Adventure Works staff can perform various activities in this application. For example, the training coordinator can create training events
and add them to a SharePoint list named Trainings. This list will be customized and enhanced by InfoPath 2013 to facilitate the training
creation use case.
Also, the HR Department at Adventure Works allows its employees to register for a training class. The training registration form is designed in
InfoPath and can be hosted inside the InfoPath Form web part on a web part page. The training registration form must be rendered in a typical
desktop web browser and in browsers on handheld or mobile devices.
After a training request is filled out and saved, the result is stored in a form library named Registrations, and an event handler associated with
the Registrations form library updates a counter in another custom SharePoint list, named Stats. The Stats list is hidden from employees so
that its content can't be modified and it does not clutter navigation.
Creating the Sample List
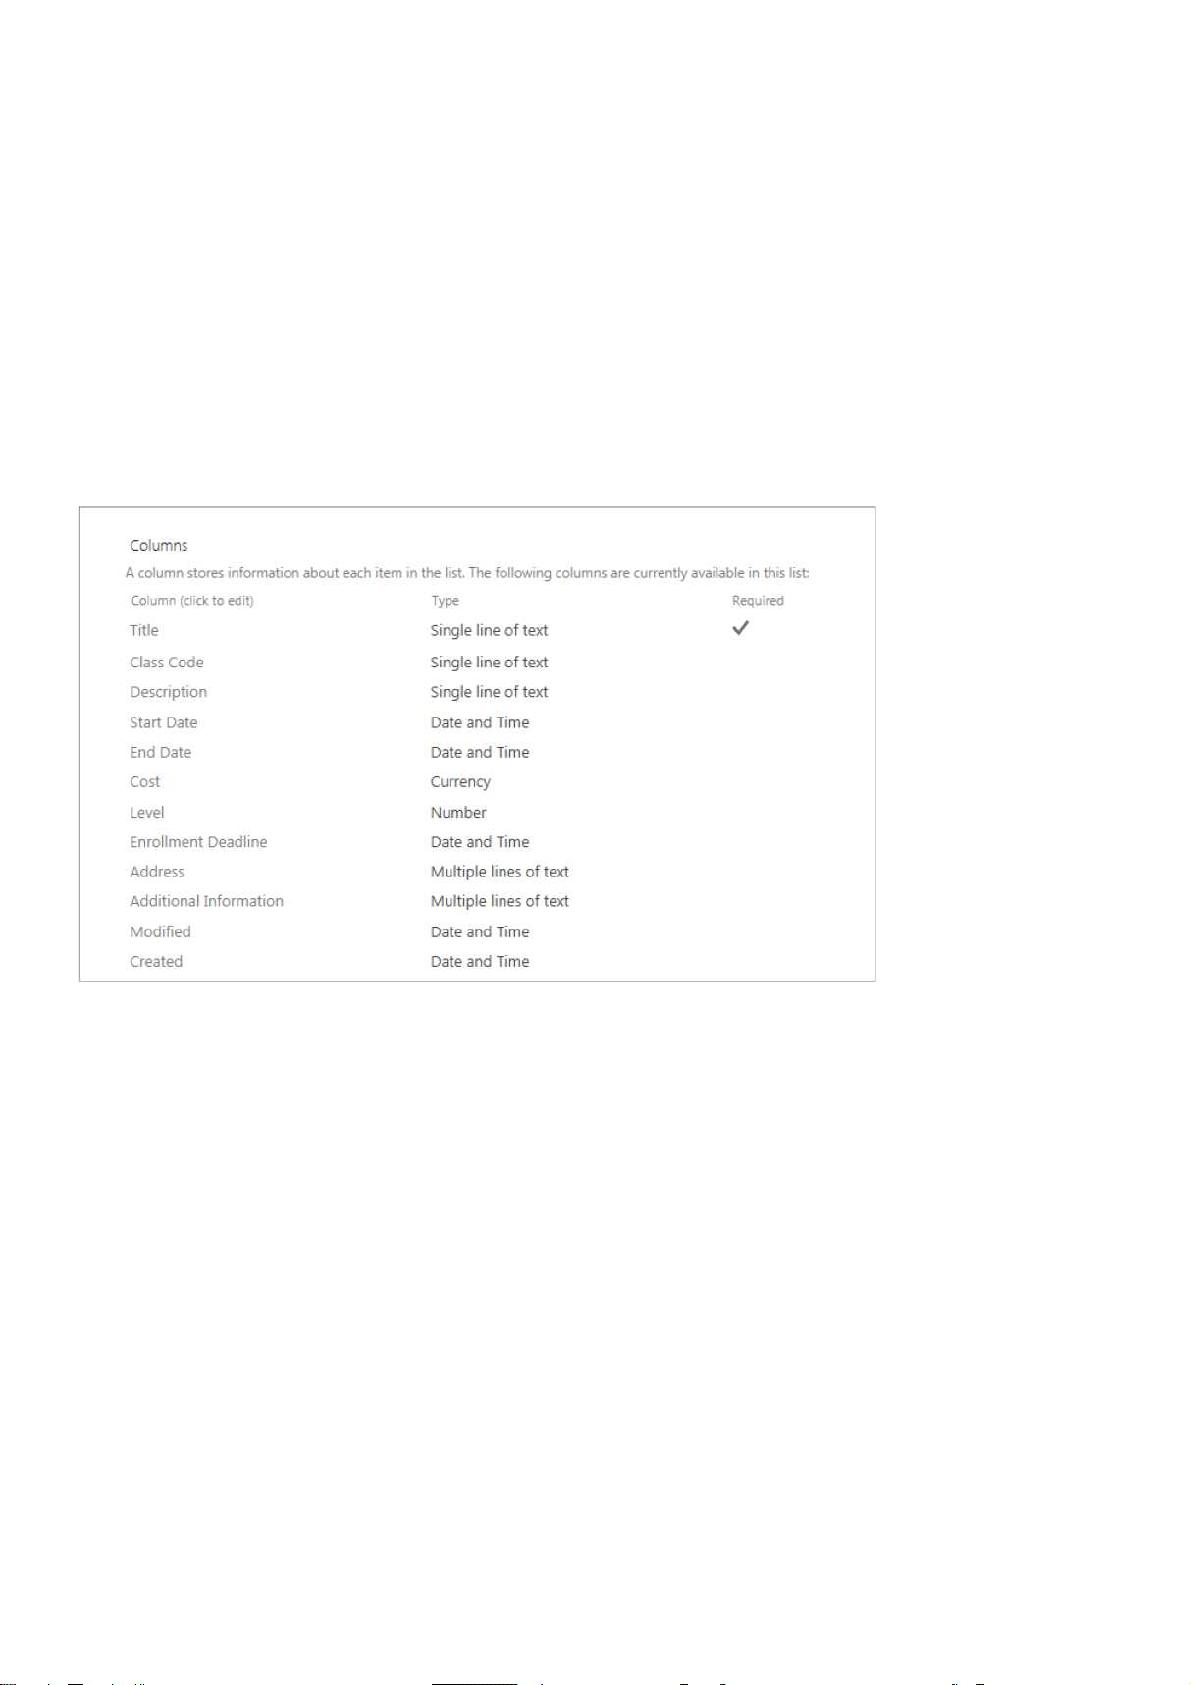
To create powerful forms with SharePoint and InfoPath you need to create the SharePoint lists and libraries that you can work with. To create
the training list, start by creating a new custom list and add the following fields:
n Title — A title for the training events; a single line of text.
n Class Code — Each class has a unique identifier for the training class (unique eight-character fixed); a single line of text.
ProfessionalSharePoint2013Development
ReprintedforHP/21769176,HewlettPackard JohnWiley&Sons(US),JohnWiley&Sons,Inc(c)2013,CopyingProhibited
Page 2 / 41
n Description — The description of the training; a single line of text.
n Start Date — The training start date; date and time.
n End Date — The training end date; date and time.
n Cost — The cost of the training (in dollars); currency.
n Level — The difficulty level associated with the training (a number from 1 to 5); number.
n Enrollment Deadline — The date that enrollment ends; date and time.
n Address — The address of the training facility (multiple lines of text); multiple lines of text.
n Additional Information — Optional information about the training itself (enhanced rich text with pictures, tables, and hyperlinks); multiple
lines of text.
Figure 11-1 illustrates all the fields of the new Trainings list, their types, and whether they are required when submitting to the list.
Figure 11-1
CUSTOMIZING SHAREPOINT LIST FORMS
SharePoint 2013 provides a simple and easy-to-use way of customizing SharePoint list forms. The forms created in InfoPath 2013 can be
used and embedded into SharePoint to build dynamic sites. One of the exciting features in InfoPath 2013 is the ability to extend or enhance
the forms used by SharePoint lists for creating, editing, or showing list items. You can modify list form layouts, set validation rules, or create
additional views using little or no code. When you finish modifying the list forms, reflecting your changes back to SharePoint is just a matter of
using the one-click publishing capability that comes out of the box with the list form.
Customizing SharePoint List Forms
To customize the list forms in SharePoint 2013, navigate to a list or library, and click Customize Form in the Customize List section of the List
tab that appears on the Ribbon, as shown in Figure 11-2.
ProfessionalSharePoint2013Development
ReprintedforHP/21769176,HewlettPackard JohnWiley&Sons(US),JohnWiley&Sons,Inc(c)2013,CopyingProhibited
Page 3 / 41
Figure 11-2
This launches InfoPath Designer in SharePoint list mode, and a basic form is auto-created from the fields specified in the list's schema. You
can see the fields in the Fields task pane on the right side of the design canvas in which mandatory fields are designated with a red asterisk.
When you click one of the existing form fields, the control tools' contextual Ribbon appears on the top and gives you the ability to interact with
the list columns inside of InfoPath Designer. Any changes at this point will be persisted later to the SharePoint list when the form is published.
For example, if you change a control's binding to a new field, that field will be automatically added to the list's schema when the form template
is published to SharePoint.
The controls placed on the forms are selected based on the field type of that column. Figure 11-3 shows the sample list created with text and
Date/Time columns already added to the form for each field. The Date and Time Picker control enables you to type a date and time or selects
a date from a calendar display.
Figure 11-3
In addition to auto-generating the form through the SharePoint Ribbon buttons, you can launch InfoPath Designer by going to the New tab on
the File menu and choosing SharePoint List as the template. You then enter the URL of the wanted list and the same InfoPath form auto-
generates for you.
InfoPath Controls
A number of InfoPath controls can be placed into your form with InfoPath 2013. Each field type maps to one of the InfoPath controls when the
form generates. The controls are part of categories that define how they work on your form; these categories are Input, Objects, and
Containers. The controls used to map to fields will be from the Input category. You can see all the Input category controls listed here.
ProfessionalSharePoint2013Development
ReprintedforHP/21769176,HewlettPackard JohnWiley&Sons(US),JohnWiley&Sons,Inc(c)2013,CopyingProhibited
Page 4 / 41
n Text Box
n Rich Text Box
n Drop-Down List Box
n Combo Box
n Check Box
n Date Picker
n Date and Time Picker
n Multiple-Selection List Box
n List Box
n Person/Group Picker
Changing the form and controls is easy as you can see by extending the form based on the scenario. By using a container called a Section or
Optional Section, you can group controls together. For this example, you create an Optional Section to meet the requirements that the training
coordinator will want to save real estate on the form, and only enter the information if needed. Add the Optional Section to your form using the
following:
1. Click the auto-generated Rich Text Box next to the Additional Information text, and press Delete. (The control will have a label of
Additional Information.)
2. In the Fields task pane, click Show Advanced View.
3. Then click the drop-down menu next to the Additional Information field, and choose Optional Section with Controls.
Now you have the Optional Section and the same Rich Text Box bound to the Additional Information file inserted into the form, as shown in
Figure 11-4.
Figure 11-4
Creating Business Logic with Rules and Views
Programming has evolved dramatically over the last decade with technologies like XML and XSD. These standards have made it possible to
separate data and presentation layers, especially on the web. This is the foundation that InfoPath is built on, and two components of InfoPath
use these technologies to help build the business logic of the InfoPath forms. These technologies are called Rules and Views that together
create the User Interface for displaying data, and the logic to make the user interface and data behave as needed.
Rules
Rules in InfoPath are a set of one or more actions used to create a dynamic experience for the users of the form when they fill it out. There is
always an event that triggers a rule, and in response, the rule performs some action such as a format change or a validation check:
Adding rules to a form is straightforward. You use the following sample rules based on the scenario to build some sample rules on your form:
n If End Date < Start Date, show a validation error message.
n If Enrollment Deadline > Start Date, show a validation error message.
n Only the Address and Additional Information fields can be edited after the training is created.
To add these rules follow these steps:
1. Click the End Date control (Date Picker) to select it.
2. Next on the Home tab in the Ribbon, click Manage Rules. (This will open the Rules task pane.)
3. Click the New button and then Validation.
ProfessionalSharePoint2013Development
ReprintedforHP/21769176,HewlettPackard JohnWiley&Sons(US),JohnWiley&Sons,Inc(c)2013,CopyingProhibited
Page 5 / 41
剩余40页未读,继续阅读
资源评论
sinat_33049993
- 粉丝: 0
- 资源: 1
上传资源 快速赚钱
- 我的内容管理 展开
- 我的资源 快来上传第一个资源
- 我的收益 登录查看自己的收益
- 我的积分 登录查看自己的积分
- 我的C币 登录后查看C币余额
- 我的收藏
- 我的下载
- 下载帮助
安全验证
文档复制为VIP权益,开通VIP直接复制
信息提交成功