没有合适的资源?快使用搜索试试~ 我知道了~
Camera calibration With OpenCV的代码介绍
5星 · 超过95%的资源 需积分: 18 22 下载量 121 浏览量
2014-04-26
12:01:31
上传
评论 1
收藏 1.34MB PDF 举报
温馨提示
试读
11页
利用opencv进行摄像机标定的介绍,英文pdf,网页版,方便大家阅览。
资源推荐
资源详情
资源评论
Camera calibration With OpenCV
Cameras have been around for a long-long time. However, with the introduction of the
cheap pinhole cameras in the late 20th century, they became a common occurrence in our
everyday life. Unfortunately, this cheapness comes with its price: significant
distortion. Luckily, these are constants and with a calibration and some remapping we
can correct this. Furthermore, with calibration you may also determine the relation
between the camera’s natural units (pixels) and the real world units (for example
millimeters).
Theory
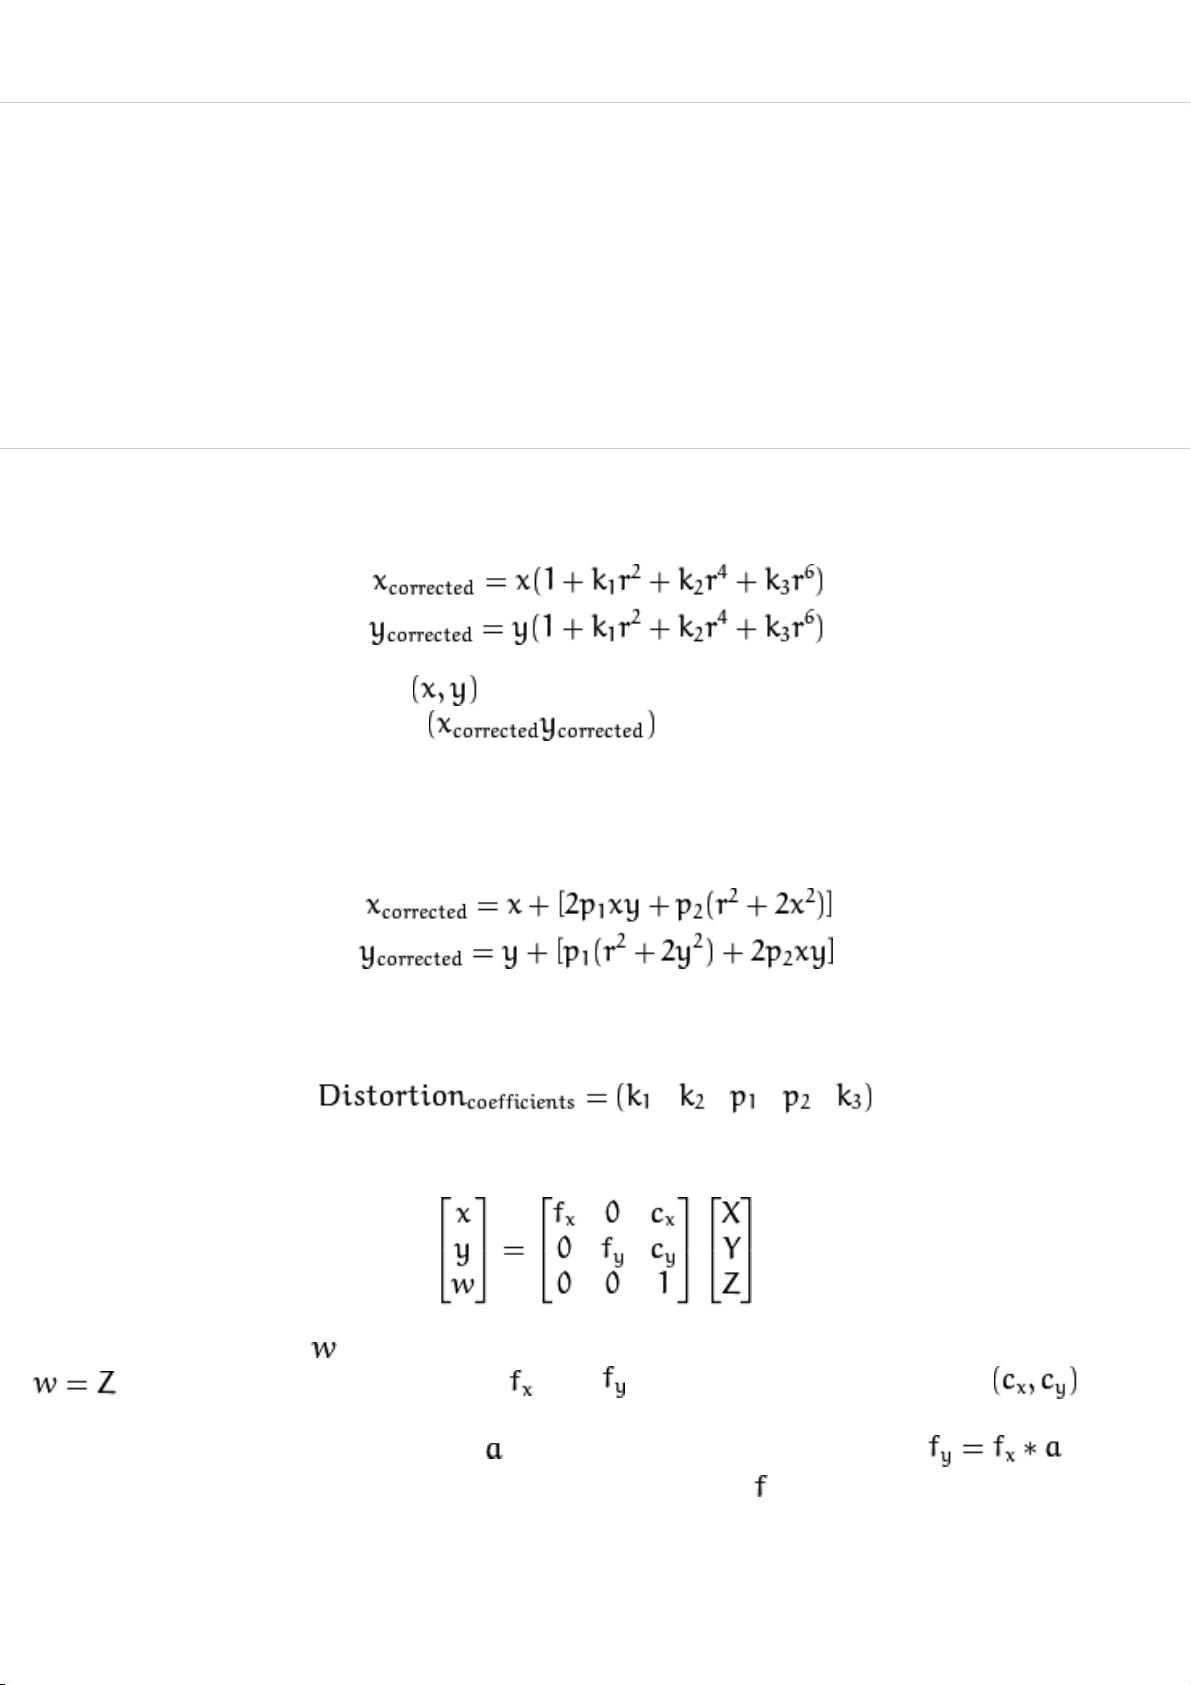
For the distortion OpenCV takes into account the radial and tangential factors. For the
radial factor one uses the following formula:
So for an old pixel point at coordinates in the input image, its position on the
corrected output image will be . The presence of the radial distortion
manifests in form of the “barrel” or “fish-eye” effect.
Tangential distortion occurs because the image taking lenses are not perfectly parallel
to the imaging plane. It can be corrected via the formulas:
So we have five distortion parameters which in OpenCV are presented as one row matrix
with 5 columns:
Now for the unit conversion we use the following formula:
Here the presence of is explained by the use of homography coordinate system (and
). The unknown parameters are and (camera focal lengths) and which
are the optical centers expressed in pixels coordinates. If for both axes a common
focal length is used with a given aspect ratio (usually 1), then and in
the upper formula we will have a single focal length . The matrix containing these
four parameters is referred to as the camera matrix. While the distortion coefficients
are the same regardless of the camera resolutions used, these should be scaled along
with the current resolution from the calibrated resolution.
The process of determining these two matrices is the calibration. Calculation of these
parameters is done through basic geometrical equations. The equations used depend on
the chosen calibrating objects. Currently OpenCV supports three types of objects for
calibration:
Classical black-white chessboard
Symmetrical circle pattern
Asymmetrical circle pattern
Basically, you need to take snapshots of these patterns with your camera and let OpenCV
find them. Each found pattern results in a new equation. To solve the equation you need
at least a predetermined number of pattern snapshots to form a well-posed equation
system. This number is higher for the chessboard pattern and less for the circle ones.
For example, in theory the chessboard pattern requires at least two snapshots. However,
in practice we have a good amount of noise present in our input images, so for good
results you will probably need at least 10 good snapshots of the input pattern in
different positions.
Goal
The sample application will:
Determine the distortion matrix
Determine the camera matrix
Take input from Camera, Video and Image file list
Read configuration from XML/YAML file
Save the results into XML/YAML file
Calculate re-projection error
Source code
You may also find the source code in the
samples/cpp/tutorial_code/calib3d/camera_calibration/ folder of the OpenCV source
library or download it from here. The program has a single argument: the name of its
configuration file. If none is given then it will try to open the one named
“default.xml”. Here's a sample configuration file in XML format. In the
configuration file you may choose to use camera as an input, a video file or an image
list. If you opt for the last one, you will need to create a configuration file where
you enumerate the images to use. Here’s an example of this. The important part to
remember is that the images need to be specified using the absolute path or the
relative one from your application’s working directory. You may find all this in the
samples directory mentioned above.
The application starts up with reading the settings from the configuration file.
Although, this is an important part of it, it has nothing to do with the subject of
this tutorial: camera calibration. Therefore, I’ve chosen not to post the code for
that part here. Technical background on how to do this you can find in the File Input
and Output using XML and YAML files tutorial.
Explanation
1. Read the settings.
Settings s;
const string inputSettingsFile = argc > 1 ? argv[1] : "default.xml";
FileStorage fs(inputSettingsFile, FileStorage::READ); // Read the settings
if (!fs.isOpened())
{
cout << "Could not open the configuration file: \"" << inputSettingsFile << "\"" << endl;
return -1;
}
fs["Settings"] >> s;
fs.release(); // close Settings file
if (!s.goodInput)
{
cout << "Invalid input detected. Application stopping. " << endl;
return -1;
}
For this I’ve used simple OpenCV class input operation. After reading the file
I’ve an additional post-processing function that checks validity of the input.
Only if all inputs are good then goodInput variable will be true.
2. Get next input, if it fails or we have enough of them - calibrate. After
this we have a big loop where we do the following operations: get the next image
from the image list, camera or video file. If this fails or we have enough images
then we run the calibration process. In case of image we step out of the loop and
otherwise the remaining frames will be undistorted (if the option is set) via
changing from DETECTION mode to the CALIBRATED one.
for(int i = 0;;++i)
{
Mat view;
bool blinkOutput = false;
view = s.nextImage();
//----- If no more image, or got enough, then stop calibration and show result -------------
if( mode == CAPTURING && imagePoints.size() >= (unsigned)s.nrFrames )
{
if( runCalibrationAndSave(s, imageSize, cameraMatrix, distCoeffs, imagePoints))
mode = CALIBRATED;
else
mode = DETECTION;
}
if(view.empty()) // If no more images then run calibration, save and stop loop.
{
if( imagePoints.size() > 0 )
runCalibrationAndSave(s, imageSize, cameraMatrix, distCoeffs, imagePoints);
break;
imageSize = view.size(); // Format input image.
if( s.flipVertical ) flip( view, view, 0 );
}
For some cameras we may need to flip the input image. Here we do this too.
3. Find the pattern in the current input. The formation of the equations I
mentioned above aims to finding major patterns in the input: in case of the
剩余10页未读,继续阅读
资源评论
- zszszzszs2014-09-19很详细。推荐下载
- enzochan2014-06-19看了一下,应该是好东西,虽然不是我需要的……
ling_yun_zhi126
- 粉丝: 0
- 资源: 2
上传资源 快速赚钱
- 我的内容管理 展开
- 我的资源 快来上传第一个资源
- 我的收益 登录查看自己的收益
- 我的积分 登录查看自己的积分
- 我的C币 登录后查看C币余额
- 我的收藏
- 我的下载
- 下载帮助
安全验证
文档复制为VIP权益,开通VIP直接复制
信息提交成功